The Central Hub for DSM Community and Information

For 1990-1999 Mitsubishi Eclipse, Eagle Talon, Plymouth Laser, and Galant VR-4 Owners. This is where the DSM platform history is documented and archived. Log in to help us in our mission, and to remove most ads from the browsing experience.

image.jpg

9!'clipseDOHC's 1g DSM build

I bought this car in 2003 and have been working on, driving, and racing it ever since.

This site may earn a commission from merchant affiliate links, including eBay, Amazon, and others.

2012 DSMtuners Calendar, Three Speed Facebook page, Pan Am SCCA home page

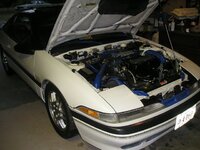
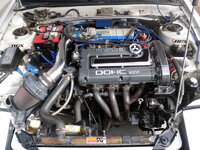
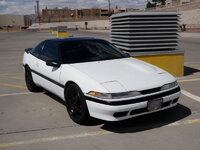
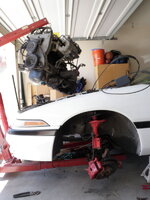
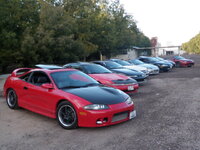
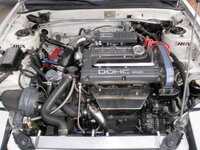
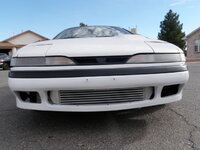
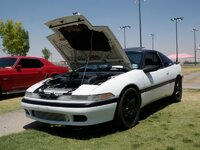
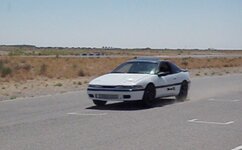
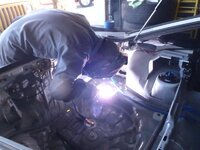
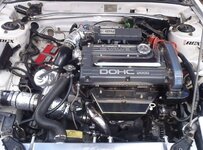
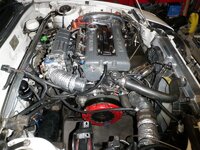
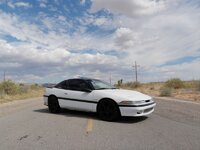
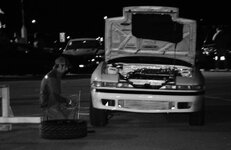
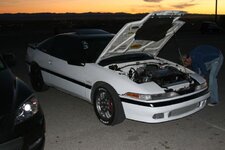
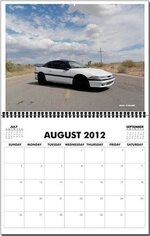
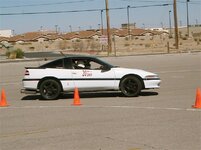
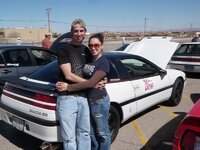
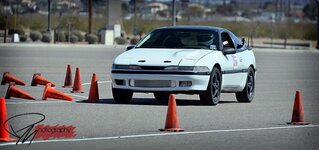
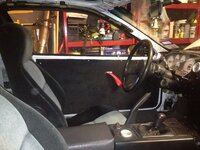
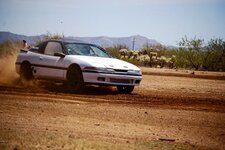
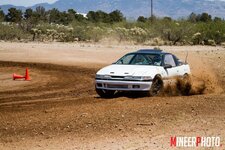
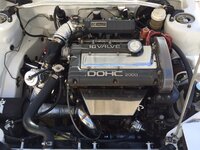
My winter project is still underway and proceeding according to schedule. There will be lots of pictures coming soon! In the meantime my car has been getting some publicity lately which I would like to share with you guys.

2012 DSMtuners 10 Year Anniversary Calendar (Buy one here):
calendaraugust.jpg


Three Speed's Facebook page (Like them here):
ThreeSpeedFacebookDec2011.jpg


Pan Am SCCA website (Check them out here):
2012 PanAmSCCA2.jpg
 
Last edited by a moderator:
Winter Project Part #1: Welding, Grinding, Sanding, Bondoing, & Porting.
12.9.11 - 1.8.12

PC226134.jpg

Welding the large opening for the A/C relay box shut

PC266138.jpg

Tacked on

PC266139.jpg

Grinding smooth

20111219144150.jpg

Welding unused holes shut

20111219144141.jpg

Lots and lots of sanding!

20111219144129.jpg


PC296140.jpg

Applying Bondo to make everything smooth

20120103142233.jpg


20120103162810.jpg

Internal wastegate arm passage welded shut for the external setup

P1016160.jpg

Before porting

P1016161.jpg

During porting

P1016166.jpg

After porting

P1046173.jpg

Smoothing out the flange for better airflow

attachment.php

My new 14b setup. 14b compressor, ported 7cm housing, ported 2g manifold, MAP o2 sensor housing, Tial 38 mm MVS external wastegate, and SCE copper gaskets and ARP hardware.

P1086184.jpg

Before porting the OFH relief valve

P1086186.jpg

After a mild port

P1086187.jpg

Reinstalled

The bay is currently ready for paint, I am just waiting for a paint gun to arrive. The rest of the project that needs to be done is to install the cams, springs, and seals, rebuild the PS pump, install the AeroCatch pins, paint the engine bay, and paint the fiberglass hood (which is currently being made). I'm still hoping to be done by the end of this month.
 
Last edited by a moderator:
wow nathan your car is gonna lool really nice!!!!!!
keep it up....LOL.....

and by any chance u dont wanna sell your old intercooler piping? well ill txt u tomorrow?
 
Last edited:
wow nathan ## car is gonna lool really nice!!!!!!
keep it up....LOL.....
Thanks Luis! I hope it looks a little better with the painted bay and goes a little faster with the cams/springs and hotside/porting.

Lookin good!

Alot of hard work but that engine bay job is going to look amazing!
Thanks! I can't wait to finish! This is the longest my car has ever been down since the first 4 months I owned it back in 2003.
 
Hope you didn't go too big on the cams. A lot of guys who tried cams are going back to stock cams and getting better power. The 14b can't really outrun the stock cams. I'm going with stock cams myself and I think they will work just fine. Even thought about trying adjustable cam gears on the stock cams to see if I can move the powerband to the right side of the dyno chart once things are up and running.
 
Hope you didn't go too big on the cams. A lot of guys who tried cams are going back to stock cams and getting better power. The 14b can't really outrun the stock cams. I'm going with stock cams myself and I think they will work just fine. Even thought about trying adjustable cam gears on the stock cams to see if I can move the powerband to the right side of the dyno chart once things are up and running.

I went with the HKS 264's, so a pretty mild cam. I know everyone is undecided on what cams to use with the 14b but a big part of my decision was the AMS Infamous DSM Camshaft Test. The test was done with a 16g but a 14b with a 7cm turbine housing won't be flowing that much less. The HKS 264's picked up the most HP/TQ without losing spool or off boost performance (which is important to me since I also DD and AutoX). With just the HKS 264's they picked up 14 hp and 38 ft. lbs. of torque with the same spool and as good if not better off boost performance then stock. Those are some outstanding numbers and even if doesn't make quite as much on the 14b, it should still be an improvement over stock. That's my thought anyway. Unfortunately I'm not just doing the cams so I won't be able to prove if they actually help or not.

I also spoke with Kiggly when I bought his new "Steel Street" Beehives and he has an entirely different thought on cams with the 14b. "Personally, I'd probably run bigger cams than the HKS 264's even on a 14b. I've driven around some setups that were on small turbos and big cams and while the max power isn't really any different than the small cams, they hit harder because they make that same power at less boost. This translates to quicker respool on transients, even though full boost may not happen until a little higher rpm. It also gives you good growing room whenever you decide to upgrade the turbo."
 
I can see what the Kiggly guys saying about the big cams, but here is a scenario that I disagree with on that. Just say you were trapping around 6k rpm in 3rd gear (this is just a scenario). Say you make some upgrades that make enough power where you are now trapping at 7k rpm in 3rd gear. Well, those big cams make big mid range power, but typically die off up top on a small turbo. If your power is 275whp @ 7k on stock cams and 260whp @ 7k on the big cams, then you're possibly cutting yourself short. Plus you'll have to shift a little sooner or you're going to continuously be running in a lower overal powerband if you continued to shift at the same rpm on both setups.

I've seen this happen on an Evo 9 with the stock turbo. On Cossie M3 cams (I think they were 280/272) it made right at 375whp on E85 and supporting mods. Went to the FP4r cams (272/272) and it picked up 28whp peak and it held that power about 600rpm more over the M3 cams.

Regardless, I think you made a great choice with the HKS 264! That's what I would choose too if I were going to try it out! Look forward to seeing the car when she's back up and running!
Thanks! My biggest concern with too large of a cam would be the 14b running out of steam in the higher powerband. I do think the 264's will be a good compliment to my 14b though.

great job Nate... cant wait.
Thanks Serg! I'm sure you'll be seeing her in person sooner or later. :thumb:
 
Can't wait to see it... Yeah those cams will for sure that extra power !!!!

Thanks! I still haven't checked for those stock intercooler pipes for you yet, I will though.

Just a minor update, the full update with pictures will be posted once I am competly done. The HKS 264's, Kiggly Beehives, and Viton valve stem seals are installed. The paint gun is supposed to be here on Wednesday and I will also being buying the paint the same day. The Franks Fiberglass hood is finished and will be shipping tomorrow. All that is left is the rebuild the PS pump, install the AeroCatch hood pins, paint the bay, and paint the hood. :thumb:

Oh yeah, and install the gixrman quick release bumper kit and stainless brake lines.
 
hurry up!!! :)
I'm working on it! :) I should be painting the bay on Thursday and Friday and then its just a matter of putting it back together. I'm hoping to be done and driving it by the end of next week.

SUBBED!!! your build is amazing an makes me want to move forward with my own!!
Thanks so much!

I wasn't going to post anymore pictures until after I finished the project but I can't wait. Here is a teaser shot of the paint booth I am building in the garage:

attachment.jpg
 
Thanks! I still haven't checked for those stock intercooler pipes for you yet, I will though.

Just a minor update, the full update with pictures will be posted once I am competly done. The HKS 264's, Kiggly Beehives, and Viton valve stem seals are installed. The paint gun is supposed to be here on Wednesday and I will also being buying the paint the same day. The Franks Fiberglass hood is finished and will be shipping tomorrow. All that is left is the rebuild the PS pump, install the AeroCatch hood pins, paint the bay, and paint the hood. :thumb:

Oh yeah, and install the gixrman quick release bumper kit and stainless brake lines.

Yeah when ever you have a chance, I know youre busy with
Painting your car and all the new parts ... But
Really Nathan, its looking nicer and nicer ....
 
Last edited:
awesome progress. i love your attention to detail on everything you have done with the car
 
Yeah when ever you have a chance, I know youre busy with
Painting your car and all the new parts ... But
Really Nathan, its looking nicer and nicer ....
I checked today, I have the SMIC and LICP with the j-pipe but I do not have the UICP anymore. Thanks a lot!

awesome progress. i love your attention to detail on everything you have done with the car
Thanks so much! The engine bay painting is done and I am putting everything back together now. I will still have to paint the fiberglass hood once I get her reassembled and running. I'm hoping to be done next week at which time I will post all the pictures!

I will post another teaser now. Here is my current status at this moment:

405249_10150607553195586_508080585_11458236_1375433533_n.jpg


and the next day...

gopr0353.jpg
 
Last edited by a moderator:
Winter Project Part #2: Cams, Springs, Priming, Painting, and Reassembly.
1.9.12 - 1.28.12

P1096188.jpg

Opening the head for new cams, springs, and valve stem seals. There is a lot of debate on whether or not larger duration cams will help the 14b but I feel that the HKS 264's are the best match and should perform better then stock.

P1096189.jpg

Stock springs on the left and Kiggly "street steel" beehive springs on the right. A lot of guys say that aftermarket springs aren't required unless you have a very aggressive 272 or large cam shaft. Maybe that is true if compared to new stock springs, but lets not forget that mine are 21 years old and I highly doubt they are still performing to OEM specs. I had my heart set on Kiggly Beehives but I was afraid that they would be too much for such a mild cam. I talked to Kiggly about this and it turned out I was in luck. He was just introducing a new "Street Steel" set of beehives (it wasn't even listed on the website yet). The street ones use the same Beehives springs but reuse the stock seats and come with a steel retainer which weighs 7 grams (compared to his titanium ones which weigh 5 grams, while the stock steel ones weigh over 14 grams) and are rated at 325lb/in and 85lb installed at 1.475", these springs support 0.500" lift - good for about 10,000rpm and 40psi (obvisouly still more then enough for my little 14b). I was very excited to be able get these for my build.

P1096192.jpg

I also wanted to throw in some new valve stem seals since I had never replaced mine before so I picked up a set of Viton seals from ebay.

P1096193.jpg

I compressed my springs with a Euro Export 4G63 valve spring compressor. This tool was very easy to use and allowed to me to change the seals and springs without pulling the head. I would recommend this tool to anyone! One bit of advise though, stick a rag in the oil ports. On the very last spring (seriously, number 16) one of the retainers popped out when I was reinstalling it and dropped into the oil pan, which I in turn had to remove. Learn from my mistake and cover those ports!!!

P1116200.jpg

HKS 264 cams. I picked these up used for a great price and I'm excited to see how they do with the 14b.

P1116201.jpg

It has to look worse before it can look better.

P1126202.jpg

New Heli-coils for the valve cover. This was my first time ever installing these and it was extremely simple. Just make sure to keep the shavings out of the head. Spraying some oil or lube on the rag will help the shavings stick to it and stay out of the head.

P1126203.jpg


attachment.jpg

Building the paint booth. This was a very simple idea and turned out great! Plus it only cost like $20 to make, PCV piping and thin plastic sheeting. I got the idea from cyclonekid77.

P1196213.jpg

Priming the engine bay

P1196214.jpg


P1196221.jpg

Primed

P1196225.jpg


P1196219.jpg

Franks Custom Fiberglass hood arrived. He does great work and is very easy to work with. It took a few weeks for him to build it but that is because he is busy. When I called he had 5 other orders in front of me for the same 1ga hood. This thing is stupid light! I am going to be securing it with AeroCatch hood pins.

393813_10150607554590586_508080585_11458238_1650111080_n.jpg

Putting it back together after painting it.

P1246230.jpg


gopr0353.jpg


P1276238.jpg


423842_10150617072305586_508080585_11483979_1314942703_n.jpg


429298_10150617072110586_508080585_11483977_1866727911_n.jpg


All that is left is to rebuild the power steering pump, install the Aerocatch hood pins, paint the hood, install the gixrman quick release bumper kit, fill up the oil, coolant, power steering, brake and clutch fluid. Then I'm done! I'm hoping to get to the drag strip sometime in mid February and break into the 12's and then my first Autox event is March 4th!
 
Last edited by a moderator:
Add Value - Be Respectful - No Trolling - No Misinformation - Participate Often!
Support Vendors who Support the DSM Community

Latest Classifieds

  • For sale 2g 2G Power Window Switches ( tested and hardware included )
    2G Power Window Switches $55 + shipping and paypal fees* Tested 6/2/26 * Hardware included *...
    • jersygsx
    • Updated:
    • Expires
  • For sale VIRGIN 4G63 6-BOLT TURBO HEAD
    Came off a virgin stock AWD Auto 1G DMS (91), also have matching block and crank which are also...
    • The_Partout_Spot
    • Updated:
    • Expires
  • For sale 1G DSM 4G63 6-BOLT TIMING COVER
    Used, see condition in photos. Buyer covers shipping / fees.
    • The_Partout_Spot
    • Updated:
    • Expires
  • For sale Garage clean out
    Changing setups on the car and getting rid of some stuff as well that's been laying around. Will...
    • 92GSXtacy
    • Updated:
    • Expires
  • For sale 4G63 Griffin intercooler cores
    Griffin intercooler cores. Top to bottom flow. High cfm and heat transfer. 24x8x2.75 and...
    • Galant665
    • Updated:
Back
Top