1cleangsx
Proven Member
- 1,739
- 2,297
- Sep 28, 2013
-
Cheyenne,
Wyoming
That’s awesome
Follow along with the video below to see how to install our site as a web app on your home screen.
Note: This feature may not be available in some browsers.
For 1990-1999 Mitsubishi Eclipse, Eagle Talon, Plymouth Laser, and Galant VR-4 Owners. This is where the DSM platform history is documented and archived. Log in to help us in our mission, and to remove most ads from the browsing experience.

This site may earn a commission from merchant affiliate links, including eBay, Amazon, and others.
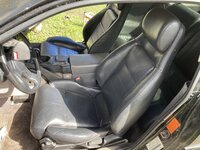
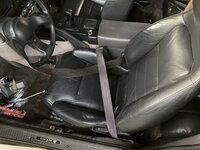
Well done I happened to have the same switch that I found at a local Savage yard to cover up the hole because the previous owner used it as a manual boost controller thanks for the write upWell, while I wait for my trans stuff to come in, I did a neat little side project. I want to utilize my scramble boost feature in my AEM TruBoostX, but I really don't want to use a toggle switch, and I'm not gonna drill my stock steering wheel for a button. Although it was tempting. I was kind of stuck, unsure what to do. Then...eureka, I remembered I have used the Eco/Power switch as a "toggle switch" before with great success in my old Auto 1G(kiggly shifter mod, I used the Eco/Power for OD) so I figured this would be a great way to add a sneaky switch to use that good old scramble boost feature.
I used this helpful diagram provided in another thread by @steve the guru.
View attachment 776786
Only caveat, is it's for a 1GB. On my 1GA the wire colors were different, but locations/functions were identical. On a 1GA the wire colors are:
Wire # 1 - Green w/ Red stripe
Wire #2 - Green w/ White stripe
Wire #3 - Solid Black
Wire #4 - Black w/ White Stripe
#5 - Unused
Wire #6 - Red w/ white
View attachment 776789View attachment 776790
Pictures for posterity's sake.
Anyway, wiring was super easy. I did have to cut off the oem connector because I couldn't find the female connector to match it, so instead I used some good quality spade terminals and just crimped them on and made it detachable if you remove the center console cover.
After that, it was a super duper simple reassembly since it's all OEM.
View attachment 776787
View attachment 776788
I am absolutely stoked with how it works.
In case you're curious, whatever you want "toggled" just hook one side up to the red/white wire, and the other side to the Green/Red wire. When the button is clicked down it's "on". When it's left in the "eco" position or out, then it's "off". Use this for anything you would a toggle switch. OD for kiggly shifter mod, Nitrous, whatever.It's VERY easy to reach from the shifter, and if you only want it to be "momentary" and not stay clicked down, it's easy to disassemble the switch and remove the "stop" for it, so it won't click down.
Anyway, I love it. If you didn't really know DSMs, you'd never think twice about the switch. Plus it's an enjoyable play on words. Switch off it's "eco" or low boost". When you click down for "power", it's scramble boost and 30+lbs.
Hope this helps someone in the future!
Very nice set I can't wait for Jose Gonzales finished those clips I want mines aluminum rawGot tired of breaking used 30 year old sunvisor clips so I took a gamble and bought some of these.
View attachment 777082
They’re for a 3000GT, but they looked identical to the 1G ones. The only difference is they have a “step” on the back, but honestly even with the step they installed fine and work perfect. Not bad for $19 shipped! This is how they look mounted.
View attachment 777083
Very pleased! No more breaking clips hopefully.
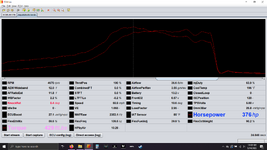
 In my excitement I tried to rip it into 3rd and yeah...nah. Still need some tweaking of the shift cables, but man. Look at that graph. Look at that flat line. That was me trying valiantly to shift into 3rd still, then waiting for boost to ramp back up. I still, hilariously, ran an 8.7. I swear that's so funny to me. Had I been able to shift like an actual racer instead of granny dear with arthritis, I feel like that would've been my 90+mph and 7 second 1/8th mile pass I've been chasing.
 Well done I happened to have the same switch that I found at a local Savage yard to cover up the hole because the previous owner used it as a manual boost controller thanks for the write up. Very nice set(of sunvisor clips) I can't wait for Jose Gonzales finished those clips I want mines aluminum raw. I also bought a 1ga 90 engine harness just in case.
I too was gonna wait for Jose's billet ones, but I broke my stock ones and didn't feel like dealing with a loose and hanging sun visor anymore. Lol.Well it is cheap to replace, just do it. BR7ES sound right, stock gap. What do the old plugs look like?
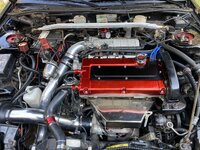
What ignition/coils are you running? Did you ohm out the coils? Ohm out spark plug wires? If COP, did you pull the boots and springs and check for coil spring compression or coil spring binding? Used dielectric grease on contact points?
Did you check your engine to chassis grounds?
What does the tune AFRs look like for the driving conditions that you were doing?
I haven't gotten to drive it yet because I'm gonna replace the plugs anyway because it won't hurt, but that at least was a problem that needed to be addressed and only would've gotten worse.Im mostly stocknand I still change at about 15k. Its 5$. I buy them a box or two at a time when they're on sale. 1.25 ea or close ish? Don't remember. So dumb cheap I didnt even care.Quick question, how often are you guys in the 400+whp/26-30+lbs boost area changing out copper spark plugs? I'm gonna pull mine later tomorrow and check them, but I'm suddenly running into some stuttering in the top of 2nd or 3rd on a long pull. It's not fuel related, it's not pushing coolant, oil and coolant aren't mixing anywhere...curious what it could be. The plugs are non-projected tip BR7ES'. I think they've got like a few thousand miles on them now, on both E85 and 93. I did drive a solid like 300+miles "lugging" the engine pretty badly because I had no 2nd gear.
Curious what y'all think. If I give it an italian tuneup it seems to clear up for a bit, but more putt-putting will result in the stuttering again.
Im mostly stocknand I still change at about 15k. Its 5$. I buy them a box or two at a time when they're on sale. 1.25 ea or close ish? Don't remember. So dumb cheap I didnt even care.
Sadly br7’s are more expensive than they used to be. They’re like $5.50-$6 per plug now.
I dont even bother with 4. I think I got 20 in the toolbox. Full box is 10 I think.That's what I get for not even checking RockAuto because I thought they'd kill me on shipping.
Even with taxes and shipping a four pack is only like $13-$14. Damn. Good catch and thank you, Paul!
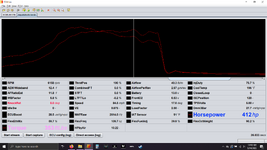
Also, to update I took it for a rip. I closed the gaps down to .026ish and I'm happy to report two things. Stutter is gone, and it's making more power with fresh plugs. ECMLink logged 430HP at 29ish lbs of boost, and that's with timing way softer than it was. Zero knock anywhere. So I'm super glad I changed the plugs. Had to adjust the fuel map a bit because it's running cleaner/more efficient, but man. I love this car.
Edit - Also, the car held fuel pressure for legitimately the entire time I was in town. Like, 2+ hours. Came back, still holding the same pressure as when I left. This blows my freaking mind, as it never did that before!

Get them from FCP Euro or Rock Auto (and search for a 5% discount code for Rock Auto)Damn I gotta start buying mine from rockauto.
I get 4 NGK 2668 and they're $13 / plug at Napa..


