The Central Hub for DSM Community and Information

For 1990-1999 Mitsubishi Eclipse, Eagle Talon, Plymouth Laser, and Galant VR-4 Owners. This is where the DSM platform history is documented and archived. Log in to help us in our mission, and to remove most ads from the browsing experience.

Talon and Vette 10_03_24.jpg

Altered Mental Status (1G AWD 5spd)

Old street racing legend reborn

This site may earn a commission from merchant affiliate links, including eBay, Amazon, and others.

Which switched ground harness do you run? I have issues toggling back and forth between lows and highs on mine..


This one.

IMG_8394.jpeg


The only issue I had was one of the terminals for the relays connector wasn’t crimped fully so only one light would switch between high and low. It took me forever but once I found it I fixed it, and now it works perfectly.

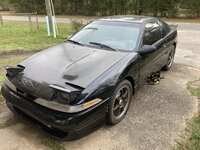
We will see how long it lasts and if any other issues pop up. But so far so good. No issues with speed bumps or bumps in the road on my test drive earlier.
 
Finally got a tank of full 93 in the car and not E35-E38 mixture. Weirdly, it was running like 21:1 AFR when I was letting ECMLink correct it by itself.

I added deadtimes on the fuel tab from -600 to -390 and it idles perfect. CombinedFT and STFT both swing from -4 to 0 but never go anywhere above 5% in either direction. Idle AFRs swing like they should. That's the only change I had to do. Also weirdly, it's no longer running rich where it was before on the E35ish mixture. So I think there may be a weird issue with ECMLinks flex fuel function when it's less than 70% but higher than 10/15% ethanol. Because the fuel map on straight 93 with like 0% correction or "weight" is ideal. It may also be due to the CAS no longer being 180* out, because it's requiring much less deadtimes being pulled compared to before. Intriguing!

Anyway, I'm pleased with everything. These new headlights are great, makes seeing things so much easier.

Uploading a log so you can see what I mean. It's a quick 0-80 pass. It's noticeably slower than E38 was(but I also slipped the clutch waaay too much and it caused some clutch slippage), but I expected as much. It's only on 18-19lbs and it's muggy/warm. Here's the log. Peruse it and judge me as always. Now that I have some good data, I'll adjust the VE table where it's still running slightly rich. Again, I haven't touched the VE map or the AFPR so fueling beyond just global changes and deadtimes is untouched.
 

Attachments

FIC 1050’s that flow 1120’s, Hellcat pump rewired, big ass fuel lines feed and return, AFPR.

Stock engine, BC 272s, BC springs and retainers, adjustable gears. Stock IM, stock 2G exhaust manifold and o2 housing. ETS FMIC, custom piping. Speed density.

Flex fuel. Runs on 93 or E85. Fastest pass was 12.6 on E85. Should be waaaay faster.
Boost leaks checked? Cam timing is correct? I am sure this has been asked. Did I see 9deg of timing? Let's see the spark plugs.....
 
I feel like I keep having issues. Sorry to keep asking for help but I’d be lost without y’all.

For posterity's sake though, I'm having an issue blowing a small puff of blue smoke under boost. It seems like this has just suddenly developed, or I haven't really noticed it before. Either one is just as likely to be true. One thing for sure though, it's spraying more oil out of the top of the catch can's filter than it was before. I'm more wondering why this is suddenly a thing.

Still got stock sized lines, running to a vented can. Would upgrading to bigger lines and running a vacuum source from the can to the intake help? (I tried routing the lines like Calan's PCV thread said to do it, but see details below for how that wasn't successful)

When I had the catch can hooked up in line between the turbo and VC, I put the stock PCV line back on and put a check-valve in-between the intake manifold and VC. It smoked like CRAZY on deceleration. Smoked a little more under boost than it did before, but the larger problem was definitely under decel. And it puffed smoke at idle this way too. Switching it back to how I have it routed now solved the smoking issue on all but under full boost. How I have it ran now is both VC lines going to the can, and the top of the can vented. I put a fuel filter in one of the lines going to the can, and it definitely helped the oil spraying out of the can's filter. Almost nothing there now.

Is there an absolutely sure-fire way to narrow down if it's the turbo going bad, or if it's something in the engine? We'll see what it ends up being.

Please post pictures of the headlights on and area of work. Thanks


Definitely will do once it gets to be night! It is SO much better of a driving experience though man, I can't even express it. It's starting to stay darker longer so my morning drive home is low-light conditions, and it's like driving a new car. So far I haven't been brighted/flashed either. So that's a plus.
 
Last edited:
Swapped out the PCV valve with a 1/8 BSPT to 3/8" nipple to delete it entirely, and uploaded a new timing map. It's on E85 now, and it absolutely rips. Torque increased everywhere, off boost, part throttle, low boost is like a higher compression N/A car by comparison to before. Screen cap below of the log verifies what I've been saying.

Screenshot 2025-09-03 16.50.02.png


Almost 400awtq! Such a blast, man. I can't wait to see what 30lbs will do, even in the hot air. The HP is really good too all things considered.

Screenshot 2025-09-03 16.23.36.png


So far no smoke, no oil spraying out of the filter on the can, it seems happier. It's also the highest HP estimate so far, and it's hot AF outside. I do need to add maybe 1/4 to 1/2 turn to the AFPR so the AFRs are back in line, but man it pulls good.


I've also decided I really don't care that people in the past have made 650awhp on an old school FP Green missing three fins on the compressor and at only 4 psi of boost. If it takes 30-32lbs for me to hit that 400+hp number, I'll consider it a success.

I also got down sub 1.8 60' times via Dragy this morning on lower boost, and softer timing tables. The wipers actually came on, which was always and has always been my benchmark for a good 1G DSM AWD launch. LOL
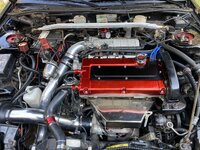
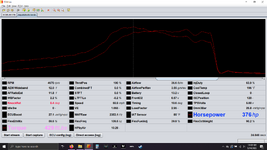
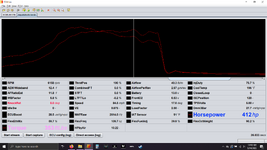
. So sometime tonight or tomorrow night I'm gonna go back out and see what she'll do on this more aggressive map and more stable boost. Might even give it 30-32lbs and see what she'll do.
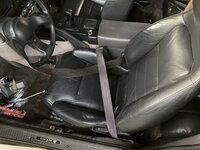

Also: Profuse apologies for no headlight pictures yet. This has been a week/week and a half from hell, so please everybody I've PM'ed and in talks with stay patient with me. Life comes at you fast.
 
Last edited:
Update: Finally scored a VC with -10AN fittings welded on. It's shaved, which I'm not really keen on...but function over form. I'm stoked to have a true/real breather setup on this car finally. Also gonna have to paint this VC red, as it's currently black. Pictures when I get it!
 
One more update.


Talked with Robert @ Forced Performance about efficiency range of this turbo and what would be an ideal boost level for the Green I have.

He recommended 30-35.

Not gonna lie...that sounds heavenly. Let's push this thing and see where it leads. :D 😈
 
Haven’t driven the car yet or done much other than try to not have a psychotic breakdown at/due to work.


Anyway, so back to the task at hand. New fuel system for the Talon! The fuel pump and regulator are staying the same, but the fuel lines have honestly BEEN sketchy, and that's before I ran E85 through them. I know they're not E85 rated so they're probably pumping black goo all in my system.

So, I went with -8AN Feed line and -6AN Return line. Both are PTFE so it's 100% E85 safe.

IMG_8442.jpeg


Bam. The whole kit n' kaboodle. At least for the fuel side.

IMG_8443.jpeg


I am kind of proud of this solution I devised to keep the entire fuel feed and return system E85 safe. It involves a -6AN to 5/16" barb fitting, and some 5/16" PTFE corrugated tubing. This is for the OEM return line that comes out of the tank, and instead of using a rubber hose here like everyone else recommends, I'm gonna use this. Hopefully it works out.


I also got this from STM Tuning.

IMG_8445.jpeg
IMG_8446.jpeg


It's their -6AN to bubble flare fitting they make so I can use the stock feed line to my AN line.


And this is the -6AN to -8AN adapter to go on it, so it'll be -8AN the whole way. Should meet all my needs.

IMG_8447.jpeg

IMG_8448.jpeg

Also for the fuel side, is this. -8AN to OEM Fuel Filter thread size so I can use the stock fuel filter. If I upgrade to an aftermarket filter I can just delete these, so that's a nice option.

IMG_8450.jpeg


To round it all off, these are for my Ethanol Content Sensor.

IMG_8444.jpeg


-6AN adapters for the sensor itself. Keep it nice and tidy. I'm considering moving the AFPR too, because that real estate is soon to be taken up by the cruise control system I've had for a little bit now. Street car stuff!!

That's pretty much it for the fun stuff. I did get these things.

IMG_8451.jpeg
IMG_8452.jpeg
IMG_8453.jpeg
IMG_8454.jpeg


The VC I bought hasn't come in yet, but when it does that's what this stuff is for. -10AN to 1/2" hose barb fittings, 1/2" oil/fuel rated hose, and a second can. I'm gonna try a couple different breather setups. The first is gonna be a two can setup. Both breather hoses into one can, and then one line running into a second can, which will vent into the turbo's intake tube to hopefully get some of that nice vacuum to assist with blow-by. If that doesn't work, I'll vent the can(s) to air. If that still doesn't work, I'm just gonna run the lines as "Snot tubes" and forgo the cans altogether. Or just spring for a good quality one. Either way, time will tell.

Another update will come after I actually do all this work I've made for myself.
 
IMG_8460.jpeg


Yay! Hopefully my crank case pressure issues are over now. I am also immediately repainting it now because black just doesn’t work for me. Pictures when it’s done. :D
 
Alright. I'm pretty sure I'm gonna have to do this again, but for now it'll work. (note to future self: Don't trust anyone else's paint work. Always start from scratch.) It was painted black by the seller and not painted well. It was just sprayed over bare metal and so it's peeling up in a few spots since I added new paint to it. But, for now it'll work.


I got the idea to use Rustoleum's Colored Chrome Paint as a base, and Duplicolor's Metalcast (colored clear coat) as a top coat to try to make my own candy red. I am honestly extremely pleased with the results of the color itself and how it looks.

Base coat of the Chrome Paint. It's in the shade and cloudy, but it's a little more shiny silver than it looks. This was three coats. Two light coats, one heavy.

IMG_8461.jpeg

IMG_8462.jpeg


The waves you see are the "shaving" that was done by the seller. I don't care enough to smooth them out, at least not yet. We'll see how I feel in the future.

Anyway, next up was the Duplicolor Metalcast. I gave this two light coats, one medium coat, and one fairly heavy coat at the end and I'm stoked with how it looks.

IMG_8464.jpeg
IMG_8465.jpeg


In the process of adding the final coat on the pictures above.

This is the final product.

IMG_8467.jpeg

IMG_8468.jpeg


This turned out spectacular IMO. The paint is not wet in the pictures, that's how shiny and deep it is. It looks like I anodized over Chrome plating. EXTREMELY happy with the result. They have a bunch of colors for the metalcast, so I would repeat this with blue, gray, yellow..whatever. It would all turn out great. I'm still not a fan of the shaved look...but it'll at least look nice. I do think in the future I'm gonna spring for an actual powdercoated VC with some good radium swivel fittings on top but this should more than do in the meantime. Lemme know what you think!
 
Last edited:
Alright. I'm pretty sure I'm gonna have to do this again, but for now it'll work. (note to future self: Don't trust anyone else's paint work. Always start from scratch.) It was painted black by the seller and not painted well. It was just sprayed over bare metal and so it's peeling up in a few spots since I added new paint to it. But, for now it'll work.


I got the idea to use Rustoleum's Colored Chrome Paint as a base, and Duplicolor's Metalcast (colored clear coat) as a top coat to try to make my own candy red. I am honestly extremely pleased with the results of the color itself and how it looks.

Base coat of the Chrome Paint. It's in the shade and cloudy, but it's a little more shiny silver than it looks. This was three coats. Two light coats, one heavy.

View attachment 774186
View attachment 774187

The waves you see are the "shaving" that was done by the seller. I don't care enough to smooth them out, at least not yet. We'll see how I feel in the future.

Anyway, next up was the Duplicolor Metalcast. I gave this two light coats, one medium coat, and one fairly heavy coat at the end and I'm stoked with how it looks.

View attachment 774188View attachment 774189

In the process of adding the final coat on the pictures above.

This is the final product.

View attachment 774190
View attachment 774191

This turned out spectacular IMO. The paint is not wet in the pictures, that's how shiny and deep it is. It looks like I anodized over Chrome plating. EXTREMELY happy with the result. They have a bunch of colors for the metalcast, so I would repeat this with blue, gray, yellow..whatever. It would all turn out great. I'm still not a fan of the shaved look...but it'll at least look nice. I do think in the future I'm gonna spring for an actual powdercoated VC with some good radium swivel fittings on top but this should more than do in the meantime. Lemme know what you think!
That color looks very close to P88 Paprika Red on my Talon. I shaved and sprayed my valve cover about 2 years ago now and love it.

PXL_20240507_194347552.jpg
 
Just in case anyone wants to recreate this color here’s what I used.

IMG_8494.jpeg


You could change one or both of these cans and get some awesome results. For the can on the left they have “smoked chrome”, and I think other colored chrome bases. The can(s) on the right have got blue and yellow. You could do yellow and then some light coats of red to make a nice copper. Or just do a top coat of blue and it would look incredible.


For build thread: I need to install these fuel lines but I’m running out of motivation. Wish one of y’all could come over and help. LOL
 
Well, I got the fuel feed line done. It turned out to be really easy and 10’ of line was legitimately the perfect length to not need to cut anything out for a 1G AWD. Was super straight forward and done in a pinch.

I was removing the old feed line when I pulled a bit, not too hard mind you, and suddenly the rubber return line I haven’t touched yet burst and showered me with E85.

Did you know that E85 absolutely freaking burns like acid when it gets on your scalp? Or your back? Or any exposed skin? I didn’t. Now I know.


So yeah, this 100% was the perfect time to do this. That’s insane what E85 does to non-85 rated hose. Pictures later when I’m done. Maybe. If it ends up being clean. 🤣
 
Alright. I'm pretty sure I'm gonna have to do this again, but for now it'll work. (note to future self: Don't trust anyone else's paint work. Always start from scratch.) It was painted black by the seller and not painted well. It was just sprayed over bare metal and so it's peeling up in a few spots since I added new paint to it. But, for now it'll work.


I got the idea to use Rustoleum's Colored Chrome Paint as a base, and Duplicolor's Metalcast (colored clear coat) as a top coat to try to make my own candy red. I am honestly extremely pleased with the results of the color itself and how it looks.

Base coat of the Chrome Paint. It's in the shade and cloudy, but it's a little more shiny silver than it looks. This was three coats. Two light coats, one heavy.

View attachment 774186
View attachment 774187

The waves you see are the "shaving" that was done by the seller. I don't care enough to smooth them out, at least not yet. We'll see how I feel in the future.

Anyway, next up was the Duplicolor Metalcast. I gave this two light coats, one medium coat, and one fairly heavy coat at the end and I'm stoked with how it looks.

View attachment 774188View attachment 774189

In the process of adding the final coat on the pictures above.

This is the final product.

View attachment 774190
View attachment 774191

This turned out spectacular IMO. The paint is not wet in the pictures, that's how shiny and deep it is. It looks like I anodized over Chrome plating. EXTREMELY happy with the result. They have a bunch of colors for the metalcast, so I would repeat this with blue, gray, yellow..whatever. It would all turn out great. I'm still not a fan of the shaved look...but it'll at least look nice. I do think in the future I'm gonna spring for an actual powdercoated VC with some good radium swivel fittings on top but this should more than do in the meantime. Lemme know what you think!
I do think you should of smoothed it out more. the sand lines are quite noticable. a bit of fine sanding would of done wonders on that VC to be real smooth and lush.
 
I do think you should of smoothed it out more. the sand lines are quite noticable. a bit of fine sanding would of done wonders on that VC to be real smooth and lush.


They are definitely noticeable, but I didn't want to take the valvecover down to bare metal after the seller painted the VC.


What I didn't realize at the time, was it was painted terribly. Had I known that, I'd have stripped it and gotten it nice. Ah well. The car has scars all over it. Builds character I guess. :p If the current coating fails due to being over a terribly done bottom layer, I'll make it nice and baby smooth.


I wonder how well bondo holds up to engine bay heat...
 
I did not expect this line to kick my ass as much as it did. But! It’s done and done. No leaks that I can see at least, and now the fuel system is 100% E85 safe.

The feed line was easy AF, but this return line…phew. Glad it’s over. I think cutting a foot or two and using 8’ of -6AN would’ve been perfect but I made the 10’ work.

IMG_8499.jpeg
IMG_8500.jpeg

^ that’s the flex fuel sensor, nice and secure.

IMG_8501.jpeg

IMG_8503.jpeg


A lot of these fuel line holders were already there so instead of reinventing the wheel I reused them. Worked out nicely. So glad those rubber hoses are gone.

But man if I do anything with AN lines in the future I’m getting an AN line cutting tool. It SUCKED without one man.
 
Decided today was the day for some driving and logging. I am absolutely stoked at the results so far.

Screenshot 2025-09-13 13.04.44.png

Screenshot 2025-09-13 13.08.23.png


The boost didn't raise as high as I thought it would by giving it more duty cycle, so I'm letting the car cool down and I'm gonna go back out later and try to hit 30lbs. But seriously man, 417 ft/lbs and 393HP on 25lbs is so ridiculously exciting for me. And it's like 100* "real feel" outside! It's not even got the benefit of being cold!

It really seems like the new VC and breather lines has helped alleviate the issues and I swear it feels faster too. Maybe because the engine is finally blowing off the pressure the pistons are fighting against? IDK, but this car feels incredible. I want that 400HP number though. I may back the timing off down low because that's more than enough torque for me, and I don't wanna kill transmissions/gears because it's making so much torque so fast.

But yeah. Freakin' stoked, man. This thing RIPS. 30lbs coming later hopefully!
 
Screenshot 2025-09-13 15.43.16.png


:)

I think that's all this turbo in this configuration has in it. The unported 2G o2 housing, and how the downpipe starts out at 2.5" plus internal gate life, I think that's what this turbo will make. I can put the duty cycle up to like 88% and it'll make 29-30 but honestly, I think with the colder weather at night or during the winter that'll make a few more lbs appear. IATs were getting into the 100* temps, so this was the best pull. But I did it. I broke 400hp. Goals met!

I'm gonna have to work on the timing map a bit, this is the peak torque it made.

Screenshot 2025-09-13 15.47.40.png


OMG That's way too much, LOL.


But yeah. Super pleased with the old girl even with it being the hottest part of the day she keeps trucking. Not sure when I'll be able to make a solid dragy pass, but it ain't gonna be today. I want it to cool off and rest easy since I been beating the crap out of it...but man. Stoked. Finally broke 400hp.
 
Take a look at "HP by Air" as a metric. If you are reaching 10 - that's a good number. Locate parts of the pull Over and Under 10 and look at what the timing is doing there.


If it's under, add timing, and if it's over should I pull timing out?
 
But man if I do anything with AN lines in the future I’m getting an AN line cutting tool. It SUCKED without one man.

I use 10" cable cutters from Harbor Freight. Cost around $10 for the Pittsburgh brand. Nothing bigger than -6, so not sure how well the would work with -8 or -10.
 
Add Value - Be Respectful - No Trolling - No Misinformation - Participate Often!
Support Vendors who Support the DSM Community

Latest Classifieds

Back
Top