The Central Hub for DSM Community and Information

For 1990-1999 Mitsubishi Eclipse, Eagle Talon, Plymouth Laser, and Galant VR-4 Owners. This is where the DSM platform history is documented and archived. Log in to help us in our mission, and to remove most ads from the browsing experience.

FB_IMG_1751294680936.jpg

Street Build 1g build - The Real Life Trials and Tribulations of building a DSM

Stock 14b,--> PTE 5031--> FP Red --> GTX 3584RS build 1GB --> 1GA chassis swap

This site may earn a commission from merchant affiliate links, including eBay, Amazon, and others.

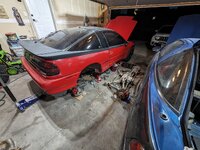
Called the machine shop and they said to bring it in. If it's their fault they'll fix it for free obviously and pay for a new head gasket.

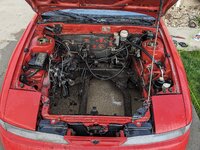
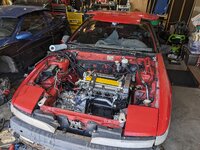
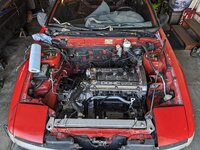
I got home today and pulled the cams and pressure tested all the cylinders and they all leaked. Some a little more than others but all of them leaked.
Yes just means I physically felt air out of the intake/exhaust ports with my hands.
PXL_20250324_222153285.jpg
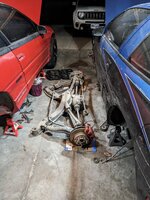
Took the head off and popped out that first exhaust valve and I see really nothing wrong with it honestly. Machine shop did verify that they only do one angle on the valve and 3 on the seat. All I MIGHT be able to see that's wrong is a single line around the face of the valve. Maybe That's where it was cut incorrectly and it's only sealing that tiny line? Honestly I don't know what I'm looking for. I don't see any damage or anything.
PXL_20250324_223853445.jpg

The fire rings definitely does bite into the head!
PXL_20250324_223101115.jpg

Picked up some Dsm3d Creations 1ga wing clips and their shift knob with some coupons things I had from them. Nice piece!
PXL_20250324_220819146.jpg
 
They have some nice stuff They even drove their dsms to the shootout and sey up a booth really nice guys plan on getting some stuff later.
 
So i brought the head back to the machine shop and watched them vacuum test the ports with my own eyeballs and every port pulled -17inhg which they said is pretty typical on that machine they run. Perfect vacuum on "their" machine was -20inhg. This seems pretty low to me honestly but i did watch him cover the hole completely on his vacuum tester and sure enough it stopped at -20inhg.. Maybe the scaling on his gauge is wrong or something.

They are going to tear into the head today and see what might be causing the issue.

One thing that popped into my head is that is it POSSIBLE that torquing the head to that 110ft/lbs cause the seat or angle of the valve to warp every so slightly and cause the face and seat of the valve to not seat correctly?

Im really on the fence about lapping the valves when they come back. I really want the valves to seal right and just be done with this issue but at the same time i dont want to mess anything up while do it.
 
Well machine shop called and said they they completely disassembled the head again and cleaned it and what not, "checked the valves" (whatever that means), filled the combustion chamber with water with the valves in and blew water into the pots and there were bubbles.

They said that they could not find ANYTHING wrong with the valves or seats that would cause it. They ALL pulled 17-20 "psi" this time around. I did ask if it was inhg or if it was psi and he said PSI but I'm skeptical of that since a PERFECT vacuum in psi is -14.7 and a perfect seal in hg is like 29inhg.

They said they even tried lapping a few intake valves and it didn't get any better.

They recommended to just try and run the engine and see if the heat expansion and engine running combo would seat them better.

They are going to mill the head again to get rid of the fire ring lines.
 
Picked up the head again. I did verify that their vacuum machine does read in inhg. Again I watched the guy cover the port and it pegged at -20inhg MAYBE just cracking over that. I'm assuming their gauge doesn't read correct.

They milled the head another .004". I'm sure I'll still have plenty of piston to valve clearance, but is it worth checking again? Is that kind of thing a static change? Say if I theoretically had .200" clearance and they shaved off that .004", does the clearance become .196" ?

Kind of planned on doing it anyways but didn't want to waste time if I didn't need to.

As far as the sealing goes, they said they vacuum tested the ports again, tried lapping, even refaced 2 intake valves to make sure they were right and nothing changed at all. They recommended running the car as is for a few hundred miles and then checking later on to see if anything is wrong and let them know and they'd get it figured out. I feel confident that they'll take care of me but I also find it odd why the valves would leak that much if at all honestly.

Well anyways, I ordered a new head gasket and cam seals because some idiot knocked them when installing cam caps.. 🙄 
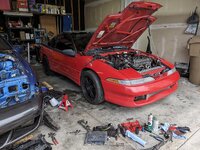
those should be here Tuesday. I'm going to do the same setup with the same Vulcan gasket and then degree the cams hopefully again and then just blow air into the cylinder to swap springs.
PXL_20250328_001807906.jpg

Got that new shift knob installed. I wish they included some instructions for installing it. That sounds really dumb but it wasn't as simple as just screwing the adapter on and then screwing the knob on. When doing that the knob was oriented to about the 5 o'clock position instead of 12.
I got creative and screwed the adapter on to the shifter, blue locktighted the inside threads of the knob and screwed it on to the adapter about the 10 o'clock so that when I really torqued it on it would be straight. Let it sit overnight and perfectoo.
PXL_20250325_231405952.jpg

Another thing I did was put a small grommet on the shifter lever UNDERNEATH the boot and that kept my shift boot from falling down.
PXL_20250329_183121053.jpgPXL_20250329_183137969.jpg

I've also got a make sure my crank sensor is actually reading.. maybe I'll do that quick today.

Wish me luck this time around fellas. I really can't wait to get this car back up and running. Feeling a little lost or incomplete without this old girl up and running honestly. Sounds dumb but even though I'm working on it driving it makes my days a ton better, stressful as it is to drive LOL
 
Last edited:
They milled the head another .004". I'm sure I'll still have plenty of piston to valve clearance, but is it worth checking again?
As for the piston to valve clearance, you have sufficient clearance, so it's not necessary unless you care.

Say if I theoretically had .200" clearance and they shaved off that .004", does the clearance become .196" ?
Not that simple since the valves don't move vertically and the valve timing is changed by the .004", too . Now theoretically you have the valve timing retarded as you have .004" shorter distance between crank and cams than before, and that retarded timing should have made the piston to valve clearance a bit more on intake valves and less on exhaust valves. Anyways the difference from before should be very little.

Well anyways, I ordered a new head gasket
Don't throw away the old head gasket if it's not torn. You can re-use it for degreeing cams, torque plating etc. So you won't waste money each time when you would need to remove the cylinder head before final assembly.
 
As for the piston to valve clearance, you have sufficient clearance, so it's not necessary unless you care.


Not that simple since the valves don't move vertically and the valve timing is changed by the .004", too . Now theoretically you have the valve timing retarded as you have .004" shorter distance between crank and cams than before, and that retarded timing should have made the piston to valve clearance a bit more on intake valves and less on exhaust valves. Anyways the difference from before should be very little.


Don't throw away the old head gasket if it's not torn. You can re-use it for degreeing cams, torque plating etc. So you won't waste money each time when you would need to remove the cylinder head before final assembly.
I'm not sure that would be an accurate use of the head gasket since it's a Vulcan gasket with the steel fire rings that dig into the head. IF I somehow reused it it would have to be without the fire rings but I don't think that would be accurate. Otherwise it'll dig into the head and probably wouldn't fit right when I swapped to the final head gasket.
 
I'm not sure that would be an accurate use of the head gasket since it's a Vulcan gasket with the steel fire rings that dig into the head. IF I somehow reused it it would have to be without the fire rings but I don't think that would be accurate. Otherwise it'll dig into the head and probably wouldn't fit right when I swapped to the final head gasket.
It's accurate and you remove the fire rings. The only thing you would need is the thickness. If you have old MLS gaskets that has the same compressed thickness as the head gasket you would use, that would be perfect.
 
It's accurate and you remove the fire rings. The only thing you would need is the thickness. If you have old MLS gaskets that has the same compressed thickness as the head gasket you would use, that would be perfect.
That's actually really good to know. I'll definitely hold onto the old gasket then. I figured once the gasket was crushed it would never read the same again and it would be worthless.
 
Last edited:
:aha:I don’t get it, LOL. Yet. Visual demonstration would make me more smarter. What is a trigger scope?
I might have to try and take a video or something later this week then LOL
The evo cam sensor that is in the Kiggly kit uses a sensor with a magnet to produce a voltage. Which is what generates your crank signal.

IIRC when it sees a tooth it produces a 4v signal and when it DOESNT see a tooth it produces a .5v signal which is why you can see the spikes and stuff in the picture. That's how the ECU sees the crank trigger. Cam trigger is also pretty much the same but I think it uses lights sometimes?

A trigger scope physically shows what the sensor is reading that I outlined above.
 
Well i got the head back together and back on the car permanently this time. I decided not to degree the cams or find my Piston to valve clearance again, i'm not sure it really needs it. Maybe i'll regret it but i feel pretty comfortable with the numbers i had gotten before.

After torquing the head down i did the compressed air test again with only about 50 psi and it blew out of the 1st exhaust port again.. im really hoping this somehow seals itself after running but im not holding my breath. The intake side seemed to be just fine though. I cant imagine its an issue with tooling since if it was all the seats would be messed up? Plus i watched them vacuum test the head when i first brought it back and it pulled -17inhg of vacuum with -20inhg being a perfect seal on their, which like i said i think doesn't read vacuum correctly.
I really am starting to wonder if theres an issue with the seat being deformed after the head is being torqued, some reason, somehow. Im half tempted to only torque them to like 95ft/lbs instead of the 110ft/lbs and see what that does. What do you guys think?

My mind is in the boat that if i have a valve job done, it should seal damn near perfectly with just dry valves in the head. It should pull a near perfect vacuum out of the port when vacuum testing.

On another note, I put a small amount of filtering media in the baffle of my valve cover. Vibrant makes some stainless steel filtering media specifically for catch cans which i thought would be perfect. shoved that in the baffle and red locktited the small allen bolts in. *slaps valve cover* thats not going anywhere.
PXL_20250401_002052255.jpg

Cleaned up all my valve cover studs since i got that DSM 3d Creations stud kid, slapped some rtv on the half moon seal and stuck it on and went to snug down the valve cover and would you freaking know it. The nuts dont fit the cutouts in th valve cover. Nuts are too big. Not only that but the cutouts are so small that i cant even fit a 10mm socket in there.

Thankfully I have a stainless allen bolt kit for it that ill have to switch to. It still looks pretty nice but unfortunate that i cant use the stud it anymore :(
PXL_20250401_010117720.jpg

And that's where the car sits. Tonight I think ill finish getting the timing belt installed, get my air gap set for my crank sensor and get that finished up and maybe start to get the intake and exhaust manifolds mounted back up.
 
Timing belt on, air gap set, exhaust manifold back on as well it's starting to look like a car again.
Crank sensor Air Gap is .035" this time around. I'll probably fire up the laptop and make sure it reads fine before putting the timing cover back on though.

PXL_20250401_223520241.jpgPXL_20250401_233526833.LONG_EXPOSURE-01.COVER.jpg

Still need to work out the tension on the timing belt. Absolutely my least favorite thing to do because it never seems to turn out right. It either over tightens while tightening the tensioner bolt, or or the grenade pin is never free once I turn the engine over and let it sit.
 
God I love a good shot of Jack. Jack and Coke is good too. Must be the indian in me because whiskey just hits different. I'd legitimately drink non alcoholic Tennessee whiskey if 1) they made such a thing 2) it wasn't prohibitively expensive.


Anyway, do work son! Excited to hear it and see it rips!
 
After torquing the head down i did the compressed air test again with only about 50 psi and it blew out of the 1st exhaust port again.. im really hoping this somehow seals itself after running but im not holding my breath. The intake side seemed to be just fine though. I cant imagine its an issue with tooling since if it was all the seats would be messed up? Plus i watched them vacuum test the head when i first brought it back and it pulled -17inhg of vacuum with -20inhg being a perfect seal on their, which like i said i think doesn't read vacuum correctly.
I really am starting to wonder if theres an issue with the seat being deformed after the head is being torqued, some reason, somehow. Im half tempted to only torque them to like 95ft/lbs instead of the 110ft/lbs and see what that does. What do you guys think?
So you finally didn't lap the valves by yourself after getting back the head from the machine shop? Usually you feel the leak more than the actual leak when the compressed air is leaking, because you can hear and feel it. But the leak sometimes is not as much as you think. I don't know how much actually leaking, so can't say anything for sure but technically what the machine shop told you is what I said earlier. After the engine gets running and some heat cycles later, they may seal better. If you care the leak now, then you should lap the valves.

You should run a cold leakdown test now (and after lapping if you would lap), and then test again after the engine gets some heat cycles when it's cold and hot. This way you may be able to see the difference in case if the difference is a lot.

For peace of mind, I would try to share about the recent cylinder head that is on my 1g now. That's MAP stage 5 head and all seats and valves were new of course. And I'm sure it passed a vacuum test before shipping. I did a liquid test when I received it, and saw many valves started dripping the liquid in few seconds. So I lapped all valves slightly and all leaks were gone, even zero seeping. To be honest, valves seal differently when cold and hot, so actually even there is a little leak when cold doesn't mean 100% you have leak when hot. Probably lapping was not necessary but anyways I always do, so I did. It's just a personal preference.
Correct. I didn't lap because they said that they had tried that and the didn't seem to make a difference. I figured they might seal / seat differently once the car heats up but I wasn't confident in that fact.

Thanks for sharing your experience with your head.
 
Well got the car mostly together last night. All that's left to do is timing timing cover, alternator and power steering pump. I noticed over the last couple months that my power steering line has been leaking right at the flange to the pump despite it being a new pump and replacing the o-ring. I replace the oring again last night with a slighting fatter one, maybe the old one I put in there didn't have a big enough interference fit. I guess time will tell.

I'm also torn between running this alternator under drive pulley and the stock one that came on it. I'm not really a fan of idling at 1300 rpm just so the battery will charge when idling. Driving it seems to be fine. I'm not sure if going back to the OE MCR pulley is ideal either since it'll overspin the alt. Decisions, decisions.

I did try to start the car but alas, another issue. It just turned over, and over and over and not a single fire. Pulled the plugs and it's getting fuel, no fuses that I saw were blown, crank is getting signal but No fires.
I did notice that when I put this COP kit on with this new valve cover that it didn't seem to fit down quite as far as the stock did. I think that this valve cover is taller I'm some way that increased the distance to the spark plugs and now my coil packs don't reach them enough to spark the spark plug.. that's my theory. I can order new PRP universal stalks but they're 100 freaking dollars for some silicone and a spring. I put one individual coil pack down over the spark plug to see how far down it needed to sit to contact the plug right and it's about 1/8" down below the flange where the COP plate would sit.. that combined with the thickness of the plate itself.. which probably a little over another 1/8" and I think we've got a problem.
PXL_20250403_122312595.jpg
Today after work I'm just going to shove all the coil packs down without the plate and see what happens.

I did email MCR about this as well because this works just fine on the stock cover.

I got my -12 an lines finished up for the catch can. Them boys is huge.
PXL_20250403_010348210.jpg
 
This is how I test my valves. I didn't take this to a machine shop, I just hand lapped every valve and got a nice wide Grey stripe around each one. It does take a while but you can't rush quality work. This head didn't have any valve springs on it and I was pulling 25hg +. I eventually got the cylinder that was leaking a bit to hold just like the others by lapping the valves more while seeing where the "lap" was showing up on the valves (close to centered on the valve face).
Just trying to help.
 
Okay boys more GOOD progress made again!
I did some test ignition fires from the Link software and saw that the plugs indeed were not firing.. not for the lack of trying but after tracing some wires i made a liar out of myself. This is what i found:
PXL_20250403_231646040.jpg

My 10amp fuse for my coil pack wires was blown.
After replacing that fuse i verified again that the coils were now getting spark and they were.

Tried to fire up the the car again and it was reluctant due to the same starting issues ive been having but it finally seemed to work and wake up. i didnt run the car for long as i just wanted to verify that the car would start and that i wouldnt have to adjust the crank sensor gap before putting the timing cover on.

I went to work on getting the timing cover back on which always fights me.. but while doing so i noticed a missing bolt in a not so good area. One of the front case bolts, about 1o'clock from the crank sensor was completely missing and not mixed in with the bolts that i had pulled out..

i looked for probably 40 minutes for that bolt or at least another that would work but found nothing.
LIGHTBULB... I checked my OLD front case.. and there it freaking was.. in a box on the shelf inside my old front case. I apparently had forgotten / didnt see that bolt when i swapped out the front case posted in: POST #630. That means its been out of there for a couple thousand miles LOL
PXL_20250405_191409010.jpg
PXL_20250405_191847824.jpg

Well anyways put the bolt back in and got back to work getting the car assembled together. Front Bumper, fished torquing down the valve cover, waterpump, alternator, etc etc. I started at 9am and finished at ~3pm but it was finally back together. Got some coolant in it and got r fired up, burped and warmed up.

Yesterday after talking with the link forums and what not i decided to switch my trigger edge setup from falling to rising and seemed to have good evidence that this would fix my starting issues. Everytime i cranked the car i actually got RPM signal.
Adam W on the link forums said that an offset of -80 trigger offset should put me close to what base timing should be and the car should fire up and run with rising vs falling edge trigger.

And that it did. She sputtered a little bit at first but she stayed running long enough for me to set base timing and verify trigger offset. I wish I could explain this all a little better but truth is I barely have a grasp on it myself.


Anyways, I was able to dial in my base timing using trigger offset after locking the timing in the ECU and with a New -78* offset the car starts right up everytime... I literally cannot tell you guys how excited I am that the whole starting issues are now gone. It made driving this car so nerve-racking because i never knew if the car died or i turned it off if it was going to start back up again or not.


Today after work, im going to retorque the head studs, gap and put new plugs in, retorque valve cover and take it on a short test drive! Hopefully ill be able to drive it to work this week!
PXL_20250405_220134448.jpg
 
Add Value - Be Respectful - No Trolling - No Misinformation - Participate Often!
Support Vendors who Support the DSM Community

Build Thread Updates

Latest Classifieds

  • Wanted Looking for T25 replacement
    2G, preferably a t28 or t25
    • Mando Vee
    • Updated:
    • Expires
  • For sale 2g 2G Manual Shifter Cables
    2G Manual Shifter Cables $85 + shipping and paypal feesYou must be registered to see element.
    • jersygsx
    • Updated:
    • Expires
  • Wanted 2g Factory radio brackets
    Looking for some factory radio brackets.
    • jesse12345
    • Updated:
    • Expires
  • For sale 1G DSM COMPLETE A/C UNIT
    Came off a bone stock 1G, won’t be using. Good for anyone that’s looking to go back to a/c or...
    • The_Partout_Spot
    • Updated:
    • Expires
  • For sale 2g 2G AWD OEM Grey Hatch Carpet
    2G AWD OEM Grey Hatch Carpet $40 + shipping and paypal fees* Great condition with backing...
    • jersygsx
    • Updated:
    • Expires
Back
Top