The Central Hub for DSM Community and Information

For 1990-1999 Mitsubishi Eclipse, Eagle Talon, Plymouth Laser, and Galant VR-4 Owners. This is where the DSM platform history is documented and archived. Log in to help us in our mission, and to remove most ads from the browsing experience.

FB_IMG_1751294680936.jpg

Street Build 1g build - The Real Life Trials and Tribulations of building a DSM

Stock 14b,--> PTE 5031--> FP Red --> GTX 3584RS build 1GB --> 1GA chassis swap

This site may earn a commission from merchant affiliate links, including eBay, Amazon, and others.

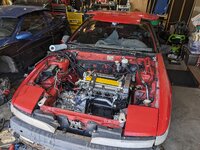
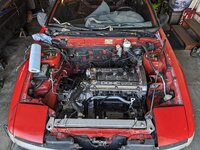
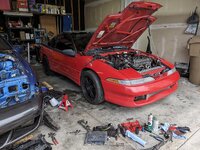
Small peas stuff today. Figured I'd get the little things out of the way so I don't have to worry about them when the head comes back.

Repinned 1 of my coil pack connectors. When removing the coil pack plate all 3 wires came out of their connectors. Super odd.

Rewired my cherry crank sensor into the existing crank connector.

PXL_20250301_225922597.jpg

Really all that's left is going to replace water pump gasket, and oring and then wait for the head to come back and lap the valves, degree the cams and put back together. Theoretically of course, I'm sure the title of the build thread will once again prove itself.
 
You gonna keep punishing that pulsar with 50 psi or just go bigger for 2025?
Honestly I'll probably keep this turbo for awhile. Only reason I would want to swap out would to get back into the efficiency range of another turbo but I really don't wanna lose too much low end spool (which is basically non existent as it is)

If I did end up moving to a different turbo it would probably be something similar to what I have but better efficiency like a xona XRE6869S or XR9564S
 
I wanna say I’ve seen rolling anti lag used in your vids correct? I would think that would level the playing field in a theoretical roll race in Mexico LOL, either way I agree with you, I think you’ve got a pretty awesome set up right now:rocks:
 
Last edited:
I wanna say I’ve seen rolling anti lag used in your vids correct? I would think that would level the playing field in a theoretical roll race in Mexico LOL, either way I agree with you, I think you’ve got a pretty awesome right now:rocks:
Yeah rolling antilag is fun. It usually just blows the tires off but the roads here aren't the grippiest and I think these tires need replacing too. Thinking about going with time Hoosier DR2's since they have them in a 225/45-17. Not trying to have a drag car, so I don't want huge sidewalls.

It's also nice to have decent spool so that if you wanna just do a quick pull you don't have to hit the rolling antilag to do it. It can be a bit obnoxious sometimes LOL
 
With a looser converter it's pretty awesome. With a stock converter it's kind of a dog for a bit until it spools up. On the restall converter you step on the gas, the converter flashes and you're in boost and off on a rip. From a roll at least. From a dig...duh.


God I miss my Autos...
 
Machine shop called and the head is ready to be picked up today! ill be grabbing it today after work and then getting started on it right away tonight. I should hopefully have the head ON the car this weekend ready to degree the cams.

This week I did a little side work and got my Holley Retrofit headlight harness installed. Now low and brights work as they should! The Harness fit perfectly if you mount it near the passenger side headlight. I decided to mount mine outside of the hood, basically in the headlight bucket. its got a nice shroud on it which should protect the relays from water and what not if i get stuck in some rain or whatever. I used Rivnuts in the thin sheet metal. clearance between the end of the rivnut and the radiator was tight but its thin enough you can kind of muscle it around for better clearance.
PXL_20250311_225827349.jpg

The ONLY wire i had to extend is the power wire to the battery. Everything else fit by routing it to the bottom of the radiator where the rest of the wiring that passes over that way. Grounds for both relays i used the philips screws that are near the power steering res, and the fusebox in the engine bay.


ill upload pictures of the head later.
 
I would love a tutorial of how to degree the cams. I’m sure they’re out there but have yet to come across one.
 
So can you explain the benefits/reasoning for degreeing the cams as opposed to just installing them straight up? I’ve never done that before and wonder how beneficial it may or may not be
The main benefit is that it verifies that your camshaft timing events are happening at the correct time in accordance with the crank degree. So basically your opening, closing events and max lift events are happening at the correct Crank timing according to your cam card.

It can get out of whack when you have the head milled or run different cams even. If you have the head milled a bunch or run a head gasket spacer or something that either shorten or lengthens the distance between the centerline of the cams and the crank it effects the cam degree. Shortening the distance ( getting head milled and what not) retards the cam timing, and lengthening it advances the cam timing (assuming everything is set at 0°)

Jafros video shows him doing it start to finish and it's a great thing to know.

I know some guys won't ever degree them and will just use a dyno and change their cam timing with adjustable cam gears and use the dyno to see what the changes do.
 
Gonna really try to get the cams degreed in in the next couple days.

Did a tiny little side project and painted one of my upper intercooler pipes. It probably won't hold up for long but I didn't prep it by sanding it, wax and grease remover and then paint. I was going to use my self etching primer but it apparently died and ran out of air?

Either way it looks much better now that it did before.
PXL_20250316_164526652.jpgPXL_20250316_164528313.jpgPXL_20230706_222113972.jpg

I'm really now hoping to have the car done before this weekend but we'll see.
 
Well I tried to do the exhaust cam yesterday but it was a complete bust.

Everytime I tried to get my closing degree @ .040" it was way off. Cam card reads that the valve should be open .040" @ 2° AFTER TRC but mine consistently showing 4-5° BEFORE TDC.. so 7° retarded. ( I zeroed the gauge out at .001" which is why the indicator reads .041")
PXL_20250320_004946591.jpgPXL_20250320_004952984.jpg

I double checked my max lift AND opening events AND top dead center using another dial indicator and all of those were spot on. Tried repositioning the dial indicator on the valve retainer and still had the same issue.

So I said screw it and retarded the cam 7° and checked it again and now it's like 13° retarded LOL
I thought maybe the lines on the cam sprocket represented 2° / mark but I verified that it is only 1° / Mark. That's where I left it last night.

I guess I'll just keep trying to reposition the dial indicator and see how it goes. I'll set the cam back to 0° and try again. I really wanna make sure that these cams are setup right and not give up this time.
 
Well I tried to do the exhaust cam yesterday but it was a complete bust.

Everytime I tried to get my closing degree @ .040" it was way off. Cam card reads that the valve should be open .040" @ 2° AFTER TRC but mine consistently showing 4-5° BEFORE TDC.. so 7° retarded. ( I zeroed the gauge out at .001" which is why the indicator reads .041")
View attachment 759606View attachment 759607

I double checked my max lift AND opening events AND top dead center using another dial indicator and all of those were spot on. Tried repositioning the dial indicator on the valve retainer and still had the same issue.

So I said screw it and retarded the cam 7° and checked it again and now it's like 13° retarded LOL
I thought maybe the lines on the cam sprocket represented 2° / mark but I verified that it is only 1° / Mark. That's where I left it last night.

I guess I'll just keep trying to reposition the dial indicator and see how it goes. I'll set the cam back to 0° and try again. I really wanna make sure that these cams are setup right and not give up this time.
This is one of common errors when degreeing cams. Probably you are not setting the dial indicator tip on a stable spot. At the moment when the valve event switches from max lift to closing event, the dial indicator tip easily moves/slides due to spring pushes back, that's why this mostly happens in closing event. You just need to get used to. Find a better position for the dial indicator tip with trial and error, and you should do couple of times and take an average.
 
Add Value - Be Respectful - No Trolling - No Misinformation - Participate Often!
Support Vendors who Support the DSM Community

Build Thread Updates

Latest Classifieds

  • Wanted Looking for T25 replacement
    2G, preferably a t28 or t25
    • Mando Vee
    • Updated:
    • Expires
  • For sale 2g 2G Manual Shifter Cables
    2G Manual Shifter Cables $85 + shipping and paypal feesYou must be registered to see element.
    • jersygsx
    • Updated:
    • Expires
  • Wanted 2g Factory radio brackets
    Looking for some factory radio brackets.
    • jesse12345
    • Updated:
    • Expires
  • For sale 1G DSM COMPLETE A/C UNIT
    Came off a bone stock 1G, won’t be using. Good for anyone that’s looking to go back to a/c or...
    • The_Partout_Spot
    • Updated:
    • Expires
  • For sale 2g 2G AWD OEM Grey Hatch Carpet
    2G AWD OEM Grey Hatch Carpet $40 + shipping and paypal fees* Great condition with backing...
    • jersygsx
    • Updated:
    • Expires
Back
Top