The Central Hub for DSM Community and Information

For 1990-1999 Mitsubishi Eclipse, Eagle Talon, Plymouth Laser, and Galant VR-4 Owners. This is where the DSM platform history is documented and archived. Log in to help us in our mission, and to remove most ads from the browsing experience.

FB_IMG_1751294680936.jpg

Street Build 1g build - The Real Life Trials and Tribulations of building a DSM

Stock 14b,--> PTE 5031--> FP Red --> GTX 3584RS build 1GB --> 1GA chassis swap

This site may earn a commission from merchant affiliate links, including eBay, Amazon, and others.

To me your plugs just look rich, with the boost you’ve ran on a 67mm turbo with no O-rings I’d say your BALLS are bigger than your problems. What’s your engine compression? I assume your timing isn’t too crazy at 8000rpm, my guess would be valve stem seals on 2 and 3, if you had 2 injectors out of 4 jacked up your AFR’s would show it:idontknow:

Considering your hot start crank sensor issues that might also explain the break up at high boost?
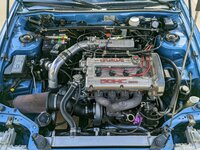
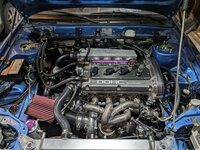
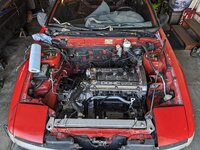
I run 9:1, I haven't done a compression test and it's been awhile since I've done a leak down.

One of the more recent pills I saw 13.5° @ 8000 @ 43 psi, 2nd gear it looks like.
AFRs are a tad rich but it's been cold these more recent logs than from when the car was tuned. So that could be it.

The crank sensor issues are heat related I think but it never broke up due to high rpm or boost, it was also ways shifting or some sort of cut supposedly. Link said that my accel enrichment was a little much coupled with 3% rich during my shifting transition made it possibly rich misfire during shift. 🤷

If you look at that video of me doing the 50psi pull I post recently it revs 3rd out just fine after the map limit and "rich" misfire
 
Maybe just needs a fresh set of plugs and a slightly tighter gap? Again I commend your efforts on that car, rebuilding your own trans, running 50 psi on a 67mm turbo with a composite LOL, you’ve sailed waters I’ve never been in and I don’t mean to sound critical in any way, I just hope you get’er sorted out! You’re cars a ripper:hellyeah:
 
Maybe just needs a fresh set of plugs and a slightly tighter gap? Again I commend your efforts on that car, rebuilding your own trans, running 50 psi on a 67mm turbo with a composite LOL, you’ve sailed waters I’ve never been in and I don’t mean to sound critical in any way, I just hope you get’er sorted out! You’re cars a ripper:hellyeah:
It's definitely possible, I'm no tuner. I don't know what gap it should be but IIRC I think it's like .024"? Down from .028"

Honestly you say what you want, you aren't gonna hurt any feelings here LOL there are people out here that are smarter than me and I thirst for knowledge.

I'm still gonna do the head gasket and water pump gasket so that it's not so much of a ticking time bomb
 
Perhaps the cylinder head got lifted a bit? Didn't you hear the sound that pushing coolant after pulling hard with high boost? I remember that I started to hear it some time later after I started to boost 50+ psi with no o-ring, just L19 studs and a MLS head gasket.
What o ring are you talking about Hiroshi? I’m not familiar yet..
 
Well boys, head gasket was cooked for sure!
The spots where gasket material is missing is missing on both sides and it's not stuck to the block so..

Also you can pretty clearly see where it was pushing out at the edges of the cylinders too. I did not touch those areas.

PXL_20250115_002458986.jpg


PXL_20250115_002456753.jpg


PXL_20250115_002446043.MP.jpg


PXL_20250115_002418337.jpg


PXL_20250115_002413513.jpg


PXL_20250115_002408399.MP.jpg


PXL_20250115_002403456.MP.jpg


PXL_20250115_002357043.MP.jpg


PXL_20250115_002255568.MP.jpg


PXL_20250115_002255568.MP.jpg


PXL_20250115_002250932.MP.jpg


PXL_20250115_002244374.MP.jpg


PXL_20250115_002238189.MP.jpg
 
What o ring are you talking about Hiroshi? I’m not familiar yet..
That's for better cylinder sealing. Usually stainless steel wire for composite or copper head gasket, copper wire for MLS gasket are used. SS o-ring with composite or copper head gasket, you would be able to make grooves as receiver in opposite side of head gasket. When you torque down the head studs, the protrusion of o-ring wire would push the gasket material into the groove and make even better sealing. Copper o-ring is simply to crush.
 
If yiu need to prep the block these are my favorite. Took off lots more stuff even after a razor blade. Carbide scraper. They're hard. Go slow as they are unforgiving if you slip. Gotta keep em flat. Raise a corner up and they're hard enough to put a gouge.

Screenshot_20250114_190902_Amazon Shopping.jpg
 
If yiu need to prep the block these are my favorite. Took off lots more stuff even after a razor blade. Carbide scraper. They're hard. Go slow as they are unforgiving if you slip. Gotta keep em flat. Raise a corner up and they're hard enough to put a gouge.

View attachment 753845
I'll definitely take a look into those. Prepping is one of my least favorites since I just usually use a razer.
 
Perhaps the cylinder head got lifted a bit? Didn't you hear the sound that pushing coolant after pulling hard with high boost? I remember that I started to hear it some time later after I started to boost 50+ psi with no o-ring, just L19 studs and a MLS head gasket.
To me, looks like this.case.
I didn't hear anything, honestly. If I didn't I wouldn't have kept doing pulls. The car is fairly lound so that's probably why. I did see some extra coolant in the overflow but no ballooned radiator or anything like that.
Usually you don't hear while you are driving. You may notice at the first engine stop after pulling hard that the overflow tank is bubbling.
 
I'll definitely take a look into those. Prepping is one of my least favorites since I just usually use a razer.
Razor sucks by comparison. They have sharp 90 degree angles. They never dig into the metal like a razor does. As long as you keep the edge flat.
 
To me, looks like this.case.

Usually you don't hear while you are driving. You may notice at the first engine stop after pulling hard that the overflow tank is bubbling.
I'm sure the head lifted. Between getting as hot as it did and 50 psi on the stock gasket I knew it was only a matter of time. It did fill the overflow a few times so that was a decent sign to me too.

Razor sucks by comparison. They have sharp 90 degree angles. They never dig into the metal like a razor does. As long as you keep the edge flat.
Sold, I ordered some up.
Any recommendations for the head being aluminum? I ordered some plastic razers too for that but open to suggestions.
 
I'm sure the head lifted. Between getting as hot as it did and 50 psi on the stock gasket I knew it was only a matter of time. It did fill the overflow a few times so that was a decent sign to me too.
What you have been describing sounded kinda familiar to it. It's just time to go to next stage of reinforcing with whatever the method. Different style head gasket, larger head studs, larger head studs washers, o-ringing etc.
Replacing the head gasket may solve the unresolved hard hot start issue, too.
 
So I think I need you guy's help. This is kind of where things get out of my knowledge generally about engines and especially cylinder heads.

Disassembling the head and and got the springs off the intake side. I used one of the stupid "punch" type spring removers where you whack it with a hammer and the magnets suck the keepers and retainers off the spring/valve because the "nice" PQY one I have doesn't push the retainer down at the same angle the valve does. So it binds up and ends up just pushing the valve down.
PXL_20250116_233819526.MP.jpg
Screenshot_20250117-082919.png

PXL_20250115_002929610.NIGHT.jpgPXL_20250116_011444988.MP.jpg

FIRST: When I pulled the intake valves they were hard to remove, and did Not Slide out easily. I kind of had to twist them to get them out. After getting them out I found 2 things. The valve stem seemed to have some "nicks' in it around where the keepers were at. I'm going to assume this is my own fault from using that crappy tool and the keepers likely gouged the valve stem, and that's probably what was getting hung up in the guide. This only happened on about 3 of the intake valves. They look like this:

1737129251895.png

SECOND: after removing all intake valves I noticed that the valve face uh doesn't look like it's been sealing very well at all. Like the valve job was done poorly. From the pictures it looked like only make a small portion of the face was sealing against the seat.
PXL_20250117_132032145.MP.jpgPXL_20250117_132157564.jpg

What I need help with is, it SEEMS like it'll need a valve job to get the faces squared away, AND I think I'm going to order some new valve guides as well because I'm sure I probably ruined the ones that were kind of stuck. Is there going to be a problem with doing the valve job and causing issues with the old valves in there? If you cut the valve seat, it sinks the valve, which makes the stem taller? So they would cut the top of the stem the same amount they cut the seat? Same thing goes for the face of the valve face..
Thoughts everyone?

I wasn't really looking to spend a bunch of money on getting this back on the road so this kinda sucks but seems like the build threat name is living up again.
 
Last edited:
Have you tried lapping the valves? Once done you can seat the valve and then fill the chamber with brake clean or similar to see if it leaks.
I haven't done guides but I understand they need to be press fit and likely should be done by a machine shop to ensure proper seat and angle. YMMV
Personally I'd stay away from that keeper tool, no good comes from smacking an aluminum head with a BFH. I had great luck with the euro sport valve spring compressor tool.
I haven't yet. My plan is to bring the head with valves into the shop and have them inspect the seats and valves and probably look at the guides to see if I really messed them up or what.

I did go ahead and order the euro sport one but won't be here till next week unfortunately.

I have a feeling I should be able to just debur/ polish the valves that got goofed since they aren't going into the guide that high, it's all around the keeper area, likely replace the guides. But like I said I'll probably bring it to a different shop than last time and have them look it over.
 
FIRST: When I pulled the intake valves they were hard to remove, and did Not Slide out easily. I kind of had to twist them to get them out. After getting them out I found 2 things. The valve stem seemed to have some "nicks' in it around where the keepers were at. I'm going to assume this is my own fault from using that crappy tool and the keepers likely gouged the valve stem, and that's probably what was getting hung up in the guide. This only happened on about 3 of the intake valves. They look like this:
I think I'm going to order some new valve guides as well because I'm sure I probably ruined the ones that were kind of stuck. Is there going to be a problem with doing the valve job and causing issues with the old valves in there?
Maybe while you were removing the keepers by that tool, you smashed the stem seals with bottom of retainer and/or you may have slightly bent valves rather than damaging the guides. Even the valves look straight, sometimes it's bent very slightly. Try to roll all the valves on a flat and smooth place. If you see waving movement even little bit while rolling, the one is most likely bent.

Please keep in mind that when you compress the valve springs to remove the valve keepers, the valves are also pushed down, too. The valves get bent at neck or broken at keeper groove much easier than you imagine. If the head is off, always use a C clamp style valve spring compressor unless you have something that can hold the valve head in center and straight. That's the right tool and the safest way. Otherwise there would always be a chance to bend or damage valves/guides. If the head is still on the block, you can use the eurosport style valve spring compressor.
after removing all intake valves I noticed that the valve face uh doesn't look like it's been sealing very well at all. Like the valve job was done poorly. From the pictures it looked like only make a small portion of the face was sealing against the seat.
Didn't you install new valves without lapping previously? Or maybe the valves were floating/bouncing.
 
Maybe while you were removing the keepers by that tool, you smashed the stem seals with bottom of retainer and/or you may have slightly bent valves rather than damaging the guides. Even the valves look straight, sometimes it's bent very slightly. Try to roll all the valves on a flat and smooth place. If you see waving movement even little bit while rolling, the one is most likely bent.

Please keep in mind that when you compress the valve springs to remove the valve keepers, the valves are also pushed down, too. The valves get bent at neck or broken at keeper groove much easier than you imagine. If the head is off, always use a C clamp style valve spring compressor unless you have something that can hold the valve head in center and straight. That's the right tool and the safest way. Otherwise there would always be a chance to bend or damage valves/guides. If the head is still on the block, you can use the eurosport style valve spring compressor.

Didn't you install new valves without lapping previously? Or maybe the valves were floating/bouncing.
I'll try rolling it tomorrow. I would have but I was more preoccupied with the gouges at the top where the keepers where. I almost 100% Guarantee those gouges are from the keepers getting smashed between the stem and retainer.

I've used the big clamp ones before and they were a huge pain. I do have one of the good EuroExport compressors on the way but I do see what you're saying. I usually stuff a rag or something under the port the valve I'm working on is so that it doesn't get pushed down quite as easily.

I honestly can't remember if I lapped the valve to be completely honest. I usually do, as I have on ever car that I've had the valves out on but I don't distinctly remember doing it on this one. It is entirely possible that the valves were floating. I'm running regular Kiggly street springs and while I know I haven't overrevved it, 48-50psi might be too much for those springs and are forcing them open?
 
I've used the big clamp ones before and they were a huge pain. I do have one of the good EuroExport compressors on the way but I do see what you're saying
Maybe the C clamp style spring compressor you are talking is different from what I am referring to. The one I am taking is like the pic below, you can buy for less than $20 and even safer and easier to use than anything else. Even the Mitsubishi factory one is this style.
The euro one is for when the head is on the block and you have to unbolt and bolt it each time when you move to other cylinder and if the head is off you have to put something under valves like you said a rag, but it doesn't hold the head stably, if the keeper is kinda stuck, the skinny valve would lift the head, and in this moment you are unevenly giving force to the valve head. Please don't get me wrong, I am not saying that you can't use. For sure you can, but I am just saying safer and easier way from experience. I have the euro one, too. But I use it only when the head is on the block when there is no way to use the C clamp style compressor because of this reason, like when replacing stem seals/springs in car.

I honestly can't remember if I lapped the valve to be completely honest. I usually do, as I have on ever car that I've had the valves out on but I don't distinctly remember doing it on this one. It is entirely possible that the valves were floating.
New valves are usually not ready to use. Lapping is a must before use.

48-50psi might be too much for those springs and are forcing them open?
High rev probably do nothing, but with that high boost could be yes.
スクリーンショット 2025-01-10 18.51.28.jpg
 
Maybe the C clamp style spring compressor you are talking is different from what I am referring to. The one I am taking is like the pic below, you can buy for less than $20 and even safer and easier to use than anything else. Even the Mitsubishi factory one is this style.
The euro one is for when the head is on the block and you have to unbolt and bolt it each time when you move to other cylinder and if the head is off you have to put something under valves like you said a rag, but it doesn't hold the head stably, if the keeper is kinda stuck, the skinny valve would lift the head, and in this moment you are unevenly giving force to the valve head. Please don't get me wrong, I am not saying that you can't use. For sure you can, but I am just saying safer and easier way from experience. I have the euro one, too. But I use it only when the head is on the block when there is no way to use the C clamp style compressor because of this reason, like when replacing stem seals/springs in car.
Thanks. That is good info.
New valves are usually not ready to use. Lapping is a must before use.
Oh I didn't just slap them in there. I did bring the valve to the machine shop they ground them. But after that I don't remember if I lapped them.

That c clamp definitely is different than the one Ive previously
 
Well I got my carbide scrapers the other day and the little one is fine but the big one seems to have been powder coated over the scraping edges. I'll have to send it back to amazon.

I was JUST about to start cutting the barbs off my old thermostat housing to tap and plug them and then remembered that I MIGHT have another spare one somewhere and low and behold I did. I believe this is an n/a housing. Everything transferred over and I only needed to plug a single hole, which was already threaded for 1/8 npt. Perfect for a coolant pressure sensor later on if needed.
PXL_20250118_005523349.jpgPXL_20250118_005530464.jpg
PXL_20250118_005526909.jpg

My EvoSpec Evo cam sensor adapter for the crank showed up and it's a perfect fit for the Kiggly sensor mount. Win win here since now I don't have to worry about shimming and finding very niche shims sizes OR worrying about the sensor going out as often. I've just got a cut and extend the wires to the current harness and badabing badaboom.
PXL_20250118_195916206.MP.jpg

I still haven't done anything with the head yet. I'm honestly tempted to not even pull the exhaust side and just take the hole head to the machine shop and have them tear it down and look it over and tell me if anything needs replaced or what not. I do already have some GSC guides on the way and if I don't need them, then whatever I guess I can keep em for a rainy day. However I DID snag another 6 bolt big port cylinder head, which I thought about building and porting for on standby basically. Maybe I'll use those guides for that?

Also BIG BIG news.. at least for me. I also picked up a part that I've been wanting FOR EVER. I didn't think this vendor made them anymore. This seemed like a decent deal, and a good lead time for it at only 1-2 weeks for the "modification" I wanted done. I'll be sure to post it up when it gets here, super stoked for that one. It goes in the engine bay :D
 
Add Value - Be Respectful - No Trolling - No Misinformation - Participate Often!
Support Vendors who Support the DSM Community

Build Thread Updates

Latest Classifieds

  • Wanted Looking for T25 replacement
    2G, preferably a t28 or t25
    • Mando Vee
    • Updated:
    • Expires
  • For sale 2g 2G Manual Shifter Cables
    2G Manual Shifter Cables $85 + shipping and paypal feesYou must be registered to see element.
    • jersygsx
    • Updated:
    • Expires
  • Wanted 2g Factory radio brackets
    Looking for some factory radio brackets.
    • jesse12345
    • Updated:
    • Expires
  • For sale 1G DSM COMPLETE A/C UNIT
    Came off a bone stock 1G, won’t be using. Good for anyone that’s looking to go back to a/c or...
    • The_Partout_Spot
    • Updated:
    • Expires
  • For sale 2g 2G AWD OEM Grey Hatch Carpet
    2G AWD OEM Grey Hatch Carpet $40 + shipping and paypal fees* Great condition with backing...
    • jersygsx
    • Updated:
    • Expires
Back
Top