The Central Hub for DSM Community and Information

For 1990-1999 Mitsubishi Eclipse, Eagle Talon, Plymouth Laser, and Galant VR-4 Owners. This is where the DSM platform history is documented and archived. Log in to help us in our mission, and to remove most ads from the browsing experience.

Talon and Vette 10_03_24.jpg

Altered Mental Status (1G AWD 5spd)

Old street racing legend reborn

This site may earn a commission from merchant affiliate links, including eBay, Amazon, and others.

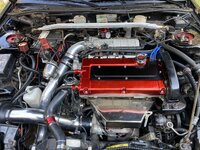
Apparently I forgot I needed the actual tensioner bracket/portion for the compressor belt and there wasn’t one(that I recall. I didn’t look though tbh) on the junkyard laser when I pulled all the A/C stuff so I put out a wtb ad and my (new) buddy @1qkfwd offered to sell me one of his HOARDE of a/c tensioners for a good price. So I snatched one up and it’s on the way.

Got a couple other parts still coming too that I’m excited about. Hope I can get some work done this weekend. Would so help if even one person would help out. Lol. But alas. I’ll get ‘er done.
 
I think it would hit the steering column knuckle tbh. That and I would have to get a longer belt. To be honest though I have no clue. I’ve never thought about that. Supposedly you can use a 2G compressor but not sure about that either. I know guys have ground the cyclone for the compressor and it’s worked in the past though. I’m curious to see what’s needed.

As sad as it would be, if this car makes me choose I will choose A/C over cyclone all day every day. Lol.
Having done this before I recall the cyclone coil pack location will get intimate with the AC compressor at least on my galant VR4. Had to use a home made coil pack bracket same location just moved to clear. And the manifold bracket clearanced some. Finding a JDM ac compressor would make life so much easier but I did not want to mess with working AC so I made it work. It was a pain in the ass but would do it all over again as you said. So much usable torque with cyclone.

IMG_0258.jpeg


IMG_0256.jpeg


IMG_0255.jpeg


IMG_0251.jpeg
 
Got these bad boys in today from Paul Volk aka @99gst_racer and they look great. I may end up outright buying the rear engine mount to match but I’ve got the OEM rear with a prothane insert so I may just go with it. Either way, stoked for these.

IMG_4616.jpeg

IMG_4618.jpeg


Having done this before I recall the cyclone coil pack location will get intimate with the AC compressor at least on my galant VR4. Had to use a home made coil pack bracket same location just moved to clear. And the manifold bracket clearanced some. Finding a JDM ac compressor would make life so much easier but I did not want to mess with working AC so I made it work. It was a pain in the ass but would do it all over again as you said. So much usable torque with cyclone.

View attachment 700428

View attachment 700429

View attachment 700430

View attachment 700431

Now this is the info I need. Good to know! I’m sad I’ll have to get rid of the OEM Cyclone coil bracket but that’s a small price to pay. I too would love to find the JDM compressor but no idea how I would do that. Lol.
 
This came in today. It was greasy but I could see the potential.

IMG_4631.jpeg

IMG_4630.jpeg


Let’s do something about all that grease. Insert the power of dawn and degreaser with a scrub brush or two. And bam! Final product.

IMG_4627.jpeg

IMG_4628.jpeg
IMG_4629.jpeg


Looks brand new, man. I know it’s overkill but it just didn’t feel right to leave it greasy. Plus now you can see all the zinc coating on the bolts. Love it.

Gonna borrow a grinder and then tomorrow in the early AM get all the AC and cyclone fitted together ready to go. Then Sunday ideally would like the exhaust bolted fully up and the wires at the ecu fixed and installed.

From there I just need some t bolt clamps, fluids, battery, and start it! :D
 
I hate that bracket. Installing the two bolts blind.

I’m gonna install it before I install the IM so HOPEFULLY that helps be not as bad. To be honest though I’ve never had a 1G with AC so I have no clue what I’m in for. Lol.

But, while cleaning it, it bit me.


IMG_4633.jpeg
IMG_4634.jpeg


Just a love nibble to show me whose boss. Don’t worry Black Betty, I know who’s boss. Lol.
 

Yep. And just like literally everyone else that stubs their toe or gets a sore finger I called 911 and said I was dying and needed help immediately.


:p


But I’m painting/refinishing the fuel rail because I’m sick of it. Here’s some before and during. The after pictures will come later as I don’t have the paint I need.

IMG_4640.jpeg
IMG_4641.jpeg
IMG_4642.jpeg


Bleh. Someone attempted to paint it at least but did a terrible half ass job. And it’s starting to rust through like everything else. Lol.

IMG_4643.jpeg

IMG_4644.jpeg
IMG_4645.jpeg


During. I didn’t get it perfect because I’m gonna prime and paint it. I can’t leave it chrome(even if it looks good) because it’s 1) not worth the effort to make it perfect(see jafros polishing videos) 2) it’ll just rust and fade immediately thanks to floridas heat and humidity and salt in the air.

But it does look good doesn’t it.


However if you want a spoiler just go check out my old blue talons build thread and see what I did to his fuel rail. It’s gonna be the same color and everything.

Here’s the post. It’s gonna look just like this. The idea is brand new OEM looking.
 
Last edited:
Not near the amount of progress done today as I was hoping. I got the car jacked up and stable, then thought it'd be relatively simple to just bolt the bracket on and get everything installed...boy was I wrong. This car fights me on the weirdest stuff, I swear. Went to bolt the bracket up and yeah...not happening. A wasp nest was built next to and into one of the upper bolt holes for the bracket, and then the others were a victim of crackhead Dale spray painting the engine block with no regard for taping off holes, so none of the bolts wanted to thread in at all. I fought with some nylon brushes, penetrant, elbow grease, and the OEM bolts for hours, with no progress and a fear that I'd strip the bolts if I pushed hard to tighten them in. So I caved, and bought an autozone tap and die set for $35 thinking I'd use it to clean the threads. Easy right? But that was a disaster as well. As always.

Went to chase the threads with the tap and for whatever idiotic reason, the M10x1.25 tap was just either made incorrectly, or was the wrong size. Because it would not thread into the hole at all, and when I checked a nut on it, it wouldn't thread on the nut. In fact, it stripped one of the four corners of the tap completely! Like...are you kidding me? These are supposed to be "carbon steel". F**king chinese cheap s**t. I'm still annoyed by that tbh. Like...how do you call yourself a quality chad of a tap, and lose to a tiny little intake manifold nut from Japan? Should be ashamed of yourself.

But, I persevered doing what I was doing before, and then got so fed up with it I just sent the damn bolt with my strength and like magic..that was what it needed. Cleaned the threads, all the oil came out, bolts didn't strip...and just like that...the bracket was on.

IMG_4652.jpeg


You have no idea how tempted I was to take a picture flipping it off, but even though it's only like 9:30 at this point, it's already touching 102* heat index with 60% humidity and 90 degrees outside. I was just too exhausted to expend unnecessary energy at this point. So I went back inside and got the AC compressor.

Second discovery of the day which surprisingly didn't bother me, is that the compressor is junk. The pully that the belt rides on is like..coming apart/shedding all of its plastic. The clutch portion spins freely without noise, but the backside of it is also coming apart in ribbons(and had what looks like a black rubber band come off). It looks like someone hit the pulley dead square with a hammer too...so honestly I don't even want to risk it, so I'm not installing the compressor(or the intake manifold) until I can order a brand new compressor. I've got the lines/manifold from this one which is the important unobtainium part, so that's all that matters. (all new compressors for these cars come without the "manifold" on top of the compressor that the lines and stuff bolt to)

Since I couldn't put the compressor on, instead I decided to install the condenser to see what a struggle it would be or what I needed to modify.

Surprisingly..the answer was nothing. The lines definitely required some finagling, and when I get new o-rings and a new dryer the radiator is 100% gonna have to come completely out again, but it fits without modifying any of the piping! So that's cool.

IMG_4656.jpeg

IMG_4658.jpeg


Tight AF on the last picture...but still..it fits! Now that's done, let's throw on the lines.

IMG_4653.jpeg

Rats nest. Oof. That'll change later, but for now...it fits and it's routed! Now for the others.

IMG_4654.jpeg


Beautiful. Gonna tighten 'em down and mount them fully later on when the compressor and IM go on, but I just wanted them routed at least to have the vision.

IMG_4659.jpeg


Finally, in all of it's glory. Feels like backwards progress a little because I'm ripping stuff apart...but as the temperature touches 100* ambient without factoring in humidity(which is 60%+)...I know I'm doing the right thing. This black car, in sweltering temperatures(even with the sun down), is gonna be undrivable on all but freezing days and cold nights without A/C. Which is maybe like...two weeks in Florida out of the year. No bueno amigos and amigas.


Final thought: Dear Christ in heaven can I see why 1G guys just delete their A/C when they modify the car. And if I lived somewhere in the far north where it's never hot, I'd be tempted to delete it. But when I'm sitting at a stop light in the future, windows up and enjoying the ice cold A/C in my vibrating, loud, squeaky 90's Japanese/American sports car...it will have all been worth it.


Appreciate all your views and comments. Thanks for sticking through this giant wall of text and boring pictures. More exciting stuff to come later. Hopefully tomorrow I can mount the exhaust/downpipe, and the rear engine mount.


Other final thought: I legit almost gave myself heat exhaustion which is a very..very short trip to Heat STROKE after that. If yall are gonna be working outside in sweltering heat like this, SIP room temp water the whole time and take constant breaks in the A/C. Like..set a timer every 15-20 mins. It makes progress slow...but I got way too close for comfort and I work in this heat daily wearing a ton of equipment/heavy clothing. I didn't feel the effects until it was almost too late. Don't be like me.
 
Not near the amount of progress done today as I was hoping. I got the car jacked up and stable, then thought it'd be relatively simple to just bolt the bracket on and get everything installed...boy was I wrong. This car fights me on the weirdest stuff, I swear. Went to bolt the bracket up and yeah...not happening. A wasp nest was built next to and into one of the upper bolt holes for the bracket, and then the others were a victim of crackhead Dale spray painting the engine block with no regard for taping off holes, so none of the bolts wanted to thread in at all. I fought with some nylon brushes, penetrant, elbow grease, and the OEM bolts for hours, with no progress and a fear that I'd strip the bolts if I pushed hard to tighten them in. So I caved, and bought an autozone tap and die set for $35 thinking I'd use it to clean the threads. Easy right? But that was a disaster as well. As always.

Went to chase the threads with the tap and for whatever idiotic reason, the M10x1.25 tap was just either made incorrectly, or was the wrong size. Because it would not thread into the hole at all, and when I checked a nut on it, it wouldn't thread on the nut. In fact, it stripped one of the four corners of the tap completely! Like...are you kidding me? These are supposed to be "carbon steel". F**king chinese cheap s**t. I'm still annoyed by that tbh. Like...how do you call yourself a quality chad of a tap, and lose to a tiny little intake manifold nut from Japan? Should be ashamed of yourself.

But, I persevered doing what I was doing before, and then got so fed up with it I just sent the damn bolt with my strength and like magic..that was what it needed. Cleaned the threads, all the oil came out, bolts didn't strip...and just like that...the bracket was on.

View attachment 700653

You have no idea how tempted I was to take a picture flipping it off, but even though it's only like 9:30 at this point, it's already touching 102* heat index with 60% humidity and 90 degrees outside. I was just too exhausted to expend unnecessary energy at this point. So I went back inside and got the AC compressor.

Second discovery of the day which surprisingly didn't bother me, is that the compressor is junk. The pully that the belt rides on is like..coming apart/shedding all of its plastic. The clutch portion spins freely without noise, but the backside of it is also coming apart in ribbons(and had what looks like a black rubber band come off). It looks like someone hit the pulley dead square with a hammer too...so honestly I don't even want to risk it, so I'm not installing the compressor(or the intake manifold) until I can order a brand new compressor. I've got the lines/manifold from this one which is the important unobtainium part, so that's all that matters. (all new compressors for these cars come without the "manifold" on top of the compressor that the lines and stuff bolt to)

Since I couldn't put the compressor on, instead I decided to install the condenser to see what a struggle it would be or what I needed to modify.

Surprisingly..the answer was nothing. The lines definitely required some finagling, and when I get new o-rings and a new dryer the radiator is 100% gonna have to come completely out again, but it fits without modifying any of the piping! So that's cool.

View attachment 700655
View attachment 700656

Tight AF on the last picture...but still..it fits! Now that's done, let's throw on the lines.

View attachment 700654
Rats nest. Oof. That'll change later, but for now...it fits and it's routed! Now for the others.

View attachment 700658

Beautiful. Gonna tighten 'em down and mount them fully later on when the compressor and IM go on, but I just wanted them routed at least to have the vision.

View attachment 700657

Finally, in all of it's glory. Feels like backwards progress a little because I'm ripping stuff apart...but as the temperature touches 100* ambient without factoring in humidity(which is 60%+)...I know I'm doing the right thing. This black car, in sweltering temperatures(even with the sun down), is gonna be undrivable on all but freezing days and cold nights without A/C. Which is maybe like...two weeks in Florida out of the year. No bueno amigos and amigas.


Final thought: Dear Christ in heaven can I see why 1G guys just delete their A/C when they modify the car. And if I lived somewhere in the far north where it's never hot, I'd be tempted to delete it. But when I'm sitting at a stop light in the future, windows up and enjoying the ice cold A/C in my vibrating, loud, squeaky 90's Japanese/American sports car...it will have all been worth it.


Appreciate all your views and comments. Thanks for sticking through this giant wall of text and boring pictures. More exciting stuff to come later. Hopefully tomorrow I can mount the exhaust/downpipe, and the rear engine mount.


Other final thought: I legit almost gave myself heat exhaustion which is a very..very short trip to Heat STROKE after that. If yall are gonna be working outside in sweltering heat like this, SIP room temp water the whole time and take constant breaks in the A/C. Like..set a timer every 15-20 mins. It makes progress slow...but I got way too close for comfort and I work in this heat daily wearing a ton of equipment/heavy clothing. I didn't feel the effects until it was almost too late. Don't be like me.
The heat is real bro
 
It's even more humid today but the same temperature, so yeah. My plans have been thoroughly derailed. I'm gonna be honest with you guys, I was 150% tempted to just bolt the intercooler pipes and IM down so it'd be sealed, and just start it(very short duration) to hear it run. But my wife talked sense into me, and advised that it's best just to take my time and not get impatient. And she's right. I don't like it, but she's right. :p So I'll continue taking my time. It's so freakin' close though man. A/C compressor, o-rings for the whole system, intake manifold bolted on, throttle body bolted on, fuel rail needs painted, then installed. Tighten up all the fittings, tighten up all the (Terrible) worm clamps. Recirc the BOV, fix the wires at the ECU, hang the exhaust, make sure all the vacuum lines are solid, fill with fluids necessary. Buy/Install battery. Final leak checks and prime the engine.


And that's it. That's all there is left to do. The last 1% takes 90% of the time though. And it being heat stroke inducing temperatures outside doesn't help my progress. I need a friend with a garage or a group of people to help if I want it done super soon, otherwise...I'll get it done death by 1000 cuts style.


But, I did get something done. I wanted to finish tightening/actually installing the intercooler pipes and GOD what a PITA. Lol. It's SUPER tight fit with the A/C lines...but it does fit. And without modification.

IMG_4660.jpeg


God what a stupid LICP design. Where it meets the coupler for the turbo outlet, it bends at like 15*...I have no idea why. When I get a custom LICP made I'm just gonna run it straight out almost touching the downpipe/o2 housing shield(maybe have it wrapped), then go 90* into the intercooler. There's plenty of clearance, and it'll 100% clear the OEM A/C fan that way too. But, in the meantime with it like this, it'll start and run at least.

IMG_4661.jpeg


Feels like backwards progress...but it's not. Condenser is bolted in fully, lines are tightened and bolted in fully. Clamps and intercooler pipes from the turbo, to the intercooler, out the cold side under the intake are all tightened down fully. So that's done. Baby steps, man. Baby steps.

Once the sun starts to set, I'm gonna try to hang the exhaust. I want at least that much done before I lower it off jackstands and push it back into its spot. Plus I can't wait to see how it looks. Love this car...but man am I getting impatient.
 
Sigh. I hate being right, and I hate being a prophet.


The downpipe doesn't fit because XXX Performance out of Pensacola, Florida is absolutely inept at fabricating or doing anything but putting H/C/I on a V8. And even then I wouldn't trust them.


What happened is they "fabricated" an o2 housing to match a PTE turbo w/ a 5 bolt flange. And apparently instead of measuring, fitting, testing, and making sure it's all gonna work together, they just slapped something together, bolted it on, and then realized it fit like shit. So what did they do? Modify the o2 housing already built? Hell no! Let's just chop up and modify the THERMAL R&D downpipe and do booger MIG welds to hold it together so that only that exact turbo setup can use that exact exhaust.

Absolute idiocy. Everything they touched looks like a 3rd grader did it in their garage. The gauge install where there was almost literally a rats nest/snake sex pit of wires interspersed through different holes and butt-connected together in separate locations making re-routing them impossible without redoing the entire bulk of wires. Now this buttf*ck of an exhaust they've screwed over.


So yeah. 1% to go is gonna take 90% longer than the rest. Sigh. Not even gonna bother trying to get it running anytime soon. Guess I'll save up for a month and just flatbed the truck to a local fabricator and have him actually do the quality welding/fab work this car needs. THEN maybe I can get this poor, abused, neglected bird to fly again.


Edit: On a more positive note, I have a date set with the fabricator. This thursday(as in like 4 days) he's gonna come pick up the Talon, and fab me my IC pipes and fit/weld the exhaust so it's pretty. So yeah. All clouds have silver linings. I'm legit excited for the quality work this guy does. Check out JDM-R Fabrications on Facebook for his work. It's insane. It's gonna be right what the car deserves, and it'll allow me to keep both OEM cooling fans!
 
Last edited:
So much better. It's dirty AF(the car) but this is what I wanted. Black and clear. Now I just need some yellow bulbs so they function correctly as indicators. Still though, love it.

Clear corner lenses.jpg
 
In preparation for my fab guy coming to pick up the car, I bolted up the intake manifold (with like three bolts) and the throttle body/TB elbow too, so he didn't have to guess as to where the pipe would end up. That way everything's right there. It's also all like finger-tight so he can loosen it/take it off if for some reason he needs to.

IMG_4681.jpeg


I'm glad I'm getting some fab work done on this car, because this is straight idiocy from Mishimoto. These mounts for the driver's side cooling fan are like 1" too long, so it spaces the fan out a metric ton and leaves a 1/2-1" air gap all the way around the fan. I guess you could fill the space with some kind of foam, or some tape or something, but that's dumb. If you didn't, the fan wouldn't function worth a damn(it'll pull air in from the engine bay, and not through the radiator like it should).

IMG_4680.jpeg


So what I'm gonna have him do is just cut these stupid little mounts off and weld some studs there. That way the fan mounts flush to the radiator like it should, and it'll give like 1" more room for piping in an already cramped space. Win-win. Dumb that this has to happen though. Just weld studs in next time, mishimoto. Easier, cheaper, much better. The passenger side is fine though.

But yeah, after today car will be gone for a few weeks(ish) so no real updates until it's all done and back in my possession. Then it should be honestly ready to start. Because the IC pipes bolted fully up, the fan bolted down, and the exhaust being on is all really that remains/needs to be done. I'll put the A/C compressor on and grind on the IM when I have a new A/C compressor. But regardless, I am excited.
 
Well, it's off to the fabricator. I gotta say it looks really good just sitting there on the pavement. Soon, Black Betty, soon.

IMG_4684.jpeg

IMG_4686.jpeg
IMG_4689.jpeg
IMG_4690.jpeg


Bittersweet. Kinda weird seeing someone drive off with your car, but I can't wait to get it back and see his work. When it's back, it's only a few more minor things to button up and get ready!


One weird thing I noticed...the car leaks in the inside from around the driver's side sunvisor mounting area. Wtf? This car never had a sunroof and the skin has never come off...could the windshield itself be leaking? Guess I'll have to drop the headliner off the car when it gets back and look for anywhere it could leak. I've never seen that before.
 
No updates really as of yet, still waiting on piping and stuff I assume. Probably reach out after this weekend and see what's up.


But in the meantime, these fell into my lap from a local. Wait until I tell you how much I paid for them.

Megan Street Coilovers.jpg


Megan Street-series 32 way adjustable coilovers. Pretty low miles, just a little surface rust in some spots. But, for the price I couldn't say no.


$150! I about died. I'm trying to save money for the IC piping but this was too good of a price to say no to. Even if I hate them, I can just swap them out for GR2s and Tein S-techs which I know for a fact ride incredible and make it nice and low. So, win win. But, I'm excited to have some actual coilovers for it and see what difference that makes.
 
Why even use that elbow if you have this guy making you new piping? The generic angle of those elbows is terrible. Also i would ask for a v band off of the o2 housing to match up with the downpipe if i were you. Makes removel in the future so much easier and no gasket needed.
 
Add Value - Be Respectful - No Trolling - No Misinformation - Participate Often!
Support Vendors who Support the DSM Community

Latest Classifieds

Back
Top