The Central Hub for DSM Community and Information

For 1990-1999 Mitsubishi Eclipse, Eagle Talon, Plymouth Laser, and Galant VR-4 Owners. This is where the DSM platform history is documented and archived. Log in to help us in our mission, and to remove most ads from the browsing experience.

Talon and Vette 10_03_24.jpg

Altered Mental Status (1G AWD 5spd)

Old street racing legend reborn

This site may earn a commission from merchant affiliate links, including eBay, Amazon, and others.

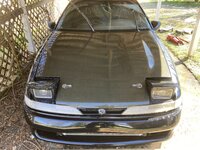
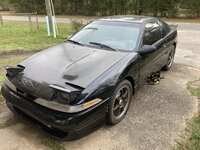
From here the letters look good, what’s wrong with them?

I like the scheme too!

Masking tape failure due to humidity so some black crept in. In person you can see faint black swirls in the red. I want it to be a brighter/more “clean” looking red.
 
Well here it is all finished and satisfactory. I’m still gonna apply just one more coat of red and gonna hit the silver with a polishing wheel, but so far I’m happy with it. Much better now.

IMG_4554.jpeg


Might be hard to tell a difference, but I can see it. In person you could too. Once it cures for 7 more days I’m gonna hit it with high temp clear to seal everything and make it just a little extra shiny.
 
Alright. Polished the area around the cyclone letters and added another coat on the letters. Stick a fork in her, she’s done.

IMG_4558.jpeg


Hopefully gonna install this thing soon. I’m gonna try to start it next week.
 
View attachment 699222
View attachment 699223Well, it’s finally done boys(and girl). With this one last interior trunk panel, the interior is finally 100% factory. It’s not perfect, but it’s all there. Including the little trim panels that cover the ecu/tcu area that I didn’t know existed. It’s like a cherry on top.Feels so good to complete a project and cross off a goal I had. Thanks to everyone who helped out with everything.Now it’s time to fix a few wires, get it all filled with fluids and pop a battery in her and start it. :hellyeah:
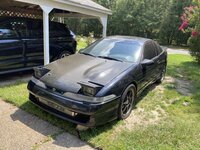
Also: I've decided it's 100% getting coilovers. I'm not gonna just replace the struts and springs. I can always do that in the future if I hate the ride of the coilovers. Anyone got any recommendations for a street-focused coilover that's quality? I'd like something that doesn't rip my teeth out over every tiny bump. It's never gonna be a corner-carving monster, but I don't want it to float like a caddy either. I liked how the stock springs and Tein S-Techs rode, but when launching they were just too soft in the rear. Real world experience appreciated!
Check out the ones Tina
Alright. Polished the area around the cyclone letters and added another coat on the letters. Stick a fork in her, she’s done.

View attachment 699613

Hopefully gonna install this thing soon. I’m gonna try to start it next week.
Damn, nice job, it turned out great!
 
Alright. Polished the area around the cyclone letters and added another coat on the letters. Stick a fork in her, she’s done.

View attachment 699613

Hopefully gonna install this thing soon. I’m gonna try to start it next week.
I've always wanted one of these. Does this one have butterfly valves in the split runners? how are you going to open them? The color even matches my setup! (you should sell it to me)
 
Well, I did some more painting. I can't have a nice freshly painted Intake but a rusty coil pack, so I got to doing stuff.

Before.

IMG_4559.jpeg
IMG_4560.jpeg
IMG_4561.jpeg


Rusty AF, but the coils are clean and not cracked. Kinda cool. But, instead of messing with sandpaper and any of that crap, I just took a wire wheel to it. This metal is like carbon steel or something because you can't even see any scratches from the wheel. In fact, it was taking tangs off my wire wheel! Lol. But, after getting all the rust off, and hitting it with the usual high temp engine enamel primer and silver, this is how she looks.

*cue stupid royalty free youtube music*

IMG_4564.jpeg
IMG_4565.jpeg
IMG_4566.jpeg
IMG_4568.jpeg


I didn't touch the coils themselves or anything related to it, so the little tachofilter on it is still a leeeeetle rusty, but that's so tiny you won't see it from how it'll be angled almost near the firewall. This thing has come such a long way, and I'm stoked to have this thing. It also answered someone elses question in another build thread as to how the cyclone mounts the PTU for the coilpack. The next picture shows how.

IMG_4569.jpeg


Kinda neat! But yeah, I didn't touch the vacuum actuator either because those diaphragms are super finicky and the less I piss it off, the better. So I left it untouched.

I've always wanted one of these. Does this one have butterfly valves in the split runners? how are you going to open them? The color even matches my setup! (you should sell it to me)

Yep! It has the butterflies(the actuator was missing in the prior pictures because I took it off to paint the manifold. Didn't want paint getting on the sensitive and easily tearable diaphragm) and everything. I'm gonna actuate it the same way the JDM ECU actuates it, and that's with the vacuum canister(same as what came on a dodge dakota) and a solenoid(in my case, the fuel pressure solenoid) and controlled by ECMLink. Gonna shoot for the butterflies to open around the 4500rpm range and we'll see where it likes them opened the most. And Lol. I got a screaming deal on this from my buddy in South Florida. It sat for weeks on facebook marketplace with no bites, and I finally was just like "alright, screw it, I'll take it".

If I end up not liking this with the FP Green, you're first on the list if I sell it!
 
Well, I was determined to do something car related today, so I mocked up the cyclone. Good god in heaven am I glad I did this now, because the bolts that were on this thing SUCKED. They were like...non-stainless 6mm allen head bolts so they were rusty as a MF'er and were so thick that nothing but a small little L shaped allen wrench would fit on there. Trying to get to the last bolt above the starter but below the runners was nothing short of torture. Lots of curse words and "really? Like...really?" were uttered, but I was victorious. Now...behold!

Cyclone Installed (1).jpg

Cyclone Installed (2).jpg


No idea how water spots got on the heatshield but whatever, I'll clean that later when I pressure wash the engine bay.

I'm also 150% pulling that fuel rail to strip it and paint it the same color as the coilpack bracket.

But MAN! Does that look great(at least to me). I was worried about the black and how it would tie with the valve cover, but I think it really helps the aesthetic. Plus it breaks up some of the red. It's only "bolted" in with the two nuts on either side, because I need 1) new intake manifold gasket 2) new bolt kit 3) more injector seals for my FIC injectors(someone really screwed this up by slamming the fuel rail down tight before making sure the lower seals were flush and almost cut one in half. Would've been a hell of a boost leak), so it makes no sense to bolt it all up yet.

Also, I am so glad I did this. I brushed against the fuel feed and fuel drain AN fittings and they moved. They were finger tight! 😱 The fuel leak this would've created..and all over my freshly painted intake and VC! Not to mention possible fire!

Just more assurance that I need to slow down and make sure every single bolt everywhere is tight and fine. Meh. That means along with dropping the oil pan, I'll have to pull the timing cover off and make sure the timing stuff is tight. :(

But, it's coming along at least. Love how this engine looks now. Can't wait!
 
Looking good. I ran a Cyclone for 10 years and loved it. The install is brutal with the way the runners sweep downward after the flange.


Oh I know the nightmare coming/I know your success with the Cyclone. I remember your posts from DSMTalk. :D 
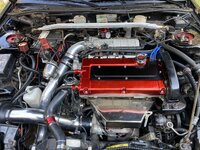
I had a Cyclone about 10 years ago too, but had it actuated via TunerPro/Jackal. I had an automatic gray 1G with a molded in body kit from a previous owner, and honestly that car was so much fun on the street. Cyclone and eGay 16G ripped on the street.

But, thanks for all the love everyone. I'm tryin' my best here. :p
 
Bought some stuff. Some new things from JNZTuning, some used things from Paul Volk(nothing tubular or anything he’s made, sadly. Yet. ;) )

But I’ll update it when I get some more work done. Next week is my slow week(only work two days) so hopefully I can DO WORK, SON. :p
 
Can’t wait for that first start/idle video:). I’m also curious how the cyclone/Green combo will work, I think it’ll be awesome for a street car!

I'm really hoping so! I'll post lots of videos and logs to show spool time/characteristics.


Also: I really need to stop buying parts for this thing. Every time I tell myself I'm gonna save money, a rare part pops up in my feed and I have to pull the trigger. I really think this new thing will MAKE the exterior 100% better(other than a new paintjob that is).
 
Man did I score at the junkyard today. Look what I found!

IMG_4594.jpeg
IMG_4595.jpeg

IMG_4596.jpeg
IMG_4597.jpeg


Complete A/C system for a 1G! Every line, condenser, compressor, bracket, bolts...and for only $105! So stoked about this. This was the last piece of the puzzle as far as the engine bay was concerned, so now that DSM will officially have A/C too. The important bits I need are all there, if the compressor is bad or the condenser leaks, they still sell new units so I can replace them. The bits they DON'T sell are any of the non-suction lines, and the manifold that bolts on top of the compressor. I also scored these for $Free.99

IMG_4592.jpeg


OEM Intake Manifold bolts in near-mint condition. They still had the factory sealant on the threads! You can still see the zinc coating!

Overall, extremely productive trip. Scored like $500 worth of used parts for $105. Totally unexpected.
 
Something that's small but I've been waiting for, forever, came in today.

IMG_4598.jpeg


4.5" ID K&N airfilter. This was surprisingly hard to find. Every example I found either had the terrible "kill-your-turbo" metal cap on the inside of the filter because it was that terrible ebay style, or it was $90. I'm not paying $90 for an air filter. There were other 4.5" filters that were like 6+ inches long, but I remember specifically the dejon intake pipe being SUPER finicky with air filter length on a 1G w/ the 2G MAF Dejon pipe. So, after hours and days of research I found the OG airfilter part # Dejon used for his kit. It's the K&N RU-1005 if anyone else is curious or needs it. With this filter and some finagling/shoe-horning you can fit upgraded SMIC pipes w/ this pipe. It's tight, but it'll fit. (that's what he said?)

Test fitting in the engine bay looks great. Just gotta tap some threads into the filter adapter so I can actually bolt it on.

IMG_4599.jpeg
IMG_4600.jpeg


Woo hoo! Progress. Soon as the gaskets get here I'll rip the cyclone off and install everything. I may install the A/C compressor and see what I need to grind to fit the cyclone on top of it. Not gonna lie...this is gonna suck. But..it's worth it.
 
MAF and an atmosphere vented BOV is hurting my head

Cars not running yet, old man. :p

Plan has always been to recirc it until it goes SD. That's why I bought the Torque Solutions recirc fitting(it was VTA due to SD and AEM EMS before). But, that's at the bottom of the list of priorities. When I'm ready I'll turn the BOV to point at the intake pipe and grab some universal heater hose.


Edit: It's buried but at the very end of THIS post is where I installed the Torque Solutions adapter. However, it's 150% gonna be VTA when I go SD. Young me liked a good BOV salute. Lol.
 
IMG_4613.jpeg


There is something so intoxicating about new OEM gaskets. JNZ Tuning even sent them in a Mitsubishi branded box! I’ve run out of time so not gonna install anything this week but this weekend I’m gonna install all the A/C stuff and then grind/fight with the cyclone until it fits together. I’m in for a bi*** of a time. But it’ll be worth it in the end.

More parts coming Thursday. Woo. Lol.
 
I'm wondering if studs and nuts would be a better solution for the cyclone manifold.

I’ve thought about that myself. I’m not super duper worried about putting the cyclone on per say, I’m worried how much I’m gonna have to grind on it and/or my A/C compressor because the cyclones don’t clear the USDM 1G a/c compressor. The JDM Engine these came on had a smaller one they used. I’ve never kept a/c in a cyclone engine so I have no experience with it. I’m sure it’ll be a beeyotch. Lol.
 
I’ve thought about that myself. I’m not super duper worried about putting the cyclone on per say, I’m worried how much I’m gonna have to grind on it and/or my A/C compressor because the cyclones don’t clear the USDM 1G a/c compressor. The JDM Engine these came on had a smaller one they used. I’ve never kept a/c in a cyclone engine so I have no experience with it. I’m sure it’ll be a beeyotch. Lol.
How close is the fire wall on a 1G? Can you use spacers and longer bolts to mount the compressor?
 
How close is the fire wall on a 1G? Can you use spacers and longer bolts to mount the compressor?

I think it would hit the steering column knuckle tbh. That and I would have to get a longer belt. To be honest though I have no clue. I’ve never thought about that. Supposedly you can use a 2G compressor but not sure about that either. I know guys have ground the cyclone for the compressor and it’s worked in the past though. I’m curious to see what’s needed.

As sad as it would be, if this car makes me choose I will choose A/C over cyclone all day every day. Lol.
 
Man I wish I had the motivation you have! Keep up the great work!

Thank you my friend. I’m definitely trying. I wanna hear it start and drive it already. But, gotta make sure it’s all done right. Lots of little stuff add up.

Hopefully I can button everything up this weekend and either start it or get it ready to start.
 
Add Value - Be Respectful - No Trolling - No Misinformation - Participate Often!
Support Vendors who Support the DSM Community

Build Thread Updates

Latest Classifieds

Back
Top