The Central Hub for DSM Community and Information

For 1990-1999 Mitsubishi Eclipse, Eagle Talon, Plymouth Laser, and Galant VR-4 Owners. This is where the DSM platform history is documented and archived. Log in to help us in our mission, and to remove most ads from the browsing experience.

Talon and Vette 10_03_24.jpg

Altered Mental Status (1G AWD 5spd)

Old street racing legend reborn

This site may earn a commission from merchant affiliate links, including eBay, Amazon, and others.

Why even use that elbow if you have this guy making you new piping? The generic angle of those elbows is terrible. Also i would ask for a v band off of the o2 housing to match up with the downpipe if i were you. Makes removel in the future so much easier and no gasket needed.


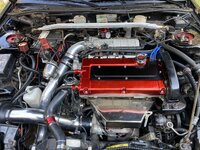
I think you missed some details. I’m using a stock o2 housing to what should be a perfectly fitting thermal R&D downpipe. But the fab shop in question cut the downpipe to fit the “custom” o2 housing for the previous turbo setup(instead of just making a nice fitting o2 housing in the first place). That turbo setup and o2 housing are long gone now. Car now has an FP Green and 2G o2 housing.

He has the downpipe and is going to be fixing their terrible hack job so the downpipe fits again with some quality stainless steel. And I’m not paying for a custom tubular o2 housing on this car just to do a v-band for the downpipe. It’s gonna need a gasket anyway for the turbo side because it’s a mitsu flanged hot side so what’s one more gasket? And I’m also not about to put a tubular o2 housing on it due to being almost psychotic about engine bay temps(this car is gonna have working A/C, is all black, and is gonna live in Florida where just this week temps were 100* without factoring the 80% humidity in, so tubular manifolds and o2 housings are a no go).


Got them in my possession today, and immediately degreased them. They didn't come with the wrenches, so I'm gonna have to source that somehow. But, I think they cleaned up amazing! One of them had either anti-seize, or brake fluid spilled on it so it ate the paint/anodizing off of it, but eh. For what I got them for, it's honestly okay if one is blown and needs replacing. Either way I'm stoked.

Coilovers (1).jpg

Coilovers (2).jpg
Coilovers (3).jpg
Coilovers (4).jpg
Coilovers (5).jpg


Stoked to use these. No idea what adjustments does what though. Lol. Either way though, should be fun.
 
Fabricator teased me with some pictures today.

IMG_4779.jpeg

IMG_4780.jpeg
IMG_4783.jpeg
IMG_4782.jpeg


Good god, I’m in love. Cannot wait to see what he does with the exhaust and the lower pipe. This 100% cements that I’m gonna need to pressure wash/clean the engine asap. These pipes look way too nice for a drab engine bay.

Final shot he sent though saying she looks good in his shop. I tend to agree. :cool:

IMG_4785.jpeg
 
Last edited:
Getting antsy. I know it’s a weird thing to be attached to but I find myself really wanting to install my coilovers. Bought a set of wrenches for them since these didn’t come with any. Still have to install the motor mounts I got from Paul Volk too. Going on vacation to Atlanta the weekend of the 7-11th, so it’s probably not gonna happen before then. But when I get back, gonna really push to finish and start this thing.


Here in a couple months it’ll be boost season in Florida, and seeing as how I work from 1800-0600, my drive home in the morning will be the coldest time of the day. Can’t wait to rip it home and drive it. Just gotta be patient.

The rough draft of the list, in no order, is basically now.

Button up exhaust
Button up all intake and turbo pipes
Recirc BOV w/ custom tube
Drop tcase
Remove oil pan/check main and rod bolts for f*ckery
Reinstall both said above
Fix drain line leak at oil pan
Install AVID engine and Trans mounts
Install coilovers
Install A/C compressor
Modify and install cyclone IM for A/C
Fix five wires at ecu/install ecu.
Recheck gauge wiring
Install battery
Set settings in ECMLink
Shorten/Fix fuel feed and return lines
Fill it with fuel
Bleed clutch and maybe brakes again
Prime engine


And that’s it. Maybe a few weekends of 100* heat and 90% humidity but it’s not very much. God I wish I had a garage or knew someone who’d let me use theirs. Either way, I’m so ready to revive this poor bird. You’ve been asleep for far too long!
 
It does look close to that downpipe tube in that spot.
But I also see why he made it like that. To clear the fans with no issue by how it looks.
It all looks good. Wish I could do that kind of welding at home. Save me also from tryin to find someone to make me done intercooler piping.
 
Looking good! Hard to tell how much clearance there is under the fans, probably not much with their shrouds. That's why it's so close to the DP with the coupler there. Definitely need to wrap that DP!

1st start, coming soooooon!
 
It does look close to that downpipe tube in that spot.
But I also see why he made it like that. To clear the fans with no issue by how it looks.
It all looks good. Wish I could do that kind of welding at home. Save me also from tryin to find someone to make me done intercooler piping.
Looking good! Hard to tell how much clearance there is under the fans, probably not much with their shrouds. That's why it's so close to the DP with the coupler there. Definitely need to wrap that DP!

1st start, coming soooooon!


Appreciate it fellas. I liked it at first but then it bugged me how close it was to the downpipe. Guess I need to invest in some header wrap now. I also was worried about the coupler melting that close to the downpipe. Wonder if I can build a little heatshield for the downpipe. Wouldn’t be hard.

Thanks fellas.
 
I bet that picture is a little deceiving, I'm sure it will be fine. Just wrap the first part of the downpipe like already mentioned. Went and looked at a picture of mine and it looks fairly close but I have never had an issue. Progress!

What is the name of that shop? Are they in Pensacola? I have been wanting to redo my exhaust for sometime and I'm over trying to do it on jack stands.
 
Hey man seen your listing some stuff in the classifieds that I believe was for this build.

Hope all is well and you can figure out to keep the car progress coming eventually after priorities are taken care of.


Good luck, Daniel 👍🏼

Yeah. A/C went out in my edge right after I dropped almost $2k on a vacation that’s non refundable. So I had to liquidate some things to help pay for the repairs. When it rains it pours. I’m also dealing with some hemorrhaging problems so that’s annoying as well. I’m not anemic…yet.
 
Oh no. What broke on the edge to cause ac to stop working. I haven’t seen many issue in them yet with ac work. Other than some condenser’s and compressor go bad.

Man you called it. The condenser cracked. It was a brand new part from a Ford dealer, only about 2.5 years old, and it cracked right where the dryer is. I was astounded.
 
Car got delivered today. Very pleased with the work. It just got too dark and mosquitos turn into Al Qaeda after dark around here, so pictures tomorrow. It’s so close now that it’s insane.

But yeah. Not too long now.
 
Car is home, and man it’s hot AF outside dude. What a terrible time to not have A/C. Bleh.

Anyway here’s pictures.

IMG_4830.jpeg
IMG_4831.jpeg

IMG_4832.jpeg
IMG_4833.jpeg
IMG_4834.jpeg


At least she looks good.
IMG_4835.jpeg
 
Last edited:
With this heat and A/C problems this just assures me I made the right decision putting A/C in the Talon. Weird IC pipe and possible coupler issues beat the hell out of 100* + 90% humidity in a black car with no A/C.


And I am just straight in love with the upper intercooler pipe. So, it’s worth it.
 
You for sure made the right choice. It’s worth the extra investment. I’ll be having AC in mine for sure also.

For sure!


But, he did a lot more than just IC pipes and exhaust fitting. He straightened out my core support so it’s flush now, and he cut the standoffs for the AC fan so it mounts almost flush to the rad now. Before there was about a 1” gap all around, or maybe slightly more because the standoffs were way too tall. The fan was super close to the turbo, close enough to make me worry that heat would kill it.

He also put in all new DP gasket, nuts, and fixed my drain without asking so it’s all buttoned up and ready. Really went above and beyond.

His name is Robert(Paulson!) Watson. His fab shop is JDM-R Performance but you’ll never find his shops FB page as he de-listed it and it’s invite only. He’s on FB though as Rob likeaboss Watson. Really happy with the quality of his work, and the price was waaaay more than fair. (Less than $1000 for everything seen. Including back-purged welds for the IC pipes!)
 
Wanted to do something on the dsm today, because it was only a realfeel of 98*(100% humidity).

I put the amber turn signals on before the car went to the fabricator, because I didn’t want my Uber rare clear corners damaged in a freak accident or during transport or in the shop, and in the meantime with the car gone I ordered the proper turn signal clips from 3dcreations.

Now that it’s back, let’s put them on! The clips required some sanding to get them to properly fit but I did buy the cheaper “unfinished” ones. So the finished ones may fit better.


But yeah. While I was out there, I had some company. Just some cool cats, some neighborhood kids. They thought the dsm was cool too. :cool:

IMG_4841.jpeg


So much better. Love these clear corners. I need to order/find some amber bulbs for them though so they actually blink yellow/amber instead of white, but for now it completes the look.

But it bears repeating…Jesus wept it’s too hot and humid to do anything outside. 15 minutes of super easy light work and I soaked a shirt in sweat. I’m legitimately considering building a garage or some kind of janky four walled car port with an A/C window unit in it because it’s downright unsafe. For reference, this is the coolest part of the day. It’s only 87*. Hottest part is 3:00pm/1500!! At this rate I honestly may have to start working on this thing at night.


But, bellyachin’ aside, here’s a before and after for y’all. Love this thing.

IMG_4835.jpeg

IMG_4842.jpeg
 
Finally getting around to painting/reconditioning the fuel rail. It's turned out awesome, man. I'm letting it dry/cure now, and when it's done I'll post up the obligatory pictures. Really happy with it though.


Also: no vague comments or etc, just gonna announce it I'm buying another DSM. :D I just can't help myself. Lol. When it's fully ironed out and in my possession I'll post up pictures/details and its own separate build thread. It's an auto, so woo.


But yeah. Gotta pay for the Edge's A/C to get fixed, get through vacation for my daughters 4th birthday in the first week of Sept, but then after that should have free income for the new addition, and getting this thing running. In the meantime, plenty of stuff to do. Gonna pressure wash the engine bay, paint various brackets/eye sores, basically make the engine bay match the pretty AF new intercooler pipes. Also: I hate how easily these cars seem to leak. Looks like I'll probably have to remove the spoiler on the hatch and make sure all the bolt holes are sealed. And find the leak around the windshield area that's leaking in through the sunvisor of all places. Anyone know how difficult it is to remove the headliner?
 
Well, it's done sooner than expected, so that's cool. This took forever because I just got distracted honestly, and didn't have time for it. Well, I had some freetime today and finished it. This fuel rail was in rough shape, man. It was pitted and "rusted" (or what passes for rust on aluminum) on one side, and spray painted black on the other side.

IMG_4640.jpeg

IMG_4641.jpeg


So I took a nice wire wheel and completely cleaned it down to bare metal, and did a little sanding to smooth away the wire wheel marks and gouges. I didn't get it perfect, but wanted it "good enough". It's a solid 5 footer, like the whole car really. Lol. It's in bare metal form in these pictures...I can't leave it like this, because it'll just gall up/rust all over again due to the salty air.

IMG_4644.jpeg

IMG_4645.jpeg


Now let's hit it with some 500* engine enamel primer, and some 500* engine enamel "cast iron" color. Let it dry in some 100* ambient temps and bam!

IMG_4855.jpeg

IMG_4856.jpeg

IMG_4857.jpeg


Looks so much better. Almost like brand new. Love it. But, two things.

1) The injector portions of the rail were masked off so that no paint would get inside the rail at all. You won't really be able to see those portions when everything is all bolted together.

2) It's been coated in 500* engine enamel gloss clear, so the "unpainted" portions are protected from rusting.


Overall...huge improvement from before! Night and day difference. Here's a quick before and after with the same pictures.


Before

IMG_4640.jpeg


After!

IMG_4855.jpeg


It's the little things. Next up is all the brackets and random stuff in the engine bay that's rusted/discolored is gonna get the same treatment. Anything that's supposed to be black will be sanded and painted black, anything silver/gray/cast, is gonna get this color treatment. Long process...but I got some time to kill. :D
 
Add Value - Be Respectful - No Trolling - No Misinformation - Participate Often!
Support Vendors who Support the DSM Community

Latest Classifieds

Back
Top