The Central Hub for DSM Community and Information

For 1990-1999 Mitsubishi Eclipse, Eagle Talon, Plymouth Laser, and Galant VR-4 Owners. This is where the DSM platform history is documented and archived. Log in to help us in our mission, and to remove most ads from the browsing experience.

Talon and Vette 10_03_24.jpg

Altered Mental Status (1G AWD 5spd)

Old street racing legend reborn

This site may earn a commission from merchant affiliate links, including eBay, Amazon, and others.

Decided screw it, just gonna enjoy my weekend and suffer through not driving the car for another week or two.

Translation: I ordered the ball joint press kit and bearing separator and removal kit online, and I'm just gonna wait for it all to arrive. That way I can do everything I need at once. I dunno if I'll ever use any of this stuff again, but if a local DSMer needs to change his wheel bearings or a ball joint then my time to shine.


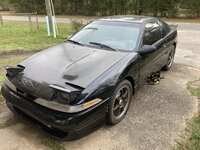
But yeah. Dang it man, I was really starting to enjoy driving this car. Ah well.

If it still makes the same noise though...what would it be? Rear diff? Something else?
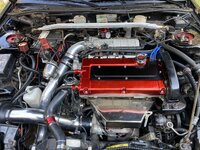
 
Well, the bearing splitter came in today so I decided to test it out. It works amazing, and as a bonus it actually pulled the bearing, and both dust shields off at the same time. Which is great because I'm replacing them with new OEM ones anyway.

IMG_7504.jpeg


:) Looks great. I can't do the other one until I get a replacement in the mail, but USPS is being even more idiotic than usual so I'm hoping it actually makes it to me. Have something coming from Utah that got tracked to a warehouse in Utah, then has sat there for 7 days now. USPS refuses to let me file any claim until Friday, and theres no expected delivery day anymore. I swear I hope DOGE guts USPS. They're useless anyway.

Anyway, while I waited for that, I decided to clean the holes in the trailing arm/knuckle that houses the spindle.

Driver's side.

IMG_7505.jpeg

IMG_7506.jpeg


Turned out mint. Squeaky clean, man.

Passenger Side

IMG_7507.jpeg

IMG_7509.jpeg


I focused the first picture on the rust spot that remains even after a scotch-brite pad and thorough elbow grease was applied, but these wheel bearings were installed "brand new" and then the car sat for years and years. It has only been driving since I've driven it. I wish I'd have gotten a before picture so you could see how filthy these holes were. They were never cleaned, I'm convinced the shop that did it just knocked the old bearings out and slammed new bearings in and sent it without cleaning anything.


Anyway, once I get the ball joint press kit and the new(to me) spindle, I'll slap it all back together and get her rolling again. Completely at the mercy of the United States Postal Service though, so we'll see how that goes.
 
I'm getting so tired of going to fix things on this car and breaking shit or finding shit broken to the point where the car is down for weeks. I feel like less damage would've occurred had I just kept driving the car and whatever was making the noise would've fixed itself or grenaded.
These cars are at the age where everything is starting to fall apart, even if you're nice to it. Keeping up with one of these is not easy if you're modding it and trying to use it as a daily (or near daily) driver. It's even more difficult if you're starting with a well-used car that needs reconditioning. You need to be willing to have a car that won't get used for extended periods of time so you can do things the way you want them to get done.
 
These cars are at the age where everything is starting to fall apart, even if you're nice to it. Keeping up with one of these is not easy if you're modding it and trying to use it as a daily (or near daily) driver. It's even more difficult if you're starting with a well-used car that needs reconditioning. You need to be willing to have a car that won't get used for extended periods of time so you can do things the way you want them to get done.


It's my process. I go to replace one thing, when I go to fix it I discover something else(or something related to it breaks by my own fault) which stops me, so I rage against the machine. Then I'm calm and just fix everything I've seen with new stuff, then enjoy driving the car for a awhile before the process repeats itself.


I don't even threaten the car with being sold anymore. I just rant and then accept my fate. :p


Thankfully, this is nowhere near a daily driver. It's just nice having another vehicle, plus the weather is perfect right now. Which in this part of Florida, is extremely rare. You have like a period of 2 maybe 3 weeks where the weather is ideal. Before that is bitter humid cold, and after that is 100* + mid/high 90 % humidity summer. :p
 
Well, the bearing splitter came in today so I decided to test it out. It works amazing, and as a bonus it actually pulled the bearing, and both dust shields off at the same time. Which is great because I'm replacing them with new OEM ones anyway.

View attachment 759468

:) Looks great. I can't do the other one until I get a replacement in the mail, but USPS is being even more idiotic than usual so I'm hoping it actually makes it to me. Have something coming from Utah that got tracked to a warehouse in Utah, then has sat there for 7 days now. USPS refuses to let me file any claim until Friday, and theres no expected delivery day anymore. I swear I hope DOGE guts USPS. They're useless anyway.

Anyway, while I waited for that, I decided to clean the holes in the trailing arm/knuckle that houses the spindle.

Driver's side.

View attachment 759469
View attachment 759470

Turned out mint. Squeaky clean, man.

Passenger Side

View attachment 759471
View attachment 759472

I focused the first picture on the rust spot that remains even after a scotch-brite pad and thorough elbow grease was applied, but these wheel bearings were installed "brand new" and then the car sat for years and years. It has only been driving since I've driven it. I wish I'd have gotten a before picture so you could see how filthy these holes were. They were never cleaned, I'm convinced the shop that did it just knocked the old bearings out and slammed new bearings in and sent it without cleaning anything.


Anyway, once I get the ball joint press kit and the new(to me) spindle, I'll slap it all back together and get her rolling again. Completely at the mercy of the United States Postal Service though, so we'll see how that goes.
Careful what you wish for.
 
Do you mind showing a pic of your bearing splitter? I'll be doing the same job this summer and I want to make sure mine will work.
 
Well, the bearing splitter came in today so I decided to test it out. It works amazing, and as a bonus it actually pulled the bearing, and both dust shields off at the same time. Which is great because I'm replacing them with new OEM ones anyway.

View attachment 759468

:) Looks great. I can't do the other one until I get a replacement in the mail, but USPS is being even more idiotic than usual so I'm hoping it actually makes it to me. Have something coming from Utah that got tracked to a warehouse in Utah, then has sat there for 7 days now. USPS refuses to let me file any claim until Friday, and theres no expected delivery day anymore. I swear I hope DOGE guts USPS. They're useless anyway.

Anyway, while I waited for that, I decided to clean the holes in the trailing arm/knuckle that houses the spindle.

Driver's side.

View attachment 759469
View attachment 759470

Turned out mint. Squeaky clean, man.

Passenger Side

View attachment 759471
View attachment 759472

I focused the first picture on the rust spot that remains even after a scotch-brite pad and thorough elbow grease was applied, but these wheel bearings were installed "brand new" and then the car sat for years and years. It has only been driving since I've driven it. I wish I'd have gotten a before picture so you could see how filthy these holes were. They were never cleaned, I'm convinced the shop that did it just knocked the old bearings out and slammed new bearings in and sent it without cleaning anything.


Anyway, once I get the ball joint press kit and the new(to me) spindle, I'll slap it all back together and get her rolling again. Completely at the mercy of the United States Postal Service though, so we'll see how that goes.
How on earth did you get the rear bearing races out? I almost stuck a stick of dynamite in mine trying to get that snap ring out.

Also, I wish mine were that clean LOL

ALSO ALSO keep the old bearing races. They make really good press parts

PXL_20230528_162105021.jpgPXL_20230528_164506030.jpgPXL_20230528_165045293.jpgPXL_20230529_001129561.jpg
 
How on earth did you get the rear bearing races out? I almost stuck a stick of dynamite in mine trying to get that snap ring out.

Also, I wish mine were that clean LOL

ALSO ALSO keep the old bearing races. They make really good press parts

View attachment 759505View attachment 759506View attachment 759507View attachment 759508


The rear bearing race inside the knuckle? Like closest to the axle? I used a bearing/race driver(This exact one actually!), and picked the one that juuuuuust barely fit inside the race but would get stuck. From there, just put the knuckle on the ground and hammered it out. I did that for both sides. Not big enough to scratch the inside of the knuckle's sleeve, but not small enough to go through the race itself.


And yes!! @pauleyman made a post in a thread I was searching and recommended to the poster to keep the old outer bearing shell as a press tool, and recommended beveling the edge so it wouldn't get stuck. So I did when driving them in, and it worked amazing.


Do you mind showing a pic of your bearing splitter? I'll be doing the same job this summer and I want to make sure mine will work.

Yessir. It's this one. https://www.ebay.com/itm/354524410968

bearing splitter tool.jpg


Picture included for posterity's sake for when/if the ebay link doesn't work anymore.

Note: If you use this exact kit, put either a piece of sturdy wood in between the bolt and whatever you're pressing against. It has a little ball bearing on the end that's supposed to glide, but instead it just explodes out. Lol. So use either a sturdy piece of metal, or a solid piece of wood in between the long bolt and whatever it's pressing against.


Careful what you wish for.

You're right of course, but man it gets frustrating. Instead of them being out of a job, I wish they made it a little easier to hold them accountable. I ended up filing an official complaint with the postmaster general's office, so we'll see what works out there.
 
Last edited:
The rear bearing race inside the knuckle? Like closest to the axle? I used a bearing/race driver(This exact one actually!), and picked the one that juuuuuust barely fit inside the race but would get stuck. From there, just put the knuckle on the ground and hammered it out. I did that for both sides. Not big enough to scratch the inside of the knuckle's sleeve, but not small enough to go through the race itself.
I guess I meant the snap ring that holds the big inner race inside the hub
 
I guess I meant the snap ring that holds the big inner race inside the hub


Oh, that son of a bi*** man. I was honestly about ready to cut the SOB out. What I ended up doing what using strong needle nose pliers with some ass behind them, and I had my wife with a flat-head screwdriver. I'd open it a bit, she'd put the screwdriver in the gap, and I just repeated until it finally came off.


Whoever designed that snap ring can eat my entire ass. All of it. Like, why the hell would you not just make it a traditional snap ring with holes that you can use snap ring pliers on? W-T-F Mitsubishi.


Unrelated note: I got impatient and installed the driver's side rear spindle/wheel bearings. Went in smooth AF, and man is it smooth spinning. Very happy with it. Now I'm waiting on my ball joint press kit and my replacement passenger side spindle.
 
Oh, that son of a bi*** man. I was honestly about ready to cut the SOB out. What I ended up doing what using strong needle nose pliers with some ass behind them, and I had my wife with a flat-head screwdriver. I'd open it a bit, she'd put the screwdriver in the gap, and I just repeated until it finally came off.


Whoever designed that snap ring can eat my entire ass. All of it. Like, why the hell would you not just make it a traditional snap ring with holes that you can use snap ring pliers on? W-T-F Mitsubishi.
This was the response I was expecting LOL
 
Forgot that I bought a super clean/reman set of 1g rear AWD brakes and they came today. Got some surface rust from sitting but man they look good. I may actually paint these and the front calipers since the wheels are all off anyway. I’m excited to have a proper working rear ebrake again.

Also: if my ball joint press kit comes in before my replacement spindle does, I’m gonna yank one out of the parts talon because I’m tired of USPS holding me hostage by my short and curlys(by that I mean my balls. Testicles. Nuts.). I’m stoked to drive this car with all the stuff improved.

Even if there’s still a noise, it should handle waaaay better.


Would just like to give a shout-out….to me. Way to go Cory, you never gave up and you’re learning new stuff every day. Great job man. Keep up the good work!
 
Ball joint press came in today. The old ball joints boots were coming off/not tight to the ball joint and as a result the grease was in rough shape. It wasn't like, powdery but you could tell it was drying out. These new ball joint boots though are secured with wire/clamps, and so much tighter. No more rattling. Yay. The previous ball joints didn't have anything holding the boots on. They were almost press fit? Weird. Anyway.


These new wheel bearing/hub assemblies...when it’s all torqued down holy jeebus are they tight. It’s fairly hard to turn by hand(and by fairly hard I mean grabbing the hub with your hands and trying to turn it is nigh impossible. However, put a ratchet on the axle nut, and they're easy to turn. Minimal effort. They spin smooth, no binding or grinding or rough spots. The FSM says hook up a special tool to tighten the hubs without an axle in it, and then it should spin with 16 in/lbs of force or less so factoring that in with having to turn the axle, the trans, and the other axle/hub that's all connected...maybe it's normal. :idontknow:

The FSM also says to press the bearing in without the inner races installed, put the axle side race in and oil seal, and then to put the outer/hub race on the hub, and tighten it in with the "Special tool" which is just a big long bolt with a washer that acts like an axle. So I guess if I have to do this in the future I'm gonna only press in the bearing without the inner races, and then just use the axle to press the outer race/hub in. Weird. What a strange procedure.

Anyway, threads like this are useless without pics sooooo.


IMG_7521.jpeg
IMG_7524.jpeg


Yay!


Also: The FSM actually says don't tighten or torque the ball joint until the car is on the ground...so many questions. How can you get a torque wrench in there with the axle installed and on the ground?
 
Do 1G's have eccentric bolts in knuckle where it bolts to the strut to adjust camber? or is that a EVO thing?

I don’t think so. At least mine doesn’t. I think you can slot the holes and add one but yeah.
 
Parts car got dropped off at my place today. Yay. Already started robbing parts off this poor abused thing.

IMG_7537.jpeg


Took the totally-functional-and-not-at-all-a-ricer-accessory front strut brace and put it on. The parts car has a rear strut brace too, but I’d have to cut a notch in my rear trunk panels and that’s not gonna happen. Maybe. Haven’t decided.

Anyway, I traded some absolutely falling a part sun visors for this.

IMG_7528.jpeg
IMG_7530.jpeg
IMG_7532.jpeg


“Italian leather” shift boot. This thing was an absolute PITA to get to fit. It fit on the stock trim ring no problem, but getting it seated down into the actual Center console was another story entirely. Had to cut and trim the boot quite a bit.

However I think it looks nice. I really should yank the spindle I need off this parts car and get my butt moving on reassembly but honestly I just don’t feel like it. I’ll wait for all the tools and other bs to come in and get it all straightened up next weekend.
 
Ball joint press came in today. The old ball joints boots were coming off/not tight to the ball joint and as a result the grease was in rough shape. It wasn't like, powdery but you could tell it was drying out. These new ball joint boots though are secured with wire/clamps, and so much tighter. No more rattling. Yay. The previous ball joints didn't have anything holding the boots on. They were almost press fit? Weird. Anyway.


These new wheel bearing/hub assemblies...when it’s all torqued down holy jeebus are they tight. It’s fairly hard to turn by hand(and by fairly hard I mean grabbing the hub with your hands and trying to turn it is nigh impossible. However, put a ratchet on the axle nut, and they're easy to turn. Minimal effort. They spin smooth, no binding or grinding or rough spots. The FSM says hook up a special tool to tighten the hubs without an axle in it, and then it should spin with 16 in/lbs of force or less so factoring that in with having to turn the axle, the trans, and the other axle/hub that's all connected...maybe it's normal. :idontknow:

The FSM also says to press the bearing in without the inner races installed, put the axle side race in and oil seal, and then to put the outer/hub race on the hub, and tighten it in with the "Special tool" which is just a big long bolt with a washer that acts like an axle. So I guess if I have to do this in the future I'm gonna only press in the bearing without the inner races, and then just use the axle to press the outer race/hub in. Weird. What a strange procedure.

Anyway, threads like this are useless without pics sooooo.


View attachment 759657View attachment 759656


Yay!


Also: The FSM actually says don't tighten or torque the ball joint until the car is on the ground...so many questions. How can you get a torque wrench in there with the axle installed and on the ground?
I think you want a big washer behind that nut. The cotter pin is supposed to go through one of the gaps in the crown of the nut to prevent it from rotating.
 
Good job Cory!!! Find it, fix it, repeat. Finally you will be back where this all started! You are a trooper, man!
 
I guess I missed it. What changes did you make to get the car to drive good ?

These new wheel bearing/hub assemblies...when it’s all torqued down holy jeebus are they tight. It’s fairly hard to turn by hand(and by fairly hard I mean grabbing the hub with your hands and trying to turn it is nigh impossible. However, put a ratchet on the axle nut, and they're easy to turn. Minimal effort. They spin smooth, no binding or grinding or rough spots. The FSM says hook up a special tool to tighten the hubs without an axle in it, and then it should spin with 16 in/lbs of force or less so factoring that in with having to turn the axle, the trans, and the other axle/hub that's all connected...maybe it's normal. :idontknow:
Mine were fairly hard to turn by hand also at first. Fear not.

I think you want a big washer behind that nut. The cotter pin is supposed to go through one of the gaps in the crown of the nut to prevent it from rotating.
You are definitely missing the big washer behind the axle nut
 
I think you want a big washer behind that nut. The cotter pin is supposed to go through one of the gaps in the crown of the nut to prevent it from rotating.

Mine were fairly hard to turn by hand also at first. Fear not.


You are definitely missing the big washer behind the axle nut

Jesus Christ you f*cking f*ck where the f*ck is the f*cking axle nut washer. F*ck.


Well, good thing I have a parts car I can rob the washers off of! Wewt.


I guess I missed it. What changes did you make to get the car to drive good ?

A little confused by what you mean. I'm excited to feel how the car handles and rides now that I'm installing ball joints that are actually tight to the knuckle, and replacing the inner tie rod ends which are floppy like noodles and if you grab the inner tie rod end and pull/push, it moves/clicks in and out. Tons of play in the front suspension/steering, and now it's all gonna be super tight and super new. So I'm stoked to see if there's a significant noticeable difference or not.


On topic: I got around to using my $11 amazon inner tie rod removal/installation tool. This tool sucks, but it worked. For $11 I can't complain. God these inner tie rods seemed exceptionally tight though. Should they be that tight?


But yeah. At this point I am officially held up only by the United States Postal Service of Ineptitude and lack of time. Once they allow me benevolently to have my spindle and brand new OEM mitsubishi nut, I can throw everything back on and give 'er a test drive.


P.S. - USPS can lick all over my cat's collective balls.
 
A little confused by what you mean. I'm excited to feel how the car handles and rides now that I'm installing ball joints that are actually tight to the knuckle, and replacing the inner tie rod ends which are floppy like noodles and if you grab the inner tie rod end and pull/push, it moves/clicks in and out. Tons of play in the front suspension/steering, and now it's all gonna be super tight and super new. So I'm stoked to see if there's a significant noticeable difference or not.
I just meant tune wise before you tore into it and did the wheel bearings and all that jazz. I've been peeking into the post a bit but missed a bunch when you were driving it often and to work and such. Was just curious what you did tune wise that got it driving better is all
 
I just meant tune wise before you tore into it and did the wheel bearings and all that jazz. I've been peeking into the post a bit but missed a bunch when you were driving it often and to work and such. Was just curious what you did tune wise that got it driving better is all


Oh okay, that makes sense. I've been shooting logs back and forth with a friend in Panama City and adjusting things. The car really, really liked E85 I discovered. Pretty much just pulled global out for E85, and then adjusted the map in little various spots. I took some deadtime out too.
 
Last edited:
Oh okay, that makes sense. I've been shooting logs back and forth with a friend in Panama City and adjusting things. The car really, really liked E85 I discovered. Pretty much just pulled global out for E85, and then adjusted the map in little various spots. I took some deadtime out too.
Hell yeah man. Glad to hear. I love e85 so much haha
 
Add Value - Be Respectful - No Trolling - No Misinformation - Participate Often!
Support Vendors who Support the DSM Community

Latest Classifieds

  • For sale 2g 2G DSM Link V3
    2G DSM Link V3 $600 + shipping and paypal fees* no cable included * cables are 75 on the...
    • jersygsx
    • Updated:
    • Expires
  • Wanted 2g Shot in the dark (2g Pass strut cut out)
    Need 2g strut tower to save time.
    • frosh29
    • Updated:
    • Expires
  • For sale 2g 2G Mishimoto Radiator & Fan Shroud
    2G Mishimoto Radiator & Fan Shroud $200 + shipping and paypal feesYou must be registered to...
    • jersygsx
    • Updated:
    • Expires
  • For sale VIRGIN 4G63 6-BOLT TURBO HEAD
    Came off a virgin stock AWD Auto 1G DMS (91), also have matching block and crank which are also...
    • The_Partout_Spot
    • Updated:
    • Expires
  • For sale 1G DSM 4G63 6-BOLT TIMING COVER
    Used, see condition in photos. Buyer covers shipping / fees.
    • The_Partout_Spot
    • Updated:
    • Expires
Back
Top