The Central Hub for DSM Community and Information

For 1990-1999 Mitsubishi Eclipse, Eagle Talon, Plymouth Laser, and Galant VR-4 Owners. This is where the DSM platform history is documented and archived. Log in to help us in our mission, and to remove most ads from the browsing experience.

20150721_135455_resized_1 Talon in the Park.jpg

Street Build Resurrection of the Red 90 Talon

1990 Eagle Talon TSI trying to save her life from the previous owner and its alot of work but a nice base car. My youngest son, who also races this car has nicknamed her "The Red Baron".

This site may earn a commission from merchant affiliate links, including eBay, Amazon, and others.

tag off of the snout that stated it needed to be balanced before installation
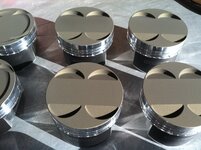
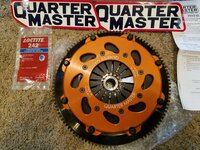
Was there a tag on there that actually said it needed to be balanced? All I see in your pics is that yellow tag that says you can't return it once you've done any work like that on it, so verify fit and part number and so-forth before doing any modification to it.
 
Well I got all of my lower end back so I was like a kid waiting to get home from school to get to his special project!
Rods are attached to pistons. Rings need filed then the short block can be checked and assembled. Easy peasy!
Special thanks to all the shops and people that helped out with this motor!
These assemblies feel great.
About time for the "fun" to begin!
Marty :cool:;)

20230914_173924.jpg


20230915_172809.jpg


20230915_171132.jpg


20230915_171122.jpg


20230915_171117.jpg


20230915_174027.jpg


20230915_173720.jpg


20230915_173715.jpg


20230915_173712.jpg
 
Well I got all of my lower end back so I was like a kid waiting to get home from school to get to his special project!
Rods are attached to pistons. Rings need filed then the short block can be checked and assembled. Easy peasy!
Special thanks to all the shops and people that helped out with this motor!
These assemblies feel great.
About time for the "fun" to begin!
Marty :cool:;)

View attachment 707439

View attachment 707440

View attachment 707441

View attachment 707442

View attachment 707443

View attachment 707444

View attachment 707445

View attachment 707446

View attachment 707447
Woohoo! Looking super sharp, Marty! 🤘
 
Rings filed to fit (they were very tight, .004" gap to start with).
.024" Top
.028" Second
Making progress :thumb:
Time to thoroughly clean the crank, cylinders and rods/pistons, then short block assembly can begin!
Marty

20230916_120511.jpg


20230916_120517.jpg


20230916_120524.jpg


20230916_121352.jpg


20230916_122909.jpg


20230916_123054.jpg


20230916_125328.jpg
 
I haven't updated lately, so I can say I am working on parts of the top end now too.
Gathering parts for the head. I had this valve cover, so I purchased a nice sparkplug cover (aluminum, nicer than I expected) to put on it.
That is Chrome Powder Coat on the VC and Red Powder Coat lettering.
Also, I wasn't happy with two ring gaps, so I ordered a single set to refile to my specs. I figure why not get it exactly the way I want it, with tolerances, when I am fooling around with this stuff (it's fun for me). That set (which will replace one 2nd ring and one top ring, but separate pistons) will be here tomorrow and the bottom end assembly can begin.
The extra head build will set me back a little over 2k for parts and a little labor.

20230926_192832.jpg


20230926_192822.jpg


20230926_202337.jpg
 
Last edited:
Well I had Blue, Chrome, Red, Black and Aluminum so I had to choose.........:hmm::hmm::hmm:;) (Plus 2 BARE, Stripped VCs, ready for coating but the kid quit doing it)
 
That is Chrome Power Coat on the VC
I really like the way that valve cover looks. It's like OEM+. OEM only better. I would love it if mine looked like that.
BTW when you wrote "Chrome Power Coat", was that a typo? Or did you mean an actual product called Chrome Power Coat?
 
BTW when you wrote "Chrome Power Coat", was that a typo? Or did you mean an actual product called Chrome Power Coat?
Yeah, Fat Finger Syndrome on a Galaxy S7. Thanks. I HATE bad grammar, so I'll fix that, and thanks, really :thumb: You just gotta pick on me, hehehe. Very thankful!
It was Chrome Powder and Red Powder lettering. I've had it for almost as long as I've been "in the game". :)
It will be hard to keep clean.......I'm old, I like Chrome Shiney stuff LOL.
The highlight is the sparkplug cover. I was delighted by its quality. I just added my "Bling" to it !!!
I put it back in its box until it is time for it but still took a picture to share.

20230927_164602.jpg
 
I like Chrome Shiney stuff LOL.
I do too. For one thing, light. I need a lot of light to see anything to the level of detail that I want. So things that reflect light well, that's the stuff I need. I have to be able to see well where the seams are, where assemblies come apart, surface shape, stuff like that. I use various flashlights and worklights a lot, plus ceiling lights. I'm even picky about the color rendering index of LED lights, because some of them are really poor, mostly the earlier ones that were made when most people weren't thinking about that stuff yet.
 
I use/We use LED White lighting under the bottom of hoods for excellent lighting and minimal draw. It is a big help over a "Hood Lamp" :applause:
 
I haven't updated lately, so I can say I am working on parts of the top end now too.
Gathering parts for the head. I had this valve cover, so I purchased a nice sparkplug cover (aluminum, nicer than I expected) to put on it.
That is Chrome Powder Coat on the VC and Red Powder Coat lettering.
Also, I wasn't happy with two ring gaps, so I ordered a single set to refile to my specs. I figure why not get it exactly the way I want it, with tolerances, when I am fooling around with this stuff (it's fun for me). That set (which will replace one 2nd ring and one top ring, but separate pistons) will be here tomorrow and the bottom end assembly can begin.
The extra head build will set me back a little over 2k for parts and a little labor.

View attachment 708835

View attachment 708836

View attachment 708851


I bought that same spark plug cover, and I too was very pleased with it's quality. But, as a heads up, go ahead and drill the holes out for the spark plug cover. I could get like 4 out of 5 bolts in mine, but the last one just wouldn't thread properly and made me worry it would strip out or crack the threads. I just took a drill bit that was equal to the size of the existing hole to get rid of "step" inside the hole as that was the problem. After that, there was zero issues. You may not have that issue, because we all know china's QC is non-existent. Still, absolutely love mine. Would 100% buy again.


LOVE the VC btw.
 
Well, I am holed up at home, trying to kick this Covid BS, but today, I finally felt good enough to put a bit of shortblock together. :thumb: I have been too busy with other people's engines but those are finally done so I can focus on MINE! :)
 
Well, I am holed up at home, trying to kick this Covid BS, but today, I finally felt good enough to put a bit of shortblock together. :thumb: I have been too busy with other people's engines but those are finally done so I can focus on MINE! :)

Man, I figured you couldn't keep yourself out of the shop for long, even though you weren't feeling the best. Glad you're doing better, and back to some 4G action, Marty!
 
I actually brought the shop to me. I have the block on the floor in front of my dryer on triple cardboard so I don't have any "excuses"....unless it's just not a good day. I'll lay down some plastic when I put the rods and pistons in then my son and I can carry it out the back door to an awaiting delivery vehicle to put it back in the shop on the stand. Ahhhh, bachelor life. Gotta love it!
 
I actually brought the shop to me. I have the block on the floor in front of my dryer on triple cardboard so I don't have any "excuses"....unless it's just not a good day. I'll lay down some plastic when I put the rods and pistons in then my son and I can carry it out the back door to an awaiting delivery vehicle to put it back in the shop on the stand. Ahhhh, bachelor life. Gotta love it!
That's awesome!
 
I actually brought the shop to me. I have the block on the floor in front of my dryer on triple cardboard so I don't have any "excuses"....unless it's just not a good day. I'll lay down some plastic when I put the rods and pistons in then my son and I can carry it out the back door to an awaiting delivery vehicle to put it back in the shop on the stand. Ahhhh, bachelor life. Gotta love it!
This makes me laugh... i have brought manifolds inside on the floor to mount turbos on them before I put them on the car.

I also do alot of living room wire harnesses hahah

20211216_183045.jpg
 
Last edited by a moderator:
Hey, whatever is more comfortable. I've built 4 motors on the back porch, in front of the same washer and dryer. 1 Saturn engine (all aluminum) and now 3 4g63s. I do the short blocks then they go to the big shop and engine stand. The Saturn motor was completed inside and we carried it to the truck and took it to the shop that was installing it for me (it is my DD and I didn't have time. Hell, the O'rielly motor I BOUGHT for it had zero oil pressure and wasted $700 on the shop labor before I insisted on a refund and built the old motor MYSELF and now has almost 80k on it). It's nice to not be hot or cold, like in the shop at times.
Wiring is most certainly something I also do inside too. Why not! :thumb:
 
Alright UPDATES:
Bottom end assembled. Need to double check rod bearing clearance. Mains came in between .0015 (thrust bearing) and .002. #1 was a little looser at just a tad more than .002". :thumb:
I'll get those rechecked and move on to the rear main seal and the oil pump hopefully in the next day or two. ;)

Edit: got the rods checked. I went with "x" bearings as regular were way to snug. Rods came out at .002" now also. Rear main seal is on and the oil pump is next followed by the pickup and then the pan!
PROGRESS.....FINALLY! :D


20231110_124746.jpg


20231110_131457.jpg


20231110_151941.jpg
 
Last edited:
Spec sheet in rough form.

20231110_171452.jpg

And I had ONE rod bearing that my old ass eyes caught a sliver of METAL in so I removed it and polished that bearing. I am sure it would have been fine but with all the $ in this, I just ordered up another set of bearings for one half of a rod bearing to make it perfect.
Peace of mind. New set will be in Tuesday or Wednesday.
Said bearing:
20231110_141919.jpg
 
Last edited:
More progress today and a BIG thank you to all of those Veterans out there! Unfortunately, Veterans Day put a hold on progress as I don't have water pump bolts and the hardware stores are all closed in observance of the holiday, but still PROGRESS.
I did run into a small snag as the crank pulley doesn't want to just slide onto the crank snout like it does on the stock crank so I guess I need to polish the snout of the eagle crank with some emery cloth until the pulley will slip fit.
That's all of the updates for the weekend I suppose until I can get a few bolts. :thumb:
I chose the Aisin pump over the Gates for this motor as it has an open impeller. I usually run Gates but had this ONE Aisin and liked the way it looked.
Thanks for following along again!
Marty

20231111_122007.jpg


20231111_122013.jpg


20231111_122047.jpg


20231111_125051.jpg


20231111_124938.jpg
 
Well the Bank and the Hardware store were open today so I popped in and picked up water pump bolts and OFH bolts for under $10. It sure is nice to have good hardware stores that carry metric hardware!
The new set of "X" rod bearings came in today too, but I'm not rushing things.
It's PROGRESS!!!
Marty

20231113_170240.jpg


20231113_170450.jpg


20231113_170457.jpg


20231113_170217.jpg
 
It's one size bigger head so they aren't JIS but for external stuff, I like the spread of the load of the slightly larger heads. Internal stuff, I pay the price + (usually ARP) but these are all grade 8 bolts. I've used them many times on things on the outside unless the head size is restrictive or in a recess.
These head sizes ended up being 13 instead of 12mm (you NEVER loose a 13 it's always the 10, LOL), but it worked out just fine and I was happy they had flange head bolts.
 
Add Value - Be Respectful - No Trolling - No Misinformation - Participate Often!
Support Vendors who Support the DSM Community

Build Thread Updates

Latest Classifieds

  • For sale 2g 2G DSM Link V3
    2G DSM Link V3 $600 + shipping and paypal fees* no cable included * cables are 75 on the...
    • jersygsx
    • Updated:
    • Expires
  • Wanted 2g Shot in the dark (2g Pass strut cut out)
    Need 2g strut tower to save time.
    • frosh29
    • Updated:
    • Expires
  • For sale 2g 2G Mishimoto Radiator & Fan Shroud
    2G Mishimoto Radiator & Fan Shroud $200 + shipping and paypal feesYou must be registered to...
    • jersygsx
    • Updated:
    • Expires
  • For sale VIRGIN 4G63 6-BOLT TURBO HEAD
    Came off a virgin stock AWD Auto 1G DMS (91), also have matching block and crank which are also...
    • The_Partout_Spot
    • Updated:
    • Expires
  • For sale 1G DSM 4G63 6-BOLT TIMING COVER
    Used, see condition in photos. Buyer covers shipping / fees.
    • The_Partout_Spot
    • Updated:
    • Expires
Back
Top