The Central Hub for DSM Community and Information

For 1990-1999 Mitsubishi Eclipse, Eagle Talon, Plymouth Laser, and Galant VR-4 Owners. This is where the DSM platform history is documented and archived. Log in to help us in our mission, and to remove most ads from the browsing experience.

img_8094800x600.jpg

My fuse box relocation (project log)

This site may earn a commission from merchant affiliate links, including eBay, Amazon, and others.

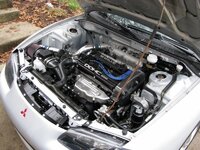
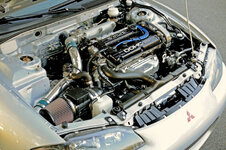
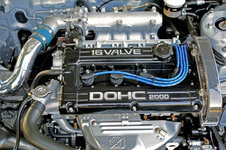
A few of the lobes on my cams had tiny rust spots. I sprayed them with WD-40 and used a fine scotch brite pad to clean the spots off. Then I sprayed them down with brake cleaner.

IMG_7702.jpg


Cleaned the cam journals with brake cleaner on a rag, then lubed them up.

IMG_7713.jpg


Make sure the engine is somewhere BTDC, then rest the cams in place with the dowel pins up.

IMG_7715.jpg


Cleaned the cam caps with brake cleaner on a rag, then set them in place. MAKE SURE you put the cam caps back where they came from. I also kept all the bolts in their original positions.

IMG_7729.jpg


Almost forgot the cam seals! Coated in white lithium grease, then slid right on the cam by hand, no tools needed.

IMG_7737.jpg


Torqued the cam caps down. Make sure you torque them stepwise (increasing torque increments) and in the proper order.

untitled.JPG


IMG_7740.jpg


I forgot to mention that before I installed the cams I filled the engine with oil and primed it by spinning the oil pump with my impact. I checked for oil at the head, turbo oil feed line, and I took off the oil return line to verify oil was going through the turbo. I primed it again after putting the cams in. No leaks have shown themselves yet :)

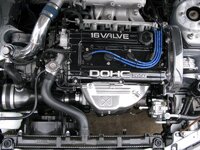
As usual, I made less progress than I hoped for. It's been too cold to paint, so I put that off for now. I'm still in the process of powdercoating the cam gears. The prep work on them is crucial and very time consuming.
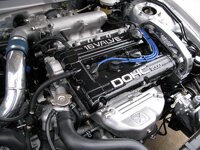
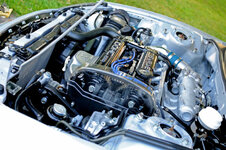
 
Last edited by a moderator:
The pump is easy to take off. Four bolts hold it to the bracket, then remove the belt, remove the nut for the high pressure hose, remove the low pressure hose, and remove the electrical connector from it. It will make a mess of p/s fluid no matter what you do.

Mine is just bead blasted, not powdercoated. To powdercoat it you would probably want to disassemble the entire pump, powdercoat it, then rebuild it with a new seal kit. If you try to powdercoat it as is you risk damaging the internals from the heat.
 
How hard was it to take out all the pins from the ecu when you were removing the stuff you dont need from the harness? Any tips for doing this, and what you would recommend def to get rid off and not to?

James :laser::talon:
 
Hey James, we got the black chrome in and it looks awesome! I don't think Brian took any pictures yet though.

Here's how to remove pins from the ecu connectors:
http://www.dsmtuners.com/forums/art...w-remove-replace-pins-harness-connectors.html

Removing pins from the ecu connectors is by far the easiest pins to remove of all the connectors on the harness. I use these screwdrivers, plus another set I have. This set has some of the smallest screwdrivers you'll find in one of these sets, which really comes in handy. Just be careful, the littlest one breaks easily!
Kronus™ 6-Piece Precision Slotted Screwdriver Set - RadioShack.com

1g's will be different, but in post 172 I listed most of the stuff I removed from the ecu harness. It's really all up to you what you want to get rid of. If you have a particular wire in question let me know and we'll figure out if you should remove it or not.

Nice. Im just scared you guys will mess it up. LOL. No really, you guys do a good job. I just purchased my Race intake manifold from Magnus. When i bring it to you, i'll tell you everything i had to do to get this thing. I want to get that coated for sure. I'll bring my TB and show you how that turned out as well.

James :laser::talon:
 
Actually, Brian sprayed a CAS cover and he did mess it up a little, he sprayed it too heavily LOL So we have to strip that and do it over.
 
That I am. I did fine on all the other parts I sprayed this weekend though. I had the pressure up a bit too far when I did the cover.

And from the way Eric explained it to a friend and I is that the part will only take a certain amount and once it's covered, it'll reject the rest. So I didn't think coating it too heavy was a possibility. I was wrong (or maybe I misunderstood him).
 
Haha. RIIIGGGHHT. So, yea, i got my Magnus in, and i am getting my exhaust housing in. So we can coat those two off the bat. And then the brakes. You guys home during spring break?

James :laser::talon:
 
Nope. I had told you by PM (I believe) that we can't. We have the ability to glass bead blast (aluminum) and powdercoat. There are high temp powders out there, but we think if you're going to do this, you might as well just get it ceramic coated. I had recommended you check out Shearer's ceramic coating - pimp!
 
Ya, we can't ceramic coat and powdercoating definitely won't hold up to the temps for any exhaust components. Even the high temp powdercoating is only rated to 1200*F or so. Brakes should be fine with normal powdercoating.
 
Nope. I had told you by PM (I believe) that we can't. We have the ability to glass bead blast (aluminum) and powdercoat. There are high temp powders out there, but we think if you're going to do this, you might as well just get it ceramic coated. I had recommended you check out Shearer's ceramic coating - pimp!

Hmm. I guess so. I will probably just send it to JNZ or Bonehead.

James :laser::talon:
 
CAS install:

Install the CAS body with gray rtv.

007.jpg


Install the sensing cylinder. Make sure the identification paint mark on it points at the sensor with the cam at TDC.

IMG_7747.jpg


Install the CAS cover plate with the gasket.

IMG_7748.jpg


Here's my coil pack relocation bracket I made. I used the stock bracket (modified), a stock balance belt spacer, and a piece of sheet metal. I welded them with my friends gasless mig so the welds are far from pretty, but they'll hold. I had to convert a bolt for my alternator relocation kit to a stud so I could install this. I'm using 1g NGK wires.

IMG_7789.jpg


IMG_7792.jpg


IMG_7795.jpg


IMG_7793.jpg


IMG_7779.jpg


IMG_7778.jpg


IMG_7786.jpg


Early birthday present from my brother - Shep Cable Bracket Spacers.

Stock:
Copy of IMG_6826 (Large).jpg


Shep:
Copy of IMG_6830 (Large).jpg


Copy of IMG_6831 (Large).jpg


My friends compressor broke, so until we fix that or install his new one I can't powdercoat my cam gears or coil pack bracket.
 
Last edited by a moderator:
Add Value - Be Respectful - No Trolling - No Misinformation - Participate Often!
Support Vendors who Support the DSM Community

Build Thread Updates

Latest Classifieds

Back
Top