The Top DSM Community on the Web

For 1990-1999 Mitsubishi Eclipse, Eagle Talon, Plymouth Laser, and Galant VR-4 Owners. Log in to remove most ads.

Please Support Morrison Fabrications
Please Support Fuel Injector Clinic

Drag Week 2G DSM - 8 Second Street Car

This site may earn a commission from merchant
affiliate links, including eBay, Amazon, and others.

This site may earn a commission from merchant affiliate links, including eBay, Amazon, and others.

I'm interested in the DBW setup as well. You could do some sweet traction control if you have wheel speed sensors.

That's certainly an option and I have an Elite 2500T so I could do traction control with that easy enough. If track prep is anything like last year though, I likely won't need it at Drag Week. I will be considering dialing it in though beyond drag week and I'm also interested in what I can possibly do with it if I put the dog box back in the car.

I’m in. What a build

Thanks!

Very cool!

In the past, reichen had issues with his 1g towing a trailer. Killed is converter/trans.

Granted it was a small tiny uhaul, but heavy none the less. I hope you ate planning something no larger and heavier than absolutely necessary.

In the 50's there was a pop-up camper, that bolted to the bumper on each side, and use a single large caster to support the weight and maneuverability. With almost zero drag or mpg degrease.

One other thing you have going, is the possibility of a lockup torque converter. I hope you are planning on using that feature.

Thanks for the input. I'll have to contact Reichen to get some more info from him. I'll likely be building a box on an open trailer from Lowe's like we did for my dad's car this past year (picture above) but I'm still shopping for the trailer now. I'm also adding a fairly large transmission cooler with a fan to help combat the increased temps. A similar cooler worked on my dad's car this past year with a heavier car, a trailer, a lot of hills and a way looser converter than what I'll be running. I'll definitely be keeping an eye on it and doing a lot of testing before hand.
 
I started working on the front suspension now that the engine bay is painted and I can do final assembly. I bought a tubular front subframe a few years back and I test fitted it to the car but I haven’t used it yet. A friend of mine bought the same one at the same time and he’s put quite a few miles on his car with it. He had a few problems here or there with it due to some quality issues so before putting mine in, I decided to address those issues primarily by adding gussets. I’ll also be adding Volk LCA’s when he finishes up his next round of them to address another potential issue that my friend is having. I won’t say who made these subframes so please don’t ask. If you’re in the market for tubular subframes and/or control arms, please contact Paul Volk. There are two main reasons I’m installing tubular subframes in my car. The first is weight and the second is wheel control. Weight is obvious. I have the before and after weights with a high precision scale of everything I’m doing to the car and I’ll post them up in a later post when I get my spread sheet cleaned up some. Wheel control is maybe less obvious to some people but I’m eliminating all of the rubber and polyurethane bushings which acts as additional springs in the system and in theory the tubular subframe should be stiffer. I say in theory because I’m an engineer and I like proof of things, but I’m not about to model both subframes and analyze them. I could possibly make a quick test rig and measure force input vs deflection also but I’m going to go with my gut and say it’s stiffer in theory.

IMG_7853-1024x768.jpg


IMG_7911-1024x768.jpg


IMG_7924-1024x768.jpg


Attached to the subframe, I had tubular lower control arms made. The center LCA will be getting replaced with Paul Volk’s when that gets here but I installed the one I have for now. The upper control arm I went with the Megan Racing tubular control arm with camber adjustment. It’s a nice-looking piece. I wish it had a more positive locking feature for the camber adjustment (like a jack screw) but I think with the quantity of bolts it has, it shouldn’t slip.

IMG_7922-1024x768.jpg


IMG_7927-1024x768.jpg


IMG_7663-768x1024.jpg


Finally, for springs and dampers, I’m using JIC Magic FLT A2 coil overs. I’ve had these for a long time and I’ve been very happy with them. They can dramatically change the ride feel with adjustments so I’ll probably work on the race damping and street damping setups that work the best and plan on changing that every day.

IMG_7973-768x1024.jpg


In addition to this work, I finally decided to de-power my steering rack. I’ve had the lines looped on it since probably around 2006 but since it was out of the car I figured I might as well actually depower it. I took the rack over to Martin at RX4Speed (he’s always a HUGE help with my car stuff, follow them on Facebook and if you're in the PA/NJ/NY/DE/MD area, consider them for any DSM work you need done) and we pulled it apart, cut the divider ring out and reassembled it (after cleaning and greasing of course). We didn’t really follow any procedure or anything but there’s not a lot to it. I think there’s a Flying Miata tutorial that you could follow if you need guidance.

IMG_7973-768x1024.jpg


IMG_7968-1024x768.jpg
 
Just wondering but which S400 turbo are you using specifically? Curious being that I just purchased an S476 SXE myself.
 
Looking good. I would suggest you add a removable bar as shown below. Two people I know with those subframes found that it was flexing (1G frames but same exact design from the looks of it). The builder of those frames started including a bar with two heim joints with his latest version to fix the issue.
 

Attachments

  • IMG_7924-1024x768.jpg
    IMG_7924-1024x768.jpg
    124.7 KB · Views: 228
Just wondering but which S400 turbo are you using specifically? Curious being that I just purchased an S476 SXE myself.

The car had an S400SX-E 67mm (some call it an S467 but that's not a real BW name), there's a new turbo coming though. In the dragster, I went 6.52 at 206 MPH on the S400 SX-E 76mm so it's capable of more power than most will ever use.

Looking good. I would suggest you add a removable bar as shown below. Two people I know with those subframes found that it was flexing (1G frames but same exact design from the looks of it). The builder of those frames started including a bar with two heim joints with his latest version to fix the issue.

Thanks! You beat me to it, it's actually in the works to make that cross bar. Martin (RX4Speed) and I are going to fab something up to tie that together once one of our cars has the engine back in.

More updates coming today. :)
 
These next couple posts, I’m going to let the pictures do a lot of the talking. I’ve got a lot of various things in process right now but I’m working on finishing them off.

In this post, I’ll cover the brakes for the car. The fronts are a Wilwood big brake kit. Earlier in the blog I misspoke and called them 6 piston calipers, they’re in fact 4 piston calipers. I originally bought scalloped rotors for it since this was going to be a 5 speed almost exclusively drag build but now that I’ll be driving it on the street and need to be able to stage with the auto, I’ve ordered solid rotors for it. These brakes are beautiful and way lighter than stock. With the scalloped rotors, its 19.5lbs of weight savings. This will go down slightly when the solid rotors come in and I’ll update accordingly. The installation is very straight forward and it’s a bolt on affair. There’s a tiny bit of shimming required to get the caliper centered over the rotor but it comes with all the appropriate shims. I also had to use smaller spacers than what the kit comes with because it’s made for a larger rotor than I’m running so I can fit the calipers in my 15″ Motegi Tracklites. The solid rotors and brake line kit should be here soon and I’ll update when they’re installed.

IMG_7972-1024x768.jpg


IMG_7974-768x1024.jpg


IMG_7993-1024x768.jpg


IMG_7977-768x1024.jpg


IMG_7979-768x1024.jpg


IMG_7995-768x1024.jpg


IMG_7983-1024x768.jpg


For the rears I bought a kit from Whalen Speed for an evo, but it fit perfectly on a 2G as expected. It uses Aerospace calipers and non-ventilated scalloped rotors. I think the rear rotors should be fine since the front brakes do most of the braking. These saved a bunch of weight too at 20.1 lbs. This will actually end up being slightly more when I add in the e-brake handle and cables since these brakes do not have an e-brake. This kit came with everything needed for the install including new brake lines.

IMG_7986-1024x768.jpg


IMG_7987-1024x768.jpg


I’ll also be adding a vacuum pump to the car. I already purchased the Audi pump used, I just haven’t done anything with it yet so no pictures or anything of the installation.

As always, thank you to the companies that support this, be sure to follow their social media pages like their images and buy their products:

http://www.fuelinjectorclinic.com

http://www.extremepsi.com

http://www.tialsport.com

http://www.xonarotor.com

http://www.haltech.com

http://www.turbo4.com
 
Next up is paint. I believe I mentioned that I’ll be using a Carbonetics hatch and doors earlier in the post. I wanted to paint them to match the car. The engine bay was sort of my test and the paint color matched perfectly buying paint from PaintScratch.com. I ordered a bunch more paint from them and had to get a paint sprayer to do the doors and hatch.


First, I had to do some other work though. The hatch was originally purchased by my friend Paul Johnson and came in damaged. His family gave me the hatch after he passed so I decided to repair it and then it obviously needed to be painted. For the repair, I actually drilled a couple holes on the underside and filled the inside of the hatch with expanding foam to help stiffen it. Then I used sanding disks to take the carbon down some about 2-3” on either side of the crack. Once that was done, I cut pieces of fiberglass mat to fit in the reduced thickness section, mixed some resin and installed them. I did the same thing on the underside as well. Once I had the repair done, I also wanted to fit the lexan window so that I wouldn’t be doing that after the hatch is painted. Fitting the lexan was a huge pain and it took my dad and I quite a few hours to get it right. We probably could have done it quicker but I didn’t want to scrap an expensive window because we got impatient and took too much off.

IMG_7814-1024x768.jpg


IMG_7998-1024x768.jpg


IMG_7844-1024x768.jpg


IMG_7849-1024x768.jpg


Once that was done, it was onto painting. I did some minor cleanup on the doors to fill some imperfections then got onto painting. Before the morning of painting, I had literally never sprayed a paint gun before. All of my painting was confined to spray cans. My friend Louie let me use his garage for the painting (huge thanks Louie!). I got there early, we cleaned up, then setup the doors and hatch for spraying. We sprayed primer, base coat then clear coat all in one day.

IMG_8005-1024x768.jpg


IMG_9002-1024x768.jpg


I let the parts sit for a couple weeks, then wet sanded them and polished them out. The clear came out pretty awesome as you’ll see in the pictures below. Unfortunately, I made one big mistake and I think I’m going to redo everything. I wet sanded between the last base coat and clear. I swear I’ve seen this on painting tutorials (maybe I’m dreaming?). After the clear, you can see all of the wet sanding of the base coat, perfectly preserved under the high gloss clear. It doesn’t show in pictures and you can’t even see it in the garage, I took the hatch out into the sunlight though and it is pretty apparent. I have to decide if it’s worth redoing before drag week or if I should save that until after.

IMG_8278-1-1024x768.jpg


IMG_8281-1024x768.jpg


IMG_8284-1024x768.jpg


IMG_8289-1024x768.jpg


IMG_8291-1024x768.jpg


As always, thank you to the companies that support this, be sure to follow their social media pages like their images and buy their products:
http://www.fuelinjectorclinic.com
http://www.extremepsi.com
http://www.tialsport.com
http://www.xonarotor.com
http://www.haltech.com
http://www.turbo4.com
 
Wow, that painted carbon came out great. I've always told myself when I get carbon parts on my car I will paint them because I don't care for the "carbon look".

Thanks! It’s not perfect but it did come out pretty good. It’s partially a testament to the quality of carbonetics parts (especially for the price) and a lot of prep work.
 
Don't think anyone really complains about the quality of the parts they put out, but recently I've seen a lot of complaints from folks about the given times that it'll take to get a part to a customer and the actual time. Some folks waiting up to a year. Who wants to wait that long?

They have some nice parts but I'd rather get used parts or from somewhere else before I wait that long on an order.

Yeah, I’ve heard of delivery issues but I’ve personably not had anything too bad. Sergio quoted me a time frame and the parts arrived within a few weeks of that. I’d buy from him again, just need to plan accordingly for the time it takes him to make the parts.
 
Or, you just never get the parts that you paid for like me!:hellyeah:

That's crazy. I don't want to get into it here but you can PM me if you wanted to discuss more or if you can point me to a thread where you've talked about this I'll go there and read it.
 
These next couple posts, I’m going to let the pictures do a lot of the talking. I’ve got a lot of various things in process right now but I’m working on finishing them off.

In this post, I’ll cover the brakes for the car. The fronts are a Wilwood big brake kit. Earlier in the blog I misspoke and called them 6 piston calipers, they’re in fact 4 piston calipers. I originally bought scalloped rotors for it since this was going to be a 5 speed almost exclusively drag build but now that I’ll be driving it on the street and need to be able to stage with the auto, I’ve ordered solid rotors for it. These brakes are beautiful and way lighter than stock. With the scalloped rotors, its 19.5lbs of weight savings. This will go down slightly when the solid rotors come in and I’ll update accordingly. The installation is very straight forward and it’s a bolt on affair. There’s a tiny bit of shimming required to get the caliper centered over the rotor but it comes with all the appropriate shims. I also had to use smaller spacers than what the kit comes with because it’s made for a larger rotor than I’m running so I can fit the calipers in my 15″ Motegi Tracklites. The solid rotors and brake line kit should be here soon and I’ll update when they’re installed.

View attachment 563580

View attachment 563581

View attachment 563582

View attachment 563583

View attachment 563584

View attachment 563585

View attachment 563586

For the rears I bought a kit from Whalen Speed for an evo, but it fit perfectly on a 2G as expected. It uses Aerospace calipers and non-ventilated scalloped rotors. I think the rear rotors should be fine since the front brakes do most of the braking. These saved a bunch of weight too at 20.1 lbs. This will actually end up being slightly more when I add in the e-brake handle and cables since these brakes do not have an e-brake. This kit came with everything needed for the install including new brake lines.

View attachment 563587

View attachment 563588

I’ll also be adding a vacuum pump to the car. I already purchased the Audi pump used, I just haven’t done anything with it yet so no pictures or anything of the installation.

As always, thank you to the companies that support this, be sure to follow their social media pages like their images and buy their products:

http://www.fuelinjectorclinic.com

http://www.extremepsi.com

http://www.tialsport.com

http://www.xonarotor.com

http://www.haltech.com

http://www.turbo4.com
Did you work with Todd at TCE or directly with Wilwood for this?
 
Did you work with Todd at TCE or directly with Wilwood for this?

For the Wilwoods I just bought them through Extreme PSI which came direct from Wilwood. They have an off the shelf 2G kit that I used. I've since "modified" the kit from the way it comes to use the scalloped rotors and now going to smaller solid rotors so that I can fit my 15" drag wheels.
 
Cool build read the whole thread thus far. What muffler is that? Looks to be about the size I'm looking for.
 
Are you using the audi vacuum pump for the crank case of the car or for something else? If you do use something like this for the crank case do you attach it to the outlet on the catch can so it draws through the can as a filter first to not junk up the vacuum pump?
 
Cool build read the whole thread thus far. What muffler is that? Looks to be about the size I'm looking for.

That muffler is probably my favorite part on my car, I’ve had it for years and I hate that others are now discovering it! Haha. It’s a vibrant 4” in dual 3” outlet. One of my good friends is basically copying my exhaust exactly and it upsets me. :/

Subbed for an awesome build with an awesome goal!!

Thanks!

Are you using the audi vacuum pump for the crank case of the car or for something else? If you do use something like this for the crank case do you attach it to the outlet on the catch can so it draws through the can as a filter first to not junk up the vacuum pump?

I’m actually using the vacuum pump for brakes, not the crank case. I’ll have a more conventional open catch can for the crank case. It can be difficult to have adequate suction for high boost to run a vacuum pump on these motors from my experience. It can be done though.
 
Ive been using the Audi pump for several years now, works just fine, I have it setup to turn on in low vacuum situations only.
 
Ive been using the Audi pump for several years now, works just fine, I have it setup to turn on in low vacuum situations only.

Out of curiosity how are you triggering it by low vacuum situations? I was planning on using the brake pedal switch to turn mine on. I’m also curious if you have a diagram of how you hooked up the lines with check valves and all?
 
Out of curiosity how are you triggering it by low vacuum situations? I was planning on using the brake pedal switch to turn mine on. I’m also curious if you have a diagram of how you hooked up the lines with check valves and all?
It IS a check valve hell back there LOL
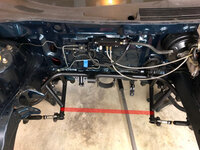
, I used an adjustable vacuum switch, the problem with wiring it to the brake light switch in my mind would be that you want the vacuum to be there before you need it, as in the instant you apply the brakes you want it there, you dont want to wait for a pump to create it, my Audi and Vw cars use these factory and they monitor the booster vacuum level and run the pump as it drops, I decided to do something of that flavor with the vacuum switch, with my standalone I could no doubt trigger it with the ecu based on vacuum/boost conditions in the intake, but why bother tying up an output if I dont have to? I would still like to setup some type of hysteresis in the system with possibly a vacuum bottle somewhere to keep the pump from running anymore that it has to but with the check valves in there it only really runs when the booster drops below my set level or vacuum and not when the intake level changes, so just when I use the brakes and vacuum in the booster drops from use. You will need around three check valves if I remember correctly, in addition to the factory one.
 
Subscribed! Truly an awesome and inspiring build. Very curious to know how your front subframe fits as I have his rear subframe and am in the process of purchasing the front.
 
Out of curiosity how are you triggering it by low vacuum situations? I was planning on using the brake pedal switch to turn mine on. I’m also curious if you have a diagram of how you hooked up the lines with check valves and all?
You only need 2 check valves. I trigger my vacuum pump if vacum goes over 11 kpa. I use my OD-button on the gear lever wire to a Digital Input in my Link ecu and it controls the relay for the pump via an aux output set to these 2 condtions described above: vacum over 11 kpa AND gear lever OD-button active, pump will start. If 1 of these 2 condtions are not met, the pump will not start. Brake booster use the engine "normal" vacuum only.
 
Last edited:
You only need 2 check valves. I trigger my vacuum pump if vacum goes over 11 kpa. I use my OD-button on the gear lever wire to a Digital Input in my Link ecu and it controls the relay for the pump via an aux output set to these 2 condtions described above. If the OD-button is off, the pump wont activate and I use the engine "normal" vacuum only.
Not if you want to also incorporate the stock cars vacuum into the system, I want to only use the pump when the engine is not providing enough vacuum AND the booster is low on vacuum, I cant have the pump sucking on the intake system for the car so a check valve there, a check valve in the stock booster location and a check valve to keep the cars intake from sucking air through the pump causing a vacuum leak...thats IF I'm remembering things correctly, I did this like 3 years ago, but I know I have at least three check valves total, as I said I dont want to have to interact with anything to have power brakes such as switches or buttons and also I dont want to tie up inputs or outputs to my ecu for something so elementary, there isn't enough as it is.
 
Last edited:
Support Vendors who Support the DSM Community
Boosted Fabrication ECM Tuning ExtremePSI Fuel Injector Clinic Innovation Products Jacks Transmissions JNZ Tuning Kiggly Racing Morrison Fabrications MyMitsubishiStore.com RixRacing RockAuto RTM Racing STM Tuned

Latest posts

Build Thread Updates

Vendor Updates

Latest Classifieds

Back
Top