The Top DSM Community on the Web

For 1990-1999 Mitsubishi Eclipse, Eagle Talon, Plymouth Laser, and Galant VR-4 Owners. Log in to remove most ads.

Please Support ExtremePSI
Please Support Morrison Fabrication

My fuse box relocation (project log)

This site may earn a commission from merchant
affiliate links, including eBay, Amazon, and others.

This site may earn a commission from merchant affiliate links, including eBay, Amazon, and others.

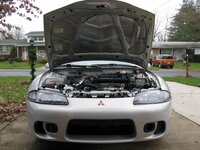
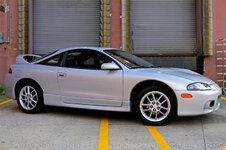
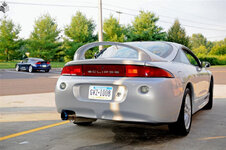
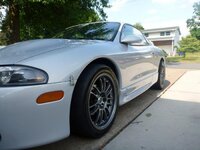
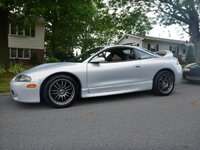
Since I deleted the winshield washer fluid reservoir, I still wanted to keep the top of the fill tube so I didn't have a hole in the hatch. Now, there is no problem just putting that piece back in as is, but I wanted to make sure that in case someone ever tried to put fluid down there, I wouldn't have to rip apart my interior again to clean up the mess. I used the cap off a small jelly jar (like the kind at a diner) to cap off the tube. Then, I used clear RTV silicone to seal the gap and to seal off the smaller hole in the fill tube. I filled it up with water and no leaks! A zip tie was used to hold the tube in place so it didn't move around and rattle - the silicone also keeps the metal cap from rattling against the body. This and the antenna were somewhat ghetto rigged, but I felt that the approaches I took were the best to keep it lightweight, dummy proof, and looking good.

IMG_6336.JPG


IMG_6337.JPG


IMG_6339.JPG


IMG_6372.JPG
 
Last edited by a moderator:
I went over all of the places that had sound deadening and made sure I got every speck of it off with the putty knife. Then I hit the spots several times with Goo Gone to make sure they were clean as can be. Then I vacuumed the whole interior and washed it all with a Simple Green solution. This was left overnight to fully dry. I put the gas pedal back in the car. I removed all the rubber plugs from the floor and cleaned them with Armor All. I put a rubber grommet in the hole the rear o2 sensor used to come through so nothing can get in the cabin through that hole. I routed the 2nd antenna’s wire along the stock amp wires so you can’t see it. Some cables and wires are held down by sticky foam pads from the factory. These wear out and don’t stick well anymore, so I replaced the bad ones with adhesive backed foam that looks very similar to the stock foam pads. I unscrewed the two metal plates under the back seats and cleaned under them. I cleaned out the hatch drain tubes by tying a piece of wire to a cleaner for a saxophone mouthpiece covered in soap and pulling it through the tubes several times. They weren't clogged but a lot of junk came out. Everything plastic was cleaned with Armor All. And I vacuumed it once again.

The final product:

IMG_6373.JPG


IMG_6374.JPG


IMG_6376.JPG


IMG_6377.JPG


IMG_6378.JPG


IMG_6385.JPG


IMG_6388.JPG


IMG_6391.JPG


IMG_6394.JPG


IMG_6406.JPG


I'm very proud of how this turned out. Too bad it'll never be seen :rolleyes:


I got about one third of the way putting all the plastic panels back in (which have all been cleaned with Armor All, even the backsides), but then a storm came and I had to pack it in for the night. To be continued...
 
Last edited by a moderator:
We'll eventually see it! Wanna come pull my dash for me? :D

The dash really is easy to pull, it just takes a good amount of time. I took enough pictures to do a write up whenever I get some free time.

Looks like crap :barf:


Haha, just kidding. Looking great! I can't wait for all the stuff to get powdercoated so we can start putting that engine back together :thumb:

Going tomorrow morning to powdercoat some of them!

I agree. How are you supposed to drive with no steering wheel or seat? :nono:

Oops, forgot to put my steering wheel and lawn chair back in LOL
 
The dash really is easy to pull, it just takes a good amount of time. I took enough pictures to do a write up whenever I get some free time.

Please do. I pulled out everything on my old 2G and took off everything around the dash but the dash wouldn't pull out? Everything was taken out accept the area around the ac controls.
 
http://www.dsmtuners.com/forums/art...-removing-your-dashboard-taking-out-dash.html

That is the article I used to remove the dash. It is a good article minus the lack of pictures. I only got confused on a few parts of the removal. I started to remove the harness from the dash before I realized that the harness stays attached to the dash when you remove it. I also spent a few minutes trying to remove the gauge cluster connectors before I realized they stay in too. The hvac controls stay in when you pull the dash.

I'll do my best to write an article with pictures. It's been awhile so the details are getting fuzzy.
 
The interior is done. I put all the panels back in except for the middle one in the trunk. My hatch didn't pop open the first time I opened it today so I adjusted the tab that holds the spring. I left the panel off for further adjustment if needed. Because I got rid of the black hunk of metal behind the rear seats I lost 2 mounting points for the rear carpet. I'll figure something out so it all looks clean - stay tuned. My carpet was all torn up when I bought the car so I made my own carpet out of black material. It looked pretty good so maybe I'll do black again, or stick with gray, I dunno yet. Ignore the marks on the trunk floor; I have no idea what that is from WTF The leather seats were cleaned before I put them back in. This is about it for the interior for now; the rest of the parts will wait until the car is rewired.

IMG_6424.JPG


IMG_6428.JPG


IMG_6432.JPG


IMG_6433.JPG


IMG_6434.JPG


IMG_6436.JPG


IMG_6438.JPG


IMG_6439.JPG


IMG_6440.JPG


IMG_6441.JPG
 
Last edited by a moderator:
I removed the Mitsubishi, GSX, and ECLIPSE logos from the back of the car. For the Mitsubishi and GSX I used a heat gun (very lightly heating it) and a fingernail. The ECLIPSE required more heat and I used a credit card to scrape the letters off. I marked the position of the logo so I can put the new logo on in the same spot (the chrome was cracking on the old one). The Mitsubishi and GSX will be staying off.

IMG_6448.JPG


IMG_6454.JPG
 
Last edited by a moderator:
Nine and a half hours of work to coat all these. HUGE THANKS to Kevin (ubpiped) and his wife for helping me powdercoat these. I was there all day and Kevin devoted his whole day off work to doing this for me. What a guy! The pieces didn't turn out quite "professional quality" but I love how they look and I'm totally pleased with the results. Kevin really knows what he's doing :thumb: I expected to powderocat parts yesterday until I ran out of powder. Huge shock to me that I returned home with over half my powder left. I am simply stunned at how many parts you can coat with such little powder.

We only ran into a few problems. On the timing belt tins, the powder bubbled up a little in a few places. Not a big deal and the bubbles are in hidden spots so I'm going with it. The cam gears also had a problem. We put the cam gears and the wastegate actuator in the oven at the same time. The wastegate turned out fine but the cam gears had oil all over them WTF and there was oil on the bottom of the oven. There was no oil on the top of the oven that could have dripped down. The powder on the cam gears got ruined so I'll have to strip them and try again. We are stumped on why this happened though. The only thing I could come up with is that they are made of a weird metal that needs special powdercoating considerations? Anybody have a clue?


It's probably hard to tell in the pictures, but in person you really can tell the difference between different shades of black.


Solar Black Flat 2-4% Gloss
Cam gears
Timing belt tins
Wastegate actuator

IMG_6457.JPG


Satin Black 55 - 60% Gloss
Bumper mount
Bumper mount bracket
Battery tie down
Brake resevoir bracket
Clutch resevoir bracket
Alternator bracket
Transmission lower mount
Dipstick tube
Rear engine motor mount bracket
Front engine motor mount bracket
Power steering pump bracket
Motor hoist mount
Radiator mounts
Motor mount bracket
Hood prop bracket

IMG_6471.JPG


Matte Black 15 - 25% Gloss

Wiper arms
Flywheel dust shield
Starter plate
Bumper brackets
Clutch line bracket
Overflow bottle bracket
Horn bracket
Assorted brackets

IMG_6472.JPG


Mirror Black 95+% Gloss
Fuel filter brackets

IMG_6466.JPG


Pewter Metallic
Main water pipe
Coolant lines

IMG_6464.JPG


Silver Metallic
Motor hoist
This was a test piece, it won't be going back on the car. I just used it to test out the 2 silver colors I got to determine which I wanted to use on the water pipe and coolant lines. I love this color but it was a little too bling for a water pipe. The pewter metallic looks exactly how I think a new water pipe would look :)

IMG_6460.JPG
 
Last edited by a moderator:
WOW that looks like crap!!!! Just kidding but I will tell you my wife did not have anything to do with this. Well I could blame the messed up parts on her that sounds good to me but dont tell her that. Hey thanks for the shout out but with out your help it prob would have been 24hrs. HAHA, Well give me a call if you need anything else.Lots of fun though see ya
 
Thanks for the compliments guys. Hearing them makes me want to finish this car up that much more. :) Too bad I go back to school tomorrow so work will be limited to weekends I come home :toobad:


WOW that looks like crap!!!! Just kidding but I will tell you my wife did not have anything to do with this. Well I could blame the messed up parts on her that sounds good to me but dont tell her that. Hey thanks for the shout out but with out your help it prob would have been 24hrs. HAHA, Well give me a call if you need anything else.Lots of fun though see ya

Thanks again Kevin. You're truly a life saver man - you saved me a TON of money by helping me do this. Your wife got the pizza so that's helping ROFL 
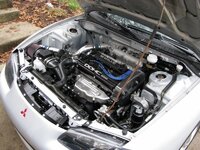
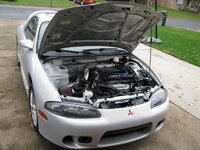
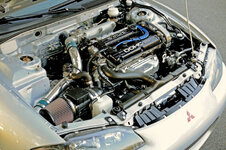
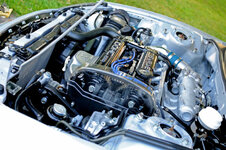
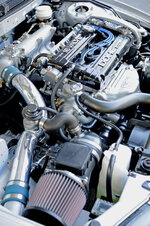
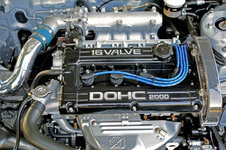
As soon as I get my motor mounts and oil pan I'll give you a call so we can coat them and try the cam gears again. I might do the engine pulleys too.


Not too much to update today. I took all 4 mud flaps off. Underneath one of the rear flaps, it looks like it rubbed against the bumper so some paint was worn off :notgood: 
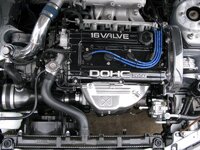
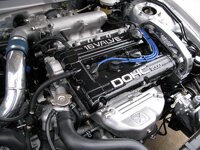
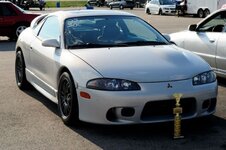
I'll have to get some touch up paint to take care of it. I polished my hood prop and my brother's too, turned out pretty good. I didn't go for a mirror finish, just polished a little so it looks kinda shiny. I tested them before and they're SS so they won't rust. Put the new hatch struts on. Found a few more bolts and such I want to order from Mitsu. I'm going to put the ECLIPSE logo back on tonight. I think I found a good solution for the rear carpet, just need to get some material. That's it.


Can anybody think of a clean way to block the holes in my firewall? I need to close the holes that were used for the heater hoses, a/c lines, a/c drain vent etc. Ideally I would weld them shut but that's not an option. What do you guys think?
 
wow you bought such a real clean car! major props on cleaning it up even more and i really like the hidden weight loss:thumb:
 
The only thing I did this weekend was shave my 1g throttle body. It needs welded and blasted, then I can rebuild it. I lightly polished it to check for major imperfections.

IMG_6604.JPG


IMG_6605.JPG


IMG_6621.JPG


IMG_6622.JPG


IMG_6631.JPG


I didn't get to do anything else because my friend and I started building a blast cabinet. We're not done yet but here is a teaser shot.

DSC00021.jpg
 
Last edited by a moderator:
Forgot to post a picture of the new ECLIPSE logo. Looks a million times better.

Old:
IMG_4374.JPG


New:
IMG_6534.JPG


Polished my t25, no porting, just polished. I am going to port the outlet to match my Megan Racing o2 housing, then polish that and the sealing ring too. I found a crack in the wastegate opening that goes the whole way through the housing so I'll have to get that welded. It was interesting to compare my turbine housing to my friend's housing. They both have several cracks in almost identical spots.

IMG_6652.JPG


IMG_6655.JPG


IMG_6662.JPG


That's it for this weekend. Most of my time was spent working on the blast cabinet.

Still looking for a good way to block the holes in my firewall. Shout out ideas if you have 'em!
 
Last edited by a moderator:
The same people that powdercoat starter plates ;)
 
Support Vendors who Support the DSM Community
Boosted Fabrication ECM Tuning ExtremePSI Fuel Injector Clinic Innovation Products Jacks Transmissions JNZ Tuning Kiggly Racing Morrison Fabrications MyMitsubishiStore.com RixRacing RockAuto RTM Racing STM Tuned

Latest posts

Build Thread Updates

Vendor Updates

Latest Classifieds

Back
Top