The Top DSM Community on the Web

For 1990-1999 Mitsubishi Eclipse, Eagle Talon, Plymouth Laser, and Galant VR-4 Owners. Log in to remove most ads.

Please Support Kiggly Racing
Please Support STM Tuned

My fuse box relocation (project log)

This site may earn a commission from merchant
affiliate links, including eBay, Amazon, and others.

This site may earn a commission from merchant affiliate links, including eBay, Amazon, and others.

Yeah, I know what you mean. I would have been happy with mine after the machine clean, but I figured I'd give this a shot since I know it has worked for a few other people.

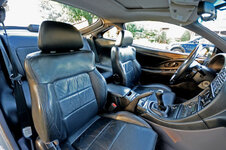
Now if only I had a shift knob that wasn't ripped up...

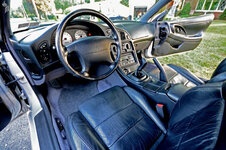
It's weird my carpet looks lighter, because the gray I used was actually slightly darker than what the carpet was. Maybe it is just the flash of my camera.
 
I'm going to use an OEM heavy leather shift knob. It's metal wrapped in leather instead of the ones that came on our cars that were plastic wrapped in leather, so it's much heavier than stock, but looks stock. My brother has one on his car now and it is very nice! The part number is MR263906 if you're interested.
 
If you haven't bought the compressed air yet save yourself the trouble. Use a heatgun instead. It will turn soft and scrape right up. Then you can get any leftover with your Goo Gone. The canned air only keeps it cold for a short time and you have to rush getting the tar off. That and you'll probably need a dozen or more cans of it.
 
Oh man, I can't afford a dozen of them....thanks for the advice - I'll try the heat gun.
 
No problem. You're a lot less likely to scratch the paint underneath once it's heated up. It's doesn't smell the best, but it works.

And nice project. :thumb: I stripped mine out some and made a tech article about it. Although it's not as drastic as what you're doing.
 
I saw your article - very nice job on that! I am actually using some of your tips in my weights savings, like removing the black piece of metal behind the rear seats and I will be lightening up my door panels like you did.
 
I just wanted to say thank you for documenting all of the electrical connections in your tech article. I finally got to that part in my tear down and was not looking forward to it. Now I can just label each connector by the same number you have them listed and I'll learn even more about my car. I really appreciate the work you put into it. You have saved me many hours and educated me at the same time.

d
 
Not a problem at all! I had to do it anyways for myself, so why not share the info with everyone else? Lucky for me my brother had some spare time this summer to write up the tech article.
 
Finally finished taking off the firewall sound deadening. I used a heat gun and a putty knife. The heat gun actually worked very well, but left behind a lot of tar. I had to remove the gas pedal to get to some of the sound deadening. I still have to go over everything with the putty knife and several more applications of Goo Gone until I'm satisfied, but the hardest part is over. Did I mention I'm never touching firewall sound deadening ever again?

IMG_6281.JPG


IMG_6284.JPG


IMG_6287.JPG
 
Last edited by a moderator:
Because I got rid of the heater and FIAV I had to modify the water pipe and thermostat housing. For the thermostat housing, I used a hammer and a screwdriver to smash the nipple up on the inside of the housing. I used vice grips to rotate the nipple in the hole so I could smash it up all around, then I was able to rip it out in 1 piece. The welder had to turn an aluminum rod to make a little insert to weld in there so it wouldn't warp the gasket surface. Then he grinded it down to make it look nice. I cut the little tube off the water pipe and cleaned up the surface. The welder patched this hole up with no insert. He had some issues because of the brazing material or whatever that was left on there but he got it straightened out and grinded it down too. I also cut some unneeded metal off of the coolant overflow bottle bracket, brake fluid reservoir bracket, and the bracket the clutch line attaches to.

Why didn't I cap off the coolant nipples/lines with rubber caps?
1. Welding looks cleaner.
2. I had a rubber cap (that was specially made for capping coolant lines) burst open on my brother's car and sprayed the whole engine bay with coolant - not fun. Welding doesn't leak.

IMG_5999.JPG


IMG_6295.JPG


IMG_6296.JPG


IMG_6005.JPG


IMG_6297.JPG


IMG_6002.JPG


IMG_6009.JPG


IMG_6010.JPG
 
Last edited by a moderator:
Eric,
Sorry to get you off your subject.
You have a few pictures from when you went to JNZ for parts. In the pictures, there is a Black (or Dark Green) 2G (95 or 96) with a rear center tail light that says Turbo and it is painted. Do you know where that car's center light part was purchased?
 
That's my brothers (snowborder714) car. The piece was like that when he bought it, but the stock piece was just painted to match the car and the badge is from a Porsche. And the car is blue by the way.
 
Mike, if you're talking about Eric's car, I sure hope you're not serious. ROFL His car is pretty much stripped down all the way. We'll be lucky if we can get it running by winter I think.

However, my beaut will be the one we're taking! :thumb:

If I'm lucky, he'll wash it before he drives to my place. :sneaky:
 
Blasted more parts tonight. This all took about 4 hours including the time waiting for the compressor to cool down.

IMG_6301.JPG


IMG_6302.JPG


IMG_6303.JPG
 
Last edited by a moderator:
Mike, if you're talking about Eric's car, I sure hope you're not serious. ROFL His car is pretty much stripped down all the way. We'll be lucky if we can get it running by winter I think.

However, my beaut will be the one we're taking! :thumb:

If I'm lucky, he'll wash it before he drives to my place. :sneaky:

:D Had to ask. I've been sanding my car all day and will be sanding and painting all of tomorrow to see if I can get a few layers of good paint on before the meet.
 
Every time I see an update for this thread I laugh at the title... Fuse Box Relocation. I think you may have gotten carried away. LOL

I like all the pics of the blasted parts. Are they getting powdercoated or painted?
 
I love what you are doing with the water pipe, it's very clean. It's great that you're taking your time and doing it right.

Thank you, sir!

Every time I see an update for this thread I laugh at the title... Fuse Box Relocation. I think you may have gotten carried away. LOL

I like all the pics of the blasted parts. Are they getting powdercoated or painted?

I really should change the title...I initially started the thread to highlight the relocation because of the people who have done this before, only a few of them have documented it. Although all of my project was planned out from the beginning, everything else I'm doing has been done a million times before so I didn't plan on documenting it. Plus at first I didn't realize that I really should have the engine back in the car to do most of the wiring.

I will powdercoat almost all of the parts pictured. The only ones not being powderocated are the lower heat shield (painted high temp black), the long coolant line that runs along the block (painted with the same paint I used on the block so it blends in), and the transfer case (not pictured) will be painted. The transfer case is part aluminum and part steel, so I could just paint the steel part and leave the aluminum part with a bead blasted finish but I think that would look funny, so I'm leaning towards painting it with some high temp black paint. I haven't decided on what shade of black I want yet. Or I could paint it with Aluma Blast. And after thinking about all this I can't help remind myself that the transfer case will never be seen LOL Powdercoating should happen next Friday since that is when my friend has some free time. I didn't order enough powder to do all my parts since I wanted to make sure I like the colors I picked and to get a feel for how much powder gets used to coat the parts. So I will do as many parts as I can on Friday, then I will have order more powder. No fancy colors here by the way, mostly shades of black with a couple pieces in silver. The point of powdercoating for me isn't to make parts stand out - it's to make them have a clean, fresh look, having parts match colors where I want, all while having a durable and easy to clean finish. I also have a valve cover powdercoated gloss black with polished letters from TRG. I didn't trust myself to coat the single most prominent piece in the engine bay so I left that to the pros. If I mess up a little on the parts I'm doing, they won't stick out nearly as much as a messed up valve cover would. I'm debating whether to have my crossmember powdercoated or not. I can't do it myself because it's so big.

Hopefully next week I will get to blast my other parts with the extra fine glass beads. It's supposed to give them a satin finish - I can't wait to see how they turn out :cool:
 
Glad to hear you're not going crazy with the colors. It's more like a restoration+.
I was wondering if you were planning on doing the subframes or suspension components. That would pretty much take care of everything. But finding an oven to put them in is another thing.
 
Suspension restoration is my next big project for this car. Nothing is in bad shape, I just want to do some maintenance type things and get rid of rusty pieces. Although, since my front axles decided they don't want to come out of the hubs, some of the suspension piecs are getting replaced sooner than expected. I don't think I would bother powdercoating the subframes because that would cost a lot to have someone do it, but when I have them out I will probably repaint them or at least touch up the paint. I will be taking care of a little rust spot on the front subframe before I put the engine back in.
 
I'll be powdercoating my own stuff because a local dsm'er has a coating setup. The only thing I would have to outsource would be the crossmember, and I would most likely have JNZ do it because my brother is close to them so I wouldn't have to ship it.
 
The sound deadening on the backside of the rear wheel wells was another PITA part. I used a heat gun and putty knife to scrape it off, but a lot of yellow glue was left behind. Goo Gone and Goof Off did nearly nothing to get this stuff off, so I resorted to using a plastic scraper to scrape it off. It came off very slowly but cleaned up extremely well.

IMG_6318 (Small).JPG


IMG_6342 (Small).JPG


IMG_6374 (Small).JPG


I did the azdave trunk mod. It worked great - highly recommended if you have problems opening the hatch. I also have new hatch struts to replace my crappy ones, didn't get to that yet.

IMG_6358 (Small).JPG


My car has 2 antennas from the factory - the main one on the body and one in the rear window. I hate the main antenna. I hate how it looks and I hate how it's constantly going up and down, up and down, up and down. When and if I ever do body work to this car the antenna hole will be shaved, but for right now that isn't an option. So I had some choices at this point.
1. Delete the whole antenna assembly and plug the hole with some rubber grommet thing. Not a bad choice but I really didn't like how it would turn out looking.
2. Leave the antenna assembly bolted in but disconnect the wires so it doesn't do anything. At least I don't have a big hole to deal with but that's weight sitting in the car doing nothing.
3. Remove all of the antenna assembly except for the part that sticks out. Winner! This way I get rid of most of the weight but it looks like the antenna is still there.

To remove the antenna I used a screwdriver and hammer to loosen the chrome nut from outside the car. I was concerned I would slip and scratch the body but the way I held the screwdriver it would have impaled my hand before it touched the body. There is a special tool for this but the screwdriver way is very easy. Then, I unbolted the assembly from the car. It's kind of hard to explain so see the pictures for how I modified the assembly to leave just a small portion sticking out. JB weld was used to keep the antenna together and to weatherproof the assembly. I had to use 2 washers to shim the antenna up to make it snug against the body.

IMG_6312 (Small).JPG


IMG_6323 (Small).JPG


IMG_6329 (Small).JPG


IMG_6333 (Small).JPG


IMG_6359 (Small).JPG


IMG_6361 (Small).JPG
 
Last edited by a moderator:
Support Vendors who Support the DSM Community
Boosted Fabrication ECM Tuning ExtremePSI Fuel Injector Clinic Innovation Products Jacks Transmissions JNZ Tuning Kiggly Racing Morrison Fabrications MyMitsubishiStore.com RixRacing RockAuto RTM Racing STM Tuned

Latest posts

Build Thread Updates

Vendor Updates

Latest Classifieds

Back
Top