The Central Hub for DSM Community and Information

For 1990-1999 Mitsubishi Eclipse, Eagle Talon, Plymouth Laser, and Galant VR-4 Owners. This is where the DSM platform history is documented and archived. Log in to help us in our mission, and to remove most ads from the browsing experience.

img_8094800x600.jpg

My fuse box relocation (project log)

This site may earn a commission from merchant affiliate links, including eBay, Amazon, and others.

Tons of gaskets, seals, timing belt stuff, bse stuff, wiper cowl stuff, coolant reservoir, brake reservoir/cap, clutch reservoir/cap, power steering cap, fuel filter, upper heat shield, oil cap, radiator cap, thermostat, valve cover gaskets, dipstick, new grounding straps, radiator hoses, coolant hoses, random clips and some interior parts, intermediate shaft spacer, and a shitload of bolts/washers/nuts. I'm a self proclaimed hardware whore so nearly every bolt/nut/washer is getting replaced in the engine bay and front suspension. The "important" bolts were bought oem and the rest will be replaced with stainless steel hardware. All in all, my parts list comprises of about 150 different part numbers.
 
whats the part number for the "eclipse" for the rear (if thats what its for :p ) i need a new one :thumb:
 
Wow!, my wife saw the kitty litter buckets and laughed. I use them all the time for everything. Cleaning stuff, parts holders, tool boxes, fluids, and tried them as jack-stands(on my wifes 660 raptor.) After like 10 minutes I went back to the raptor and it had collapsed, RIP lil bucket. ;)
 
The wiring has been put on hold for awhile. I figure I need the engine assembled to do some of the wiring, then I'll have to have the engine back in the car to do the majority of the wiring. Progress has still been slow since cleaning parts takes me forever. I'm happy to say that every part is now thoroughly cleaned and ready to blast :) My hookup with a blast cabinet keeps backing out on me so the blasting has been pushed back weeks, but I hope to blast some things on Tuesday. I also need to get some things welded, but my hookup on that has been busy so I'm waiting patiently.


I cleaned the engine and painted the block. I used a combination of aircraft stripper, Permatex rust dissolver, Permatex gasket remover, and a super heavy duty wire wheel that attached to my angle grinder to prep the block and get it down to bare metal. First, I taped everything off with painters tape and newspaper, then I put 3 coats of Dupicolor gray engine primer and 3 coats of Dupicolor semi-gloss black engine paint. It turned out really nice but the next time around I'll probably go with a satin or matte black. I still have to clean up the rust on the front of the engine (it appeared after I hosed off the block to clean off the chemicals). BTW, Permatex gasket remover worked amazingly for cleaning up all the scum in the intake and exhaust ports on the head - that stuff is the sh*t! The trick is to let it sit at least 1/2 hour - the directions on the can only tell you 10-15 min. These are the only pictures I have, the rest are on my brothers computer.

IMG_6269.JPG


IMG_6270.JPG


I ported my throttle body elbow to 60mm using a Harbor Freight die grinder and some bits that were meant for steel. They worked great though. Then I polished the whole thing with an 80 grit flapwheel on my dremel, an extra fine cross buff on my die grinder, and hand polished with Mother's mag and aluminum polish. I thought it turned out very good for my first port and polish job.

85792d1217265973-porting-2g-tb-elbow-match-1g-60mm-tb-why-img_6116.jpg


85793d1217265973-porting-2g-tb-elbow-match-1g-60mm-tb-why-img_6119.jpg


85794d1217265973-porting-2g-tb-elbow-match-1g-60mm-tb-why-img_6120.jpg


85795d1217265973-porting-2g-tb-elbow-match-1g-60mm-tb-why-img_6123.jpg


I ported my oil relief valve (since I'm eliminating the balance shafts) with my dremel and a small attachment. I tried to port as far as I could while still allowing the piston room to seal. Then, I cleaned the part thoroughly afterward to clean off all metal shavings.

85796d1217268036-porting-oil-housing-relief-valve-img_6130.jpg


I disassembled my T25 so I can polish the turbine housing and media blast the compressor housing. When I finally got it apart I found the heatshield on the turbine side was damaged. I also noticed my stock exhaust manifold had a few minor cracks in it. So yesterday I bought my friends T25 and exhaust manifold for $25. I still have to take his apart to make sure it's ok but I'll probably be using his center section with my compressor and turbine housings.

85884d1217563925-t25-disassembly-img_6152.jpg


85885d1217564143-t25-disassembly-img_6155.jpg


85886d1217564143-t25-disassembly-img_6156.jpg


Quick update on the lining I sprayed in the front fenders. I used 3M professional rubberized undercoating. Since I sprayed that, I have washed the car once. There are spots that are starting to fade on the lining now, they're like little white spots. Also, whenever the weather is hot the lining gets "tacky". I made sure I prepped the surface in there very well. I guess it could have been my mistake, but I suspect the 3M stuff is junk. When the car runs again I will drive for awhile with the 3M stuff on to see how it holds up but I will likely try a different product at some point.
 
Last edited by a moderator:
My parents left on vacation yesterday for a week, so I deemed this week as "interior week". Since they're gone I can have the car in the driveway without getting yelled at, and I can store all my parts in the house without them getting in the way.


First, I removed the stock amp from the car, then the carpet came out. I took off the padding from the bottom of the carpet, then spent about 3 hours hand picking the little strands of it out that got left behind. Talk about a fun time... Before my Mom left, she was kind enough to use her vacuum-looking steam cleaner thing she uses for the carpets in the house to clean my carpet twice. It didn't look that dirty before but boy did that cleaner pick up a lot of dirt. I'm going to clean it at least once more today just to make sure it's clean as can be.

IMG_6178.JPG


IMG_6184.JPG


IMG_6187.JPG


IMG_6198.JPG


IMG_6237.JPG
 
Last edited by a moderator:
A bunch of other stuff came out of the interior then. Backseats, all plastic panels, everything in trunk, spare, jack, carpet, seat belts etc. Things that are staying out: rear speakers, windshield washer fluid reservoir and all tubing, big black hunk'o metal behind rear seats (I lose 2 mounting points for the rear carpet and 2 mounting points for the plastic panels there but it should be fine without it), sound deadening will come out once I get some dry ice, possibly the stock antenna mechanism, stock amp, some unused audio wires (to amp and nonexistent cd changer). I decided not to mess with any of the wiring harnesses in the interior, so unused connectors will be taped up but not removed. For the windshield washer fluid reservoir, I removed all of the tubing that goes up the engine bay. I also removed all the tubing that goes to the rear squirter up to where it connects to the hatch. I had to lower the rear part of the headliner to reach in and remove the hose that travels up there, but I left the big rectangular part in that bolts to the roof so there isn't a giant hole there. I put a vacuum cap on the nipple there just to keep dirt out and water out of my interior. I will also be capping off the big rubber hose near the fill port so in case some retard tries to add washer fluid, it won't get all over my interior.

My plans for this week are to finish the weight savings in the interior (I'm only doing these mild weight savings, I won't be cutting any metal or studs out or anything like that), clean every piece that came out, and reassemble it all. I'm also going to do the azdave trunk mod (which worked great on my brothers car) while I have everything out. Whenever my hookups get to it, I need to weld, media blast, and powdercoat parts. Then I will be cleaning some rust off the chassis and repainting the spots with paint I had made up to match my car color perfectly. The engine will go back together whenever my brother has a free weekend because he would like to help assemble it and two heads are always better than one. Hopefully we can get most of it done in one weekend.

Feedback is welcome guys! Love it, hate it, think I should do something different? Let me know - I'm always open for ideas! Enjoy the pictures :)

IMG_6209.JPG


IMG_6211.JPG


IMG_6221.JPG


IMG_6223.JPG


IMG_6224.JPG


IMG_6226.JPG


IMG_6242.JPG


IMG_6254.JPG


IMG_6259.JPG


IMG_6261.JPG
 
Last edited by a moderator:
Haha, their driveway was at least 1/2 mile long and the whole thing was full of dirt, mud, rocks, you name it. Since we had my brothers GST he had to drive like 2 mph the whole way so he didn't bottom the car out on all the dips. Then when we get there, Eric tells us it's easier to park on the next street over and then walk through a little patch of woods so you avoid all the crappy roads LOL
 
Damn, dude. You're nuts. But props from me nonetheless.

I'll take that as a compliment :)

Looks sick cant wait to see it after its done..

Me too!!!


Today I steam cleaned the carpet 2 more times until the water coming off had very little dirt in it. I tucked some of the wiring in the interior (rear speakers, winshield washer fluid resevoir wiring, etc.) to get it out of the way and look a little cleaner. Then I went and blasted some parts with extra fine coal slag to prep them for powdercoating. You can read about my experience here.

85953d1217816248-media-blasting-img_6271.jpg


85954d1217816248-media-blasting-img_6272.jpg


85955d1217816248-media-blasting-img_6274.jpg


85956d1217816248-media-blasting-img_6277.jpg
 
Heh, I have been doing this same exact process. I bought my car from a kid who lived on a farm, then let it sit in a field for 3 months. Just imagine how much dust, cow shit, mud, etc.. was in my car LOL. I literally have the interior stripped 1-2 times a month. I have replaced every missing/ broken screw/fastener/clip so far on the interior. I have cleaned the carpet to spotless perfection and made a new trunk carpet. Headliner is the final project for the interior and to be honest I think I will have just about the cleanest OEM style interior anyone can find (It s almost showroom clean at this point) Seeing as this is my DD I'm building a spare motor outside the car and will clean up the engine bay when install time comes. She goes in for paint in a few days if all goes according to plan.

Looks to me like you enjoy doing this kind of work as much as I do. I only wish I lived closer to JNZ because I have ordered over a hundred different clips and such from them and shipping is killing me.

Keep up the good work
 
Today I removed the sound deadening beneath the rear seats, next to the rear speakers, and some on the firewall and on the rear wheel wells. I called local places that sell dry ice but all of them close before I get off work so it's impossible for me to get my hands on dry ice this week. Ok...I have some canned air at home, right? Nope, and those things are hella expensive so I didn't feel like buying a bunch. No problem - I'll just go at it with a putty knife and a rubber mallet. I started with the stuff under the rear seats. All in all, the putty knife worked pretty good, although it left behind a lot of the black tar. Then I moved to the rear speakers and that was harder to remove because of the curvature it's on. Even more tar was left behind in these areas. Then I moved to the rear wheel wells and I could pick about 1/2 the stuff off with just my hands - the other 1/2 was hard even with the putty knife so I skipped that for now and moved to the firewall. Trying to get the sound deadening off the firewall is a huge PITA! This stuff left behind TONS of tar, and trying to get in there with the putty knife is very tricky because the firewall has so many dips and such in it. I gave up after a little section and a portion of a big section. I went back and cleaned the rear seat spot and the rear speaker spots with Goo Gone to get rid of all the tar. It worked surprisingly well (and my interior now has the scent of "Citrus Power" :rolleyes:
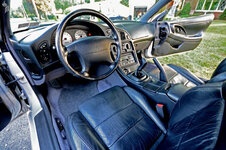
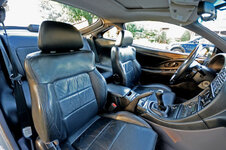
. At first I only let it sit a few seconds before scrubbing, but I soon learned to let it sit for at least 10 minutes so it can work it's magic. After a few applications most of the tar is gone - only a few little spots remain that I can pick off with my fingernails. I was very pleased to see that the putty knife left very few scratches on the body. I'm going to give in and pick up a few cans of compressed air tomorrow to hopefully make the firewall and wheel wells easier. I also taped up some more unused connectors - all the connectors for the hvac stuff I removed, the little light that lights up the cigarette lighter (the yellowish tint won't mesh with my custom white led interior that I have planned), the light that goes in the cup holder (c'mon, it doesn't even light the cup holder up well and that's one more thing I have to remove to get the center console out), and I taped up the amp connector and stuffed it under a brace running across the floor. I kinda have the urge to remove all the unnecessary wiring in the interior now, but I just don't have time for that at the moment. I go back to school in 2 weeks so after that I'll only be able to work on weekends. Pictures of the interior will be posted after I finish gutting it all and clean the whole thing with a Simple Green solution. I would love to paint the interior now too....
 
I give you "most dedicated to cleaning his DSM up" award :)

Sweet.............:thumb:

Heh, I have been doing this same exact process. I bought my car from a kid who lived on a farm, then let it sit in a field for 3 months. Just imagine how much dust, cow shit, mud, etc.. was in my car LOL. I literally have the interior stripped 1-2 times a month. I have replaced every missing/ broken screw/fastener/clip so far on the interior. I have cleaned the carpet to spotless perfection and made a new trunk carpet. Headliner is the final project for the interior and to be honest I think I will have just about the cleanest OEM style interior anyone can find (It s almost showroom clean at this point) Seeing as this is my DD I'm building a spare motor outside the car and will clean up the engine bay when install time comes. She goes in for paint in a few days if all goes according to plan.

Looks to me like you enjoy doing this kind of work as much as I do. I only wish I lived closer to JNZ because I have ordered over a hundred different clips and such from them and shipping is killing me.

Keep up the good work

The first week I bought the car I cleaned what seemed like a forests-worth of pine needles and leaves out of my trunk. I dunno how it got there, but whatever. Sounds nothing like what you've had to deal with! Even with how much of the interior I have torn out, I have only found 2 missing screws and have only broken 3 fasteners taking everything out - not bad I would say! I also made a new trunk carpet from some black material (pic is in post 84), but I will probably be redoing it since I got rid of the black hunk of metal that the carpet clips go into.

I just checked out your interior pics in your profile. It looks amazing OMG The carpet looks like a lighter shade of gray than mine - is it dyed/painted? Great job though, hopefully mine will look 1/2 as good as that!

P.S. - You're missing a fastener on the dead pedal :tease:

um...i love this...

LOL
 
This is the type of thread i like.:thumb:
Are you going to paint all that stuff you pulled out from the interior?

You mean all the plastic pieces? I'm not planning on painting them now, but future plans might be to paint the gray trunk panels and the little panels around the rear windows black to give it that "OEM black" look. A black headliner, carpet, and floor mats would be nice too, but I would leave the lower dash and center console side panels gray so it's not a total blackout.
 
What plans you got as far as the engine goes?

Not much at all, really. As you've seen most of my effort/money has been placed in maintenance and cleaning things up. Modifications will include Megan racing o2 housing, downpipe, and catback exhaust (with a custom vband clamp between dp and exhaust), ebay intake pipe, K&N filter, Evo III intake manifold, I'm rebuilding a 1g throttle body, polish turbine housing, Hondata intake mani gasket, I'm building a SS turbo oil return line with fitting welded on a 4g64 n/t oil pan, SCE turbo and exhaust mani copper gaskets, B&M short shifter, Symborski shift kit, brass underhood bushings, Prothane motor mounts (sides), Solid aluminum front and rear motor mounts (Biglady mod), Techan-fit clutch line, SS oil feed line to turbo, and Zaklee cam gear cover. I'm probably missing some stuff but as you can see, most of it is "little" stuff, no big power adders here. I'll be sure to mention all the mods as I install them throughout the build. After I recover from this wave of modifications I'll be focusing on suspension and brakes rather than making the car go faster. I'm interested in road racing / autocross so power will take a backseat to handling.
 
Sweet.............:thumb:


The first week I bought the car I cleaned what seemed like a forests-worth of pine needles and leaves out of my trunk. I dunno how it got there, but whatever. Sounds nothing like what you've had to deal with! Even with how much of the interior I have torn out, I have only found 2 missing screws and have only broken 3 fasteners taking everything out - not bad I would say! I also made a new trunk carpet from some black material (pic is in post 84), but I will probably be redoing it since I got rid of the black hunk of metal that the carpet clips go into.

I just checked out your interior pics in your profile. It looks amazing OMG The carpet looks like a lighter shade of gray than mine - is it dyed/painted? Great job though, hopefully mine will look 1/2 as good as that!

P.S. - You're missing a fastener on the dead pedal :tease:


LOL

Heheheh you mean this fastener?

p1000621ek9.jpg


I had it sitting in my box of old fasteners/clips/screws LOL. I took the picture and then realized it was missing.

As for the carpet. I pulled it out, pressure washed it, used oxy clean detergent + carpet shampoo+ water mix in my carpet cleaner, then pressure washed it to remove the soap, vacuumed it, and then used a light coat of gray dupli-color fabric paint. I have to say it worked VERY well, and if you try it I hope you have as good of results as I did.

It appears the kid who owned it had removed the interior panels and broke or lost a bunch of clips and then put it back together half-assedly (not even a word). All of my panels were loose which really bothered me so I made it a point to replace them all so I had a nice tight fit again. I had to drive it around for about 3 weeks with basically just a seat and a steering wheel while I waited for JNZ to ship my fasteners LOL.

I wanted to start a project thread like your for my car, but I keep forgetting to take before and after pics so it wouldn't have the same feel.


Keep up the good work bud.
 
Hah, that's the fastener!!

I thought your carpet looked painted - it was just "too clean to be true". I'm happy with the way mine turned out from the steam cleaning so I won't bother painting it, but yours turned out very nice.
 
Add Value - Be Respectful - No Trolling - No Misinformation - Participate Often!
Support Vendors who Support the DSM Community

Build Thread Updates

Latest Classifieds

Back
Top