The Top DSM Community on the Web

For 1990-1999 Mitsubishi Eclipse, Eagle Talon, Plymouth Laser, and Galant VR-4 Owners. Log in to remove most ads.

Please Support Rix Racing
Please Support Fuel Injector Clinic

Altered Mental Status(1G AWD 5spd)

This site may earn a commission from merchant
affiliate links, including eBay, Amazon, and others.

This site may earn a commission from merchant affiliate links, including eBay, Amazon, and others.

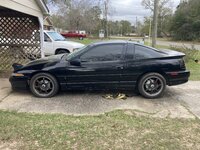
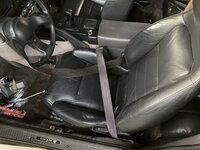
Something about new bolts is like, intoxicating. Crazy how buttery smooth these things go in when everything is new.

IMG_4304.jpeg

IMG_4305.jpeg
IMG_4306.jpeg
IMG_4307.jpeg
IMG_4308.jpeg


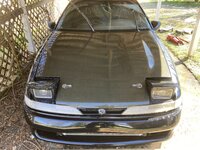
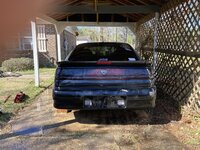
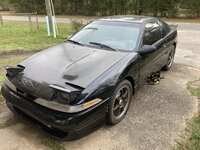
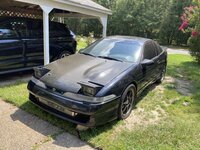
Getting so close now…
 
Alright, so I've decided this thing is gonna be fuel exclusively by BOOSTane Pro/100 octane because it's ridiculously cost effective. $4.65 a gallon for 100 octane unleaded gas. ($4.26 a gallon for 99 octane! Or $9.25 for 106. Lol)

So, with that said, I'm gonna drop this here for future me in case I need to reference a mixing chart. Also as a bonus, anyone else planning to use it can see your mixing ratio too because the can's ratio and the app's ratios are straight stupid.

BOOSTane Mixing Chart.jpg
 
Painted the old Dejontool 2G MAF in a 1G intake pipe that I bought a number of months back. I didn't completely strip it down and repaint it, I honestly just scuffed up the paint that was on it(which was original to Dejontool. Very old paint!) and sprayed over it with some good quality Caliper Paint rated to like 500*. It smells like straight cat urine, but is tough AF. I think it turned out awesome for taking me literally like 5 minutes to prep and a couple coats of red.


Painted Intake Pipe (1).jpg
Painted Intake Pipe (2).jpg
Painted Intake Pipe (3).jpg
Painted Intake Pipe (4).jpg
Painted Intake Pipe (5).jpg


Couple pictures are blurry, but eh. You get the idea. I love this red. Gonna paint the VC with the same paint(but it's gonna be prepped way better). Gonna have a nice Red/black/chrome engine bay scheme eventually.
 
I hate this car.

IMG_4353.jpeg

IMG_4354.jpeg

IMG_4357.png


I did this to the ungrateful bastard only for it to refuse to go into any gear. Idk if it’s a shift cable issue or what but I’m over it.


But, it had an OEM bushing that was super worn and a single bronze bushing. I upgraded it to the rtm delrin bushings and honestly their kit sucks. It needs to be pressed into the ends(I sanded the piss out of the opening too beforehand) and the cotterpins included are way too big for the hole on the arm so I got creative.

I also bought some sunvisors locally that need to be reupholstered and various trim pieces that this thankless spoiled brat doesn’t deserve.

IMG_4347.jpeg

IMG_4348.jpeg

IMG_4351.jpeg

IMG_4352.jpeg


The last two pictures might be hard to see but they’re little ecu/tcu covers. Again, it’s the small touches that this drama queen mf’er doesn’t appreciate. :mad:

Meh. Might burn it down might not. Let it sit and think about what it’s done.
 
I hate this car.

View attachment 696123
View attachment 696124
View attachment 696125


I did this to the ungrateful bastard only for it to refuse to go into any gear. Idk if it’s a shift cable issue or what but I’m over it.


But, it had an OEM bushing that was super worn and a single bronze bushing. I upgraded it to the rtm delrin bushings and honestly their kit sucks. It needs to be pressed into the ends(I sanded the piss out of the opening too beforehand) and the cotterpins included are way too big for the hole on the arm so I got creative.

I also bought some sunvisors locally that need to be reupholstered and various trim pieces that this thankless spoiled brat doesn’t deserve.

View attachment 696126
View attachment 696127
View attachment 696128
View attachment 696129


The last two pictures might be hard to see but they’re little ecu/tcu covers. Again, it’s the small touches that this drama queen mf’er doesn’t appreciate. :mad:

Meh. Might burn it down might not. Let it sit and think about what it’s done.
The shift arm pivot with the small shoe on it, may be seized. The replacement I just got wasn't seized but it was full of rust. However it cleaned up easily, amd with some fresh synthetic grease it's nice and buttery. Lol.
 
Not. Laughing.


I am. I meant it to be laughed at. It genuinely annoyed me at the time, but I'm not really super angry. I did get a lot accomplished today. But I'm still gonna make it sit and think about what its done.


I may threaten to auto swap it within earshot of it, just for extra salt and pepper.
 
I am. I meant it to be laughed at. It genuinely annoyed me at the time, but I'm not really super angry. I did get a lot accomplished today. But I'm still gonna make it sit and think about what its done.


I may threaten to auto swap it within earshot of it, just for extra salt and pepper.
Oh I got it, and I was LOL. I needed that today so thanks for that. Auto swap in earshot…now you’re just being mean Cory
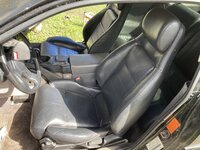
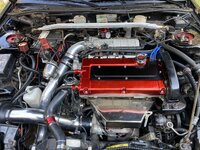
 :p
 
The shift arm pivot with the small shoe on it, may be seized. The replacement I just got wasn't seized but it was full of rust. However it cleaned up easily, amd with some fresh synthetic grease it's nice and buttery. Lol.


Is there a way to remove it?


I think the shifter cables are adjusted wrong or something. Because the car is in neutral. It will roll back and forth, but the shifter in the car will not rock side to side at all, and only has one gear in and out. Is there a lockout or a way to lock the shifter in place that I might be missing?
 
Well shit. I couldn’t let it go knowing I had work for the next two days, so I went back out after tons of reading and discovered something.


Oops. I should’ve looked at the cables first before losing my temper and calling it names. Now I have to buy it something nice as an apology. Sorry Black Betty! It wasn’t your fault. Someone put 90 cables in this thing, as a result one cable is way too short and does what the video shows. Doh!

Glad you found it. I was going to ask about the bracket if it was wrong or messed up- wouldn’t have guessed someone put the wrong cables.
 
I couldn't leave it alone, and something just kept nagging me so I went through my spare parts and did a whole bunch of stuff today. I messed with the shifter cables, thinking I would install my spare set and I thought it would be a simple process and then I could move on to installing the turbo.

It wasn't. The spare set I had was...horrible, to say the least. I did have one cable that was salvageable that had the OEM rubber bushing in it, but didn't think anything about it. This will come in handy later.


So I fought, and fought, and fought. I used the new cables, I used the old cables, I used a combo of the two and switched them back and forth thinking I had the order wrong. Nope. Same problem every time. But, the more I messed with the shifter, the more I noticed just how much the "side to side" arm(not the one that goes 1/2 3/4 5/R) would move. It had a massive amount of slop. I began to wonder two things. 1) If that slop was preventing it from really having the proper tension being applied to the cable and 2) how that other different cable would fit. So I tackled both problems at one time.


The previous owner in his wisdom ordered the OEM shift bushings for the shifter, so I pulled the shifter and WOW am I glad I did this.

IMG_4366.jpeg


This bushing was completely gone. IDK how but it was like...melted and coming out in legit pieces.

IMG_4367.jpeg


This one wasn't too bad actually, but he had it in his bag of goodies, so I replaced it anyway. Added some lube/grease to it too, just in case(because it was already greased when I took it apart).

Another weird side note...when I took the shifter base plate out of the car...it had like, a million washers stacked under it. I guess to move the entire shifter assembly up? I have no clue why. When I reinstalled it, I just left them out. The cables seemed like they were happier going in, and there's ZERO movement of any kind in any direction so I have no clue why these were here. Lol.

IMG_4369.jpeg


But...the end result after I tried this different cable was....this!


God that is such an intoxicating feeling AND sound. It feels like slotting a round into the chamber of a rifle. Love it. Again, might seem small to some...but this is huge. The car has never been able to go into gear since the day I bought it. This was a huge step in the process of getting the car running and driving, and man am I happy. I ran out of time after all the back and forth struggling I did with cables and fitment and testing, so I shut the hood happy with it finally being able to be shifted like a normal car.


But, before I could end the day entirely, I yanked the UICP off and did this to the HKS BOV.

IMG_4368.jpeg


Torque solutions Recirc fitting for the HKS SSQV. I am about 99% sure it's gonna leak at idle/vacuum, but whatever. Hopefully under boost it won't leak and if it does I'll just go full custom piping(partially because these pipes are honestly atrocious. They feel like they're paper thin and made out of the cheapest metal ever, and no beadrolls anywhere) and go with a better, more leak-proof BOV but in the mean time it'll be fine. One step closer! So stoked!


I'll ask one more time though..if anyone has a punishment racing short route intercooler piping kit you don't want or need anymore(including LICP and TB Elbow) please PM me. I have a strong feeling the punishment piping will work perfect but I'm not buying the $250 piping kit alone that CXRacing sells. Or even better, if you have the actual piping from ETS for their Street Intercooler, I'll take that too!
 
Another weird side note...when I took the shifter base plate out of the car...it had like, a million washers stacked under it. I guess to move the entire shifter assembly up? I have no clue why.
I think that's done to keep the shifter base stationary instead of soft rubber bushings that allow flex. Just saw someone else do it as well.
 
I think that's done to keep the shifter base stationary instead of soft rubber bushings that allow flex. Just saw someone else do it as well.

Interesting. It's weird because this base plate had a set of solid metal bushings to replace the rubber ones already installed too. So I have no clue. Lol


On a side note, if anyone wants a set of Torque Solutions shifter-base bushings, I have a brand new set I won't need.
 
Interesting. It's weird because this base plate had a set of solid metal bushings to replace the rubber ones already installed too. So I have no clue. Lol


On a side note, if anyone wants a set of Torque Solutions shifter-base bushings, I have a brand new set I won't need.
Oh I see. Weird, huh.
 
Were they trying to get some extra spacing for that staging brake, possibly? Can’t think of any other reason to try to raise it, especially with how sensitive they are with the cables/brackets/bushings all needing to be right.


I didn't think about that, but it's a good possibility. It also had aftermarket seats with much larger bolsters in it originally at the time AMS built it, so it 100% might've been necessary. But I'm willing to bet money it didn't help either with shifting, or cable longevity.
 
Well, day of victories, man. Day of victories. I woke up determined today, so I got right to jacking the car up, and replacing the brake line that I destroyed/that crumbled in my hand. The old ones were black sleeved and not bad per say, but these ones from JNZTuning feel soooo much better, and the heads can tighten without moving the whole line.

IMG_4373.jpeg


^ Old brake line. You can see my super, very smart, ultra genius maneuver to seal the end of the broken line. I know, you're impressed.

IMG_4374.jpeg


Bam! New hotness. This car had a red valvecover back in the day and some red accents, so I've decided to embrace the red. I love how it looks, and it's uber functional. Shortly after this, I bled all four corners and wow did the driver's side rear need it. Super brown and sputtery fluid kept coming out, so I bled it until it came out smooth and clear. :) All better now!


Now it's time for something I've always dreamt of doing. Installing an FP Green on my DSM. It's awesome how nice it snuggles in here, and with all new OEM fasteners + nickel high-temp anti-seize, it flew together in a breeze. I still need to install the feed line from the OFH, but that'll come later.

IMG_4375.jpeg


All my ducks in a row. Even got the OEM 2G spring washers.

IMG_4376.jpeg
IMG_4377.jpeg


Aaaand she is IN folks! Look at that hotness, man. But all that exposed exhaust metal needs to be addressed. This car was reported to have some overheating issues in traffic, so I'm gonna try two things. 1) an OEM cooling fan (and probably a SPAL or FAL pusher for A/C when I put the A/C back in it) and 2) heatshielding! So let's get to step two here.

IMG_4378.jpeg


Wait, wait. Can't have a street turbo car without a proper intake and the IC piping. Let's throw that on real fast. :D

IMG_4379.jpeg


Much better. I also slipped on the LICP on the turbo itself, and it fits great. This car needs the IC piping addressed so bad, but one thing at a time eh.

Now on to the heatshielding!

IMG_4381.jpeg

IMG_4380.jpeg


I'm honestly REALLY proud of these last two pictures, or more specifically the context. The upper heatshield fits perfect as it should(it's stock everything), but the lower heatshield took some finagling. I had to bend a certain portion that goes around the o2 housing, and then I had to bend the portion inbetween the turbine housing and wastegate inwards so it comfortably clears the wastegate actuator arm. Both was a success though, because it fits snug and perfect. It's loose right now so it looks more bad fitting than it is, but once I get the bolts for it, it clears everything perfect and leaves no gaps. This is honestly awesome that FP designed this stuff to fit the OEM lower heatshield, and this is gonna help MASSIVELY with engine bay temps.

I still have to install the feed line in the OFH, but I'll do that tomorrow because I still need to remove the bypass spring in my 90 OFH since I'm not running an oil cooler. But, she is IN! And my list of stuff I need to do before starting it grows shorter and shorter by the day. It looks so good in the engine bay. Like it belongs.

Also, just so I can reference this in the future, the OEM heatshield bolt part# is MD067956.
 
I envy that Dejon intake pipe! There’s one on here I’m watching along with the Dejon intercooler pipes but I can’t justify it right now, hopefully the cards will align when one pops up for sale.


I jumped on that the first chance I got. I got it for like $20 + shipping too. I told the guy what it was and he still only wanted that same amount so I leapt on it. I had one waaaaay back in the day on my original 1G AWD Auto, along with Dejon's UICP too. I miss that setup. I miss those times, actually. DSM golden age.


But yeah, I love it too. It's nostalgic, and functional!
 
I just picked up a stock intercooler from a known member on here today at a fantastic price (thank you again!) while many say I’m going way backwards I just say I’m going back to simplicity! That or I’ve gotten old and want to relive how it was.


I've got a stock 2G SMIC still chilling on my back porch. Lol. Honestly, I want to get another 1G, but in AWD Auto form and it's 100% gonna be a period correct modded car. Stock or bigger SMIC, "upgraded" LICP and UICP, probably this same Dejon intake...just the good stuff. My 1G Auto on a 14B and upgraded pipes/free mods RIPPED man. With supporting mods at 21-24lbs(Whatever teh wastegate would hold. LOL) it ran deep into the 12's. Loved it.
 
More struggling, but more victory. The pictures don't really show major progress but there was definitely some made.

First thing I did was a little trick I learned/taught myself years ago to refinish our rusty/mangled wiper blades. I yanked them off, and took a wire wheel to remove the peeling paint and rust that was covering them. If I got OCD with a sander I'd have made them perfectly smooth, but honestly..close enough is good enough. This car is never gonna be a show car. But, it'll look good enough. A solid 10 footer is what I am going for. So I yanked them off, prepared them, and sprayed them with Plasti-Dip. Little coats with the can aimed waaay far away, drying 5 minutes in between coats, and then slathering the shit out of it in later coats. Let it dry fully for a couple of hours and bam! You get this.

IMG_4386.jpeg

IMG_4387.jpeg

IMG_4388.jpeg

IMG_4389.jpeg


Again, if you take your time and sand it super smooth, they will look OEM, and this plastidip stuff lasts an eternity on these wiper blades. Much better than before. They were rusty and like..powdery(it's how aluminum "rusts") in spots. Now they're all uniform and black. This trick works GREAT for the drip rails on the doors of a 1G btw. Peel all the black coating off, and spray it far away with a bunch of little bitty light coats, then towards the end coat the crap out of it. They'll turn from patchy chromey to brand new in no time.

Now back to the engine bay. There's no pics of progress or what I was doing in the moment because it was boring. So I'll just upload updated engine bay shots and give a cliff notes afterwords.

IMG_4382.jpeg

IMG_4384.jpeg

IMG_4385.jpeg


1) I bolted the lower heatshield down with some bolts I found. Contrary to what I found on searching, these bolts are NOT M8-1.25 X 15mm. They're M6-1.0 x 15mm (or some variant. They're 6mm bolts regardless.). The upper/exhaust manifold heatshield bolts ARE M8-1.25 x 15mm though. So that's true. Just not the turbine housing bolts for the heatshield.

2) I installed the turbo feed line. My god what a pain in the ass. With the internal wastegate actuator, there was just no way to mount the line going in from the radiator side. None. I even completely removed the actuator and tried to bolt it back up after bolting the line in, to no avail. I had to route the line behind the turbo, tucked underneath the water pipe, and running below the alternator(being careful not to touch the turbo, exhaust manifold, or the alternator). Which meant I had to take the turbo entirely off again to route it this way because there's no way to tighten the line with the turbo on. Some curse words were definitely uttered. Many bolts were dropped. It was a fun time. But, it's done, and the turbo is 100% ready to go. Drained, fed, and ready to rock.

3) I pulled the bypass spring out of the OFH. If you don't know why I did this, cliffnotes is on a 90 OFH without an air cooler, the bypass spring can make your oil pressure wonky, or even drop randomly because it's trying to cut flow/bypass the oil cooler. I'm sure some have success without doing this, but I'm not taking any chances. So I popped off the C-clip, pulled the spring off, reinstalled it and tightened it to "Jesus Christ this is tight" Ft/lbs.


Bonus round: I also installed my little interior mirror trim piece to complete the door panel install.

IMG_4391.jpeg


Now with the exception of a passenger side b-pillar cover, the interior is 100% complete. I am so happy with where this is. Now I've just gotta check bolts in various places(I'm legit worried about the cam cap bolts to the point where I'm considering just yanking the head and buying a new one), bleed the clutch, get better t-bolt clamps(over half the clamps on this ghetto IC pipe setup are worm clamps), paint the VC, buy/install a battery, fix a few wires at the ECU, load up ECMLink, and start it!
 
Last edited:
Support Vendors who Support the DSM Community
Boosted Fabrication ECM Tuning ExtremePSI Fuel Injector Clinic Innovation Products Jacks Transmissions JNZ Tuning Kiggly Racing Morrison Fabrications MyMitsubishiStore.com RixRacing RockAuto RTM Racing STM Tuned

Latest posts

Build Thread Updates

Vendor Updates

Latest Classifieds

Back
Top