The Central Hub for DSM Community and Information

For 1990-1999 Mitsubishi Eclipse, Eagle Talon, Plymouth Laser, and Galant VR-4 Owners. This is where the DSM platform history is documented and archived. Log in to help us in our mission, and to remove most ads from the browsing experience.

4C0AADBF-4B95-42A4-B3AE-AAC64D4BB8EF.jpeg

6266 Build or Bust

This site may earn a commission from merchant affiliate links, including eBay, Amazon, and others.

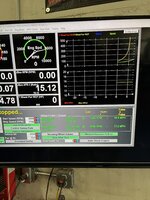
Not that I have ever done as far as breakin. I would drive it normally before going to a WOT pull but it should be ready to rock-n-roll.
 
So I made some progress on the trans the last couple days. Looks like the end clutches are Borg Warner.
IMG_3393.jpeg
I still have an old set of alto red/kolene steels I can use the next go around.
IMG_3394.jpeg
IMG_3395.jpeg
I don’t know if these end clutches were original or what but they were COOKED LOL. The steels looked like wave springs LOL.
IMG_3396.jpeg
IMG_3397.jpeg
IMG_3399.jpeg
So I finally got to use the press I bought off amazon last year, I’ll say in my opinion the biggest pain by far was the snap ring on the return spring, following the advice on other threads on here I found using some flathead screw drivers worked best to walk the snap ring back in its groove.
IMG_3404.jpeg
For the press I used a 2” pipe fitting to compress the return spring since I don’t have any outer bearing races lying around.
IMG_3416.jpeg
I skipped the pics but I replaced both inner and outer seals on the piston, along with the correct oil seal on the back. After I beat the return spring I threw in the frictions and got’er done.
IMG_3406.jpeg
IMG_3408.jpeg
IMG_3409.jpeg
So that wraps up the center diff and end clutches, next up is everything else LOL

IMG_3403.jpeg
 
Great job, I never had any doubts!
* * * DON'T GO WOT IN OD, LOCK IT OUT.....* * *
The most I could do was half throttle. If you ever roast an end clutch, that material gets into the valve body, so just a friendly tip. ✌️
 
So now at the moment I’m stuck on the front basket/5 friction install.
IMG_3411.jpeg
My kit came with 5 frictions and 5 steals, I assumed I’d need to reuse my thick bottom and top plates, so I’ve got my thick bottom installed, along with 5 frictions and 4 thin steels, when putting the thick steel on top there’s no room for the return spring. I left a message for John at IPT, I’d imagine I could use the press to make it fit, but no else has mentioned having to do that, so that’s where I’m at LOL
IMG_3415.jpeg


IMG_3413.jpeg
 
One steel, I think the back one or front one, have to give you a specific clearance on the clutch pack, so you have to get the correct thickness to make that happen. I didn't do mine right and it was too tight, I think.
John will be very helpful. :thumb:
 
So I made more progress today! Turns out my End Plates for the front clutch were packaged with the rear clutch frictions LOL, once I replaced the oem ones with the right ones I got the front 5 friction install done.
IMG_3420.jpeg
Then I moved on with re installing the planetary’s and low/reverse frictions.
IMG_3421.jpeg
I was following along with John’s video at this point AND cross referencing the ATSG manual ftw.
IMG_3422.jpeg
For the low/reverse/center support I marked the 2 oil passage ways on the trans and the support to get’er lined up right.
IMG_3423.jpeg
Then per John’s video I checked my clutch pack via air compressor, I’m assuming it’s the end clutch? Either way I got the same result/sound as the video LOL, and at this point I can still easily rotate the sun gears in the planetarys by hand easily, which visibly rotates the transfer gears as well :thumb: Knock on Wood so far I think I’m good! I’m confident in my work thus far, ever since i decided to tackle this trans myself I’ve been like a kid at Christmas assembling a new Lego set or something LOL, I know I can’t celebrate until I’m driving my car down the street but still I’ve thoroughly enjoyed every minute so far. And for YOU MARTY, I found the clearance reference of the front clutch frictions in the service manual, however this isn’t referencing a 5 friction, it’s still comical.
IMG_3418.jpeg
I have a press, how in the HELL do you verify 11lbs of force to check the clearance LOL, and let’s say you did, what vender sells a selection of snap rings for the front clutch? Kiggly doesn’t, so I’m still scratching my head on that one:hmm:
 
Put your bathroom scale in between the press and the pack, ROFL
 
Man those autos kind of intimidate me. The end clutches are about the only thing I'd dig into again, when snap rings go flying thats where i draw the line. I'll be following to see how things roll out.
 
HELL YEA!!!
Great job sir, thanks for all of the documentation! It is super important. ✌️
Did you do the valve body Translab 175 kit also?
 
Is it just me or are all these transmission pans banged up? I have 2 that are beat up so I ordered one on ebay that was dumb rusty but not as banged up. Awesome job by the way, super pumped for you!
 
This one was a little beat up LOL, but it was clean on the inside, I plan on upgrading to a larger capacity aluminum one in the near future so no biggie.

One other thing I want to throw out for others who have followed along, a few posts back when I was struggling with the 3rd gear frictions/steals…I installed the wrong clutches LOL:ohdamn: Some how in my head I mixed up the rear clutches with the front clutches LOL, I knew something wasn’t right when the rear clutch hub wouldn’t fit, the ID is different between the 2, so yeah pretty embarrassing mistake but an easy fix LOL
 
Last edited:
Well today I got the nick-nacks on the case, pulse generator plugs, inhibitor switch and ground strap, the dip stick and brackets I’m gonna paint this weekend.
IMG_3472.jpeg
I tried cleaning up the switch a little with the brush, and used some wet wipes underneath.
IMG_3471.jpeg
The rest went on pretty easy.
IMG_3473.jpeg
Then on to the fun part LOL, converter time!
IMG_3474.jpeg
I spent about an hour LOL getting 1 full quart of Schaeffers All Trans Supreme in this thing, a quart is what John recommended in the video, I also per the video lubed up the snout and tip of the input shaft and oil seal on the pump with the trans assembly goo he sent.
IMG_3475.jpeg
IMG_3476.jpeg
Then on to my first time ever seating a torque converter, wasn’t too bad, it took maybe 10 minutes or so of me messing with it to get what I’m 99% sure is fully seated. I messaged @awd4g63turbo if he had the same measurement as me on his ftc unit which is 3/4” from trans face to converter bolt pad. Anyways it’s exciting to see this thing done in the garage.
IMG_3478.jpeg
 
Jeremy, do you have any automatic half shaft yet? I got mine mixed up and need to know how to identify the auto shafts from the 5 speed shafts :banghead: The mounting brackets have a number in them but I don't know what is what. Stupid me, didn't mark any of them. Thanks if you have any help for me!
Super job on the trans, I'll look on my thread and see if i posted a measurement on the converter depth.
Marty
 
If your converter starter teeth are just about even with the end of the splines of the trans output shaft then it is indexed properly. It takes 3 "steps" until it seats all the way.
Here is how deep mine sets.

Screenshot_20260225_175133_Chrome.jpg
 
Point of advice, before you get too far change that filter you have for one that's OEM or has two/three feed holes for the filter.

Find one that looks like this.

Top View
Walmart DSM trans filter 1.jpeg


Bottom view
Walmart DSM trans filter 2.jpeg


Trust me on this one.
 
Add Value - Be Respectful - No Trolling - No Misinformation - Participate Often!
Support Vendors who Support the DSM Community

Build Thread Updates

Latest Classifieds

Back
Top