The Central Hub for DSM Community and Information

For 1990-1999 Mitsubishi Eclipse, Eagle Talon, Plymouth Laser, and Galant VR-4 Owners. This is where the DSM platform history is documented and archived. Log in to help us in our mission, and to remove most ads from the browsing experience.

4C0AADBF-4B95-42A4-B3AE-AAC64D4BB8EF.jpeg

6266 Build or Bust

This site may earn a commission from merchant affiliate links, including eBay, Amazon, and others.

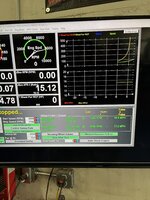
Are you having issues with your sensor? I remember like ten years ago I was logging a crazy amount of phantom knock on my e85 16g set up, knowing it wasn’t actual knock I sent the ecu to ecmtuning and sure enough they pinned it on a bad solder, maybe during the non eprom to eprom conversion? Either way they fixed it and no more crazy knock counts :hellyeah:
 
Are you having issues with your sensor?

No, my sensor was new from Mitsu about 15 years ago, doesn't have many miles on it, and it seems really good still. Don't really have any problem with phantom knock. I'm still Activate at 2200 rpm and 0 TPS. So it's fine for now LOL

But when I had ecu+ I always enjoyed being able to see knock voltage and knock "sum" (related to retard) as 2 separate side by side traces. The voltage would just kind of cruise along at 0.2 to 0.3 volts normally. A knock event would cause an instantaneous very narrow spike in the voltage of about 1 volt or more, so it was very obvious. You could tell if it was a single event or a multiple event. Even with a single event, the knock retard decrements slowly afterwards. It's not knocking that whole time that you see knock retard. It's just relaxing the retard back to 0 over some period of time. If it was continuing to knock you would see several voltage spikes not just one.

I didn't know that McKenzie Lange was a Haltech guy. Actually didn't know much about him period, but just recently I looked through his Remote Tune Checklist with Ohhshmit and that is stuff that OhhShmitt needed to see. It's a good list.
So I think McKenzie is a good guy from what I can tell so far.
 
View attachment 780630Well I pulled the trigger on this guy LOL
View attachment 780631It was on sale for $1279 thru Haltech and I couldn’t resist. I specifically chose the the 1500 because of the plug n play option. I’m keeping ecmlink for now, especially for the first start up on the auto. I still need the PnP harness. DSM 3d creations also makes a bracket to bolt this into the factory location which I’m going with for sure.View attachment 780632Also in other updates I’ve got my DSS HD 3.5” aluminum driveshaft, I’m still waiting on the Frontline Fab tcase brace, then my tcase is off to Boostin Performance for their stg 1 300m tcase :hellyeah: Happy Holidays:)
A Merry Christmas indeed 😄
 
Oh yeah man i got the 3dsm creations ic7 holder and getting the s2 bracket too . Can't forget drive by wire. Haltech knock sensor being used. Following you.

View attachment 780648

View attachment 780650

View attachment 780651

Yeah I saw that Vic! You got the fancy Haltech Goodies LOL. I’m not ready to tackle a full wiring harness yet so I went with the 1500 for easy installation. It’ll be next summer at the earliest before I install mine. I’m excited to see your car up and running next year hopefully:rocks:
 
Hey guys! Got my block and head back from the engine doctor. The head checked out good which I knew it would, the engine was also great, just got new main/rod bearings. No cylinder hone/rings needed:thumb:
IMG_3161.jpeg
Today I got my discontinued oem front cover tuned up, re packed the oil pump with vasoline.
IMG_3157.jpeg
I used 1500 grit wet/dry sandpaper on the outer cover to smooth out some grooves.
IMG_3158.jpeg
IMG_3159.jpeg
And boom. Next up I got my oil pick up tube back from my buddy who completed my kiggly pick up mod.
IMG_3164.jpeg
IMG_3165.jpeg
The only thing left is cleaning this thing, I’m royally paranoid about specs/slag ending up in my oil LOL, I’ll be using a pressure washer/compressed air to hopefully get this thing cleaned, anyways Merry Christmas guys:)
 

Attachments

Hey guys Happy New Year! Today I used my Vevor 10L ultrasonic cleaner that Santa brought me to clean my oil pick up tube, and man it didn’t disappoint.
IMG_3244.jpeg
I filled it with a 1:5 part mix of ultrasonic cleaning solution and distilled water, ran it for about 40 minutes.
IMG_3247.jpeg
Afterwards I could see the sediment/metal left behind in the solution.
IMG_3250.jpeg
IMG_3251.jpeg
Not goin in this engine!! Lol
IMG_3249.jpeg
Its got an easy drain as well, afterwards I rinsed the pick up tube under hot water for a few minutes and still saw a spec or 2 hit the sink, I then blew it out with compressed air for about 5 minutes to dry it out, I’m fully confident she’s clean now LOL.
IMG_3232.jpeg
Yesterday I got my new oil pan and magnetic drain plug from stmtuned :rocks: Got the drill out and modified the drain hole for my 12an drain.
IMG_3233.jpeg
After getting her all cleaned up today I hit it with a few coats of low gloss paint to smooth out that hole for the oil, after I de burred it of course LOL, anyways tomorrow I’ll begin on the short block, installing the front cover, rear main seal and oil pick up etc, I hope to have the engine back in the car by the end of January, then it’s on the trans, again Happy Holidays everyone :hellyeah:

IMG_3252.jpeg


IMG_3246.jpeg


IMG_3245.jpeg
 
Looking GOOD N CLEAN! Nice of Santa 🤶 to get you what you deserved! Boy it looks like it cleans very well. 💪
 
Hey guys so I made some progress on the short block, got the front cover and rear main seal on, along with the oil pan.
IMG_3269.jpeg
I put the rear main housing in the vice to file down the outer edges for flex plate clearance.
IMG_3260.jpeg
Another side note on the rear main seal installation, naturally I was struggling with the install and upon searching the forum here I came across the post with using the water pump/power steering pulley as a perfect fit to tap it in.
IMG_3262.jpeg
IMG_3263.jpeg
So yesterday I get the pan all rtv’d and ready to go only to realize the holes don’t line up on the block:idontknow: 
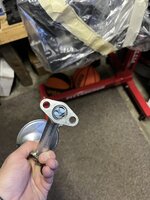
So I’m thinking maybe it’s the kiggly pick up tube? Then I’m like, oh yeah, I’ve gotta beat the piss outta my new pan again to clearance the 2 main studs LOL. So today I figured I’d re spray the domestically battered portion.
IMG_3273.jpeg
It came out all right.
IMG_3274.jpeg
Then I finally got this sucker on, rtv’d and torqued to spec with my inch lbs wrench:thumb:
IMG_3275.jpeg
Anyways tomorrow I plan to get the head on this thing along with all the parts soon to follow, just waiting on a timing belt:rocks:
 
What Flexplate are you using? The Kiggly unit tells how much to remove from the rear main housing "wings". You don't happen to be using one are you? I'd like to see a picture of the instructions showing how much to remove. I am running one, but those instructions are now MIA. Now I like to mod all of the rear main housings so they are ready for anything. Good progress! :thumb:
 
Hey Marty! I will be running the kiggly unit, I just don’t have it yet LOL, I still need a new SCE head gasket and timing belt, to finish up the long block, then it’s on to the trans. I’m nickel and diming these last parts in the order I’m working LOL. I did finish shaving the edges of the rear main housing today after the oil pan rtv was cured.
IMG_3276.jpeg
So they’re shouldn’t be ANY clearance issue, and on a side note, I was re reading thru the auto swap page on w4a33.com, and noticed they mention DSS no longer using the Dana/spicer yoke on their HD shafts, and that they switched to the sonnax unit, so I go out to the garage and open up my driveshaft, it’s been in its box under the car for weeks now LOL, and sure enough it’s got that beautiful forged Sonnax yoke! I’m glad I never got around to buying one LOL, I already had it!!:hellyeah:
 
You did great on the shave of the rear main seal housing. Looks like it just follows the block edge around, so thanks for the picture, that's good enuf! :thumb:
You DO have a pilot bushing in the back of the crank, right? I can't remember.
I'd test the converter to fit it, just to be safe in my own mind.
 
Got my tail shaft back! I also supplied the DSS portion as well so the entire unit was balanced, I’m happy with how it came out:)
IMG_3336.jpeg
IMG_3335.jpeg
1310 what! What a beauty LOL, tomorrow I’m gonna get it mated back up to its aluminum counter part and on the car with my new OEM hardware for the mated portion to the diff.
 
IMG_3344.jpeg
Driveshafts in. I installed it with a new carrier bearing from driveshaft parts.com, along with some Torque Solution solid bushings.
IMG_3341.jpeg
Along with new OEM hardware from stmtuned for the tail shaft.
IMG_3343.jpeg
Next up is a new SCE headgasket to get back to the long block and get this thing back together before the apocalypse LOL
 
Well I changed gears and decided to start on the trans while I wait for the headgasket. Today I got started on re installing the welded center diff and the 2 transfer gears.
IMG_3371.jpeg
IMG_3372.jpeg
What a beauty, welded by the man himself Aaron Gregory, re installation was pretty easy, it took me a few try’s to get it to set down all the way flush, then the driven transfer gear went back in easy peasy.
IMG_3373.jpeg
Per the service manual I replaced the o ring on the bearing retaining cover and lubed it with atf fluid.
IMG_3374.jpeg
IMG_3375.jpeg
luckily I could still see the sharpie I used to mark the outer face of the gear so I wouldn't re install it backwards LOL
IMG_3376.jpeg
I used this cork gasket that came in my rebuild kit for the idler gear cover, hopefully there’s no issues.
IMG_3377.jpeg
And that’s it for today, tomorrow I’m gonna dive into the end clutch next, I’ll be following John’s video on YouTube “ipt transmssion” step by step, and I gotta say I’m loving every step so far:)
 
The end clutch is a breeze Jeremy. Make sure you use the correct seal for your mainshaft. There are 2 different sizes, other than that, its simple. Soak your clutches in ATF while you disassemble the one you're working on.
Nice job on the welded dif! I have a spare welded dif for any of my other autos. The one in my Blue TSI is welded and it drives great on the street. 👍
 
If I can do it you definitely can do it. I also followed John's video just to make sure. Everything is still holding up with some very hard-core miles from last summer. I was told not to make hard pulls in over drive but I'm an idiot and did plenty of those, still solid.
 
Add Value - Be Respectful - No Trolling - No Misinformation - Participate Often!
Support Vendors who Support the DSM Community

Build Thread Updates

Latest Classifieds

Back
Top