


10's or bust
15+ Year Contributor
- 125
- 7
- Jun 16, 2007
-
Columbus,
Georgia
Nice
Follow along with the video below to see how to install our site as a web app on your home screen.
Note: This feature may not be available in some browsers.
For 1990-1999 Mitsubishi Eclipse, Eagle Talon, Plymouth Laser, and Galant VR-4 Owners. This is where the DSM platform history is documented and archived. Log in to help us in our mission, and to remove most ads from the browsing experience.

This site may earn a commission from merchant affiliate links, including eBay, Amazon, and others.
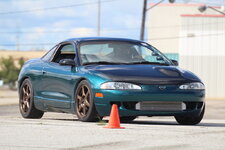
Awesome build.
Why stick with the GM MAF when you're already wired for speed density?
 , based around an oem bush so it had some space left for this.
How did you find the install on the arms? Any feedback at all will be appriciated so i know if i need to look into issues or easy of folks using them for future,
I know the poly bushes are tight but it does fit
Hope you like and enjoy them. If you have any questions i am here to answer.
Great work on the car aswell mate, keep it up
Im glad they went on ok for you and the install was easy, that was my plan to make it as easy as possible for all,The arms went on super easy. No issues at all. They look great and were able to get rid of my negative camber from the lowering of the car. Went from about -2.5 on both sides to right around -1.3 with some adjustment left. It fit fine with the prothane bushings no issues there. Thanks for your work on them.
My only note would be when installing the 4 bolts that hold the arms to the body brackets, put the bolt heads towards the spring. I did this to ensure as much clearance as possible to the spring allowing easier access to hold the bolts steady while tightening the nuts and to be as safe as possible when the spring is going through compression strokes. Probably not a big deal but something I considered when installing them.
Im glad they went on ok for you and the install was easy, that was my plan to make it as easy as possible for all,
As for the bolts i tried both ways and mine wont go in from the spring side since my coil is in the way at the hole i have used, thats why i went from the other side and honestly it wont hit the spring, i checked it with stock shocks and under a bit of compression that i could get and its very much clear of any hitting, since all spring sizes will be different its going to be what ever folks are happy with per setup, i have no hitting aswell just for note
If your lowered did you not want to use any of the upper holes to make your arms motion with less camber under cornering/compression? Means more tire on the road and more grip overall.
If you have driven on them yet let me know how you like the drive with them on
That makes sense feel for it then adjust to suit, i wish you luck for tomorrow, keep me updated on how you got on and how the arms felt for you on the tight turns of autoX.I had a similar issue so I had to rotate the spring to give myself a gap to get them in. I agree there is no way for them to hit either direction of installation.
I wanted to use OEM for the roll center to start as the car has a handful of points of adjustment now and I had not dialed in any of them. I wanted to keep as many "controls" as possible so I can gauge how the car reacts to variables. I will absolutely be making use of the roll center holes once the other settings are to my liking. The first autocross I will be going to is tomorrow so I will start to get a feel for the alignment changes then.
That makes sense feel for it then adjust to suit, i wish you luck for tomorrow, keep me updated on how you got on and how the arms felt for you on the tight turns of autoX.
Have you done many miles since the install with any cornering involved? I hope you and all like them as much as i do,
I dont know the best settings for autoX but for slower runs and quick turns i can imagine alot of camber is abit excessive, i have never autoX as we dont have these events here,Some back roads and a few freeway entrance/exit ramps but nothing too aggressive yet. Tomorrow is the first real test. I expect them to handle just fine. The biggest difference is the rear camber being brought closer to 0. The -2.5 degrees led to some interesting behavior when hitting bumps or transitioning on and off throttle/braking.
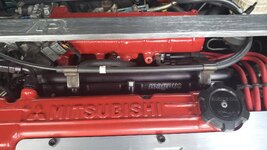
What ever happened to the custom spark plug cover?