The Top DSM Community on the Web

For 1990-1999 Mitsubishi Eclipse, Eagle Talon, Plymouth Laser, and Galant VR-4 Owners. Log in to remove most ads.

Please Support RTM Racing
Please Support ExtremePSI

1992 VR4 #71/1000

This site may earn a commission from merchant
affiliate links, including eBay, Amazon, and others.

This site may earn a commission from merchant affiliate links, including eBay, Amazon, and others.

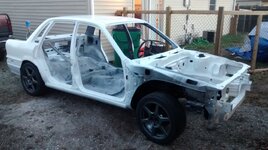
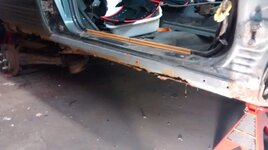
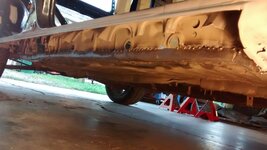
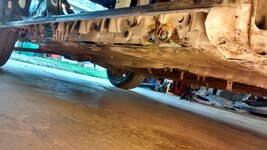
Just wanted to warn you before you got too much deeper into the build thread and lost all the pictures, it's already happened to a few of the guys and they are none too pleased.

I really appreciate that, it would be drag to have to redo all the photos... Do you know of any alternative hosting websites aside from photobucket?
 
Google photos works well. If they start charging for minimal server space and 3rd party hosting, the world is probably ending...So...
 
I use Imgur for my build photos (though its worth mentioning I have them all in google photos as well). As far as I know there are no limits, they even give you quick URLs for HTML, BBCode, Markdown, or direct links.
 
I got things back up and going with google photos (see previous page for the steering column stuff)... Photobucket has gone hawkish with old photos. My old posts still seem to retain the images, but I plan on removing all the old photos from photobucket and placing on google just in case.
 
Left Side Kicker Panel Replacement

This was tough. The rig I had to set up to get the shape right using the tools at had at hand was silly. If you have access to a break, this sort of bodywork shouldn't be nearly as bad as it was for me. I also learned from the moonroof the value of doing spot welds and then sealing with body sealant or bondo, depending on the location.

Finally finished up one kicker panel. Quick little recap of where I started:
_kOdp-EF3bCzShoXthfujJpyIddpBjVsHUi9Qn_a4rZWcK0k0WN-HWXOuDwllFwLar_OTJDt157FD3W20Rt=w1000-no-tmp.jpg


Did the initial cutout in two steps. I had to remove the pinch weld once I saw how bad it was:
FRbRUmK86v_mBLV7WyYxwz2xVkXe_3m-q7UdMXtoqcoLJCLEPIpMTuDphZeq0VVYuBjNXP9OPCWF9NBpRkO=w1000-no-tmp.jpg

VShEelmz9FnenpFza-3I3RoCzjae7d6AqWoo82fD-DmuVbh_qGxoeTAXhTgo0oTLsjYfIRRWD-oTvMD-cya=w1000-no-tmp.jpg


Got busy with the bead blaster (sand is still falling out of my ears several weeks later). This is a partially done pic:
zjqxNEodLFjd7gyy2N_2iTHPuxLkclEeAerZDnjfz5iWQAO7X-tCfj5Qe0enmD8SPDJ96XiO2slusfNZmXU=w1000-no-tmp.jpg


Also cut out some additional gusset metal and the primed everything to seal it off from future rust:
GW5VVcVTXWqWzTrXQhnO-bTfhHTxn5jbx7Y_kg3WL_Mpjk2HNglRmu2XvS4oIDPXFSsMiaZKN8WUdgDvwCJ=w1000-no-tmp.jpg


The pinch weld had to be replaced so I cut, bent, and tacked in some 20 gage, being sure to prime inside surfaces as I went:
o2cQrVVd-WvdhMDHXLmMDed5jsfuCrE4f3IsxoPx2p2ASs-TAg43RDjuBBHhnHdjDKIoOHGoXtjSn3_wGrE=w1000-no-tmp.jpg

kAf2fd7P3GTgGvDoWGxHZehSed6FPrNGKDXELUYALoPZ9p6xC3c1dmlP3NEY1JPm0MCvVISI5-7Q3kKeN_x=w1000-no-tmp.jpg

RwG5XM4ywTLK29p2Dh2-FbTCBLXXMczr5bJX51uZEX2SjqM_OQbeerLoXsyau84b1k8f6qUsbCdqWTKRRhl=w1000-no-tmp.jpg


Since tac welding 20 gage is the only real way to join such thin material without extreme warping, you have to seal joints somehow. I found a good seam sealer on Amazon and applied it to the appropriate surfaces:
91E-CccQEeTlHCYQDnwZaZQRZnVyya3FtuwVJixlBZ2fKYvfcdPqv5vuDrHzIVyFSWWe274DHJLCBEjGH7c=w1000-no-tmp.jpg

5BQgPvH9TMRq-V3a1VsWMGHWAqyefjlqMda2e0VXy2zw8FElp22PF6P3wkRQxiuvwVl7Ao7dWao0RUyZPTh=w1000-no-tmp.jpg

vAi5LhOY_DYT01zCzsL5_TGVxADxoMVuBk3aqF8j3LNKEYObi_cblfJU_EvcpAYks9Id8jYkUwUbNSjqL22=w1000-no-tmp.jpg


With the pinch weld replaced, it was time to start on the exterior piece. I started with some CAD (cardboard aided design... any engineers out there??) to cutout and bend up my first piece. I had an elaborate home made brake setup, but I forgot to photograph it:
-73KfmBIjfA-9HTfALovFFpkdQJacmK11KvKfyJ9GJzqpvA0NNtQuPu4qcH7AUYyeN2qFcKQ0i5GxaquMpX=w1000-no-tmp.jpg


Since the old gusset had to be removed, I devised a way to provide some support for the panel with rods:
bUfDJWmXcGuSm01VgIEv8EXeHRFq-9Fx1ijz5wtFsqeMbIoSDAA2fcPvzWUtA6D9_QC4oIZCF5hRUl_4BGC=w1000-no-tmp.jpg


After the initial tac welding, I cut, plug welded, and ground the rods flush:
VcvfZdaPByhrexL_DymJ1aS4fzD-2JZC6L-dq3Bh_eYhxDLkkDS9jAujIhy4_xCZ2YzG_jWNxz5QSgYYN8Z=w1000-no-tmp.jpg

UVC_aXJ2COXwt_jQAWOYJU3hfKY5xLWk2Fp8mZgFuL4ios0WAo-dKCeHECu_FJUXNa9VbgVTB7ksEwB5ex4=w1000-no-tmp.jpg

(definitely not my prettiest welding job):
n5aQrYvJNYLlHfe9N4D3LwGgP2zYPcJruf_QlX4LjwVJ8uHUawvqUZPG9A4tbOydhoyOQ6fe0DDND2lIQio=w1000-no-tmp.jpg

qEqANMboYHzXhPjRb4Ot4Swo5TJA-XsAb0OqdX6KSCryb3EvaJlOkb75G_sVzqJAD8TVURlMwFpt86_GvWJ=w1000-no-tmp.jpg


Then the rest gets tacked into place:
0eNhLcEmGmJ2KUomka0XkKLVa0aMPnrVum5duF5-nAvEKqsQc5eiuWLXB8ssIvgSpJqqOdXssbsfajMmp0e=w1000-no-tmp.jpg

ktdblVrUNsqRpsZ9hip-ghM7Urzjlxvw4iDqT_HOCZb3gRmpjmZfsi72Ep4gL9ScEwbNWX9KtICsFDtYT1F=w1000-no-tmp.jpg


Finally, some primer is laid down, and voila!:
RESyBAsFNje0geYa9vonLc5ucrv9aMHvX2vwD2YSM1paLRYV9CIrMDKQlQNGlxlLliDsOmJU0lfz7_Stm_K=w1000-no-tmp.jpg
 
Last edited:
Moonroof Delete (part 2)

I was also unhappy with the way the moonroof joint looked, so I went back to work on that. BTW, it was a huge mistake to try to seam weld that joint to avoid using bondo. The metal is way too thin. If you do this, save yourself the trouble of having to salvage a badly warped piece. Just tac weld it and use bondo. Anyway... pictures. Step 1 was fixing the severe warpage with a combination of hammering and yielding with a rig inside the car:
L_Xo8eYKC4KnDobVTdo-B47D-g5BGq1_sf_s6EBuWaJzXlblMeDLtO0sRcZjEUskjP1cGgvBtw0ayQdq1US=w1000-no-tmp.jpg

MsQy1Q3bnM4ElRJmXbB3iQseshufzBORA4psFY-VUmvOCJJ-WruOsB3cYmg8I-GNDbhYcm_5zL9Ev4WVLub=w1000-no-tmp.jpg

SNdxpAcI9pEGjzg5ZuH7001dBuG_yVsuY4BOZhcHtecO1Ncutxx1FkZoHuHwu3EUB0NFoQRvl787LgDd63a=w1000-no-tmp.jpg


Not perfect, but much better. Then onto the much despised bondo. Apply then sand (I'm not willing to admit how many times I applied and then sanded):
W5YnAcS9ArxYpBWpWFQvlsWkhnjHwoa1rNJKfnGjfUmBvHa_jhG-3aPZxLF-4mx1-3sDEQgksW4G7H-e1gn=w1000-no-tmp.jpg

fTvu-Blb4nGQHdNiOxJ_NcCtbNL8uWbv1Ed78llL7sbOVt02xss1jVII78xcSbkYzWIDqa5ssogjhatBmKS=w1000-no-tmp.jpg


Finished product, ready for painting. I'm much happier with this than my intial work... feather edging truly is akin to artwork, and I'm no artist. You can still see the seam now, but you have to look for it:
6kFPGkCpk5z0XbxZ6Cgj-8LX_1kkjYJwyxRTr-3s2sbpV8VxwVon9rHvQoGkf64LoxuQLvKE3BAGo3LXbsh=w1000-no-tmp.jpg

GCEMGzs7CP_3eGxrkP7Vp37iyps0spu54DFLjbtQOH-XDghN0FGXPzc1J4vTZby08dJEIM634QxeDSLg-H5=w1000-no-tmp.jpg
 
Last edited:
Right Side Kicker Panel Replacement

Last update for now; the passenger side kicker repair is well underway. Since I pretty much did the step by step writeup on the driver's side, passenger side will be all pictures. I'll update this post once more when its completely done. Again, starting from the beginning:
UGZQGEZrgvohDTkBINcNB2vKtWkrP8AksauMmJVDVupGCIJb4-1u3bTrVo_UjFq0w2prxpkfDlU-Ca6snJw=w1000-no-tmp.jpg

42_pKSAwFqeBfkXh-B-sSPjExL8tWLOX6eXCNHuNi4OpggqE92L__H1svgppwXD-nFk2-eO_J3OVuP3AzTA=w1000-no-tmp.png

Zh95ha4uM8SU0kC8y5TUEJOAVN9mG8eanTkWhD62p71ATJPPKyCrV91NxWN8LPNibjRkVgl-DuBqGBe4K_s=w1000-no-tmp.jpg


(There was sandblasting before the priming... lots and lots of sandblasting, I just didn't take any pictures)
rTp0MjDNIm_xriRZX6kAMlZaR4bRzxAc8e8hkIRwgIgOAWd6VznA_050YGhTF9AfIEzy9yCKqkXOSiwHatA=w1000-no-tmp.jpg

4dOQIObq3eyRug1PJOZSHToMt4kEVUt7eG8Ua_Ggm976lUlKLWkO1HMao246HRbNbbwiWnYuMnp4jwjTu6s=w1000-no-tmp.jpg


First repair weldment for kicker panels:
4aAUNo28dDS6oUQCoGGQd19mHVbTG8r7-y2Rsyd4z_RPmQPInLiLrjnU7luvIRDBaOUwa5KwoGmRCrkL1hA=w1000-no-tmp.jpg
 

Attachments

  • upload_2017-8-6_11-18-25.png
    upload_2017-8-6_11-18-25.png
    68.8 KB · Views: 198
  • eAzbKnsKS_lVac8Op_4XXrvvhN3GR0dUimAguneEhPFI0rDlFOsOPGHfjl7G6s5taiiLiXyYsyrPPzZv4_a=w1000-no-tmp.jpg
    eAzbKnsKS_lVac8Op_4XXrvvhN3GR0dUimAguneEhPFI0rDlFOsOPGHfjl7G6s5taiiLiXyYsyrPPzZv4_a=w1000-no-tmp.jpg
    45.8 KB · Views: 188
  • MtP6aqYSnEuHlC8j1HZ-Wv2FcYRVGVXWB9S8z77Q2OANy4Uy1omCfx6wfh8poBV2PWY07-M5vmooIJVVV_d=w1000-no-tmp.jpg
    MtP6aqYSnEuHlC8j1HZ-Wv2FcYRVGVXWB9S8z77Q2OANy4Uy1omCfx6wfh8poBV2PWY07-M5vmooIJVVV_d=w1000-no-tmp.jpg
    74.8 KB · Views: 188
  • t-xrvzBNLTsDlXegf5UUzPlawGVZx4CKVhMMDbidKl72D6Re_YwXKm0fXEDmalvQ-EswZ2KHHTFQULQHA6i=w1000-no-tmp.jpg
    t-xrvzBNLTsDlXegf5UUzPlawGVZx4CKVhMMDbidKl72D6Re_YwXKm0fXEDmalvQ-EswZ2KHHTFQULQHA6i=w1000-no-tmp.jpg
    76.1 KB · Views: 191
  • 6CUMhjwjOt-wEBuFV7tqhZuMFI-HCsToXgbH0Fuyr-1vRIbaSJ_vw5ybkcUGbxo0Ss63Vovli2Tkt91qqm3=w1000-no-tmp.jpg
    6CUMhjwjOt-wEBuFV7tqhZuMFI-HCsToXgbH0Fuyr-1vRIbaSJ_vw5ybkcUGbxo0Ss63Vovli2Tkt91qqm3=w1000-no-tmp.jpg
    94.6 KB · Views: 185
Last edited:
Got the passenger side finished up this evening:
XWmIBghJuYSJ-Ip3Jp4JIsN1l4UHVqS8KqYtrcXyE_drF9Vq1wa3GD3BnGoI2XbKHj0ocSZ5beJvsiEllcA=w1000-no-tmp.jpg

fmpMJuLg6LPR-BqD5oTMUAnFmrwbWm-FREy5S1TDBr_I17ZARaLUHk_myVetHge1Ks3b0oEzgO3HZH9BdzQ=w1000-no-tmp.jpg

UctXNILqb8qwBKJ0YUBNuhaJw7YL3Qo_JNLzTh_g-lm59P-lpgT0J0m3P2K38GYgM0nyXqSTHxp20eUBTdg=w1000-no-tmp.jpg

MeTXnAYi48S5E5pHSQX5zlIajObju_a1st5Vrs9O0iqxsfiyTl5qnyWClgkkK2xb28cKzGxVFhk7GCaJtgg=w1000-no-tmp.jpg

A5Dre5MJdwGEaLEHmDhaJLC7n79PmvNyre6LmgGBoGaaXgeL0X0z4pAbgxaf6DBQIXnsVqLmdbUZcu_FpCY=w1000-no-tmp.jpg

_6A9ecMKOoPNuC3A4jtYMHQW0Z2KNQs652JkU6hPnC0m9-qJrt2dyY0yHbiZ62Aiglum2IUPq5ftJMxx4SI=w1000-no-tmp.jpg

HZSE8Oyxai2b3nQVKCOeimGp07XOsxnJJw4H0AzI12MLQFaOugujw_T0F7BdZAWINtTWcEFmiYU38wdWVl8=w1000-no-tmp.jpg

J9Ir6Vrru4aHIZW-g03vzC9NzgTVA57j5xCwHEelJ5qTmYc8ZxDt5LK8OMeTKvW8xSD0sXk0UG9AZg9omBM=w1000-no-tmp.jpg

PLWOXMqPh-Grv2E00_PJrn8_tyIdAdrdv1V1FLBU0VAiNlViCioO2Uu1vYnaRT2yd4s-YyTdz0hW3KXGkgk=w1000-no-tmp.jpg

_hxgwRQS2U28bFruMDwPv_a4d5PrL83h600sWJJUW95tpj0RLQ8f4xIvQacgMRyOiZdGVvGKie-Yb24bEcI=w1000-no-tmp.jpg

CLblzHsISnwRyBhxYzA1CainWJxeBM9dym9_EthWjAk-V61UOYImz-K7vv3-NNcxkgrPrqUnZtLuaJNTtIg=w1000-no-tmp.jpg

W_2KwOt5vnq2c1_I86fEZqK8UwotXkol7M8x64jfPr6_V10bw8d73qXHi6SrzszTp9fcgUGL-L8ww-TZ0lw=w1000-no-tmp.jpg

x1beZOWvmjoSNUTowIv0v5TECQpCxz9P2OM6Z2ywnb7mJCvpsHSoMw6xfeNtZ1VsXHRwH9fHe5RNlQDpU_U=w1000-no-tmp.jpg

cvEVzlXjTdofIb6lFhD2dflCzr7IxQdl7uYQhZL9RfIqn28Dydzz8nxYRXKIH_zGg7tsxteNDlHk1aEfv-w=w1000-no-tmp.jpg

VnYxf6kfbduOpPTLlqP_3PBErJoEh03tA-RMrC3V1kZgF6UDr8JoRNR_4pgSHdHzYhDaBs81iemXwxH05vg=w1000-no-tmp.jpg
 

Attachments

  • 9xhwaOvWnW0GsLYTUM5FyRokGO_LlN9QsWDNLrpZbRCRmT8fRI6ygwIk2a92bZYzCuUMjrfnRa31yFt6j22=w1000-no-tmp.jpg
    9xhwaOvWnW0GsLYTUM5FyRokGO_LlN9QsWDNLrpZbRCRmT8fRI6ygwIk2a92bZYzCuUMjrfnRa31yFt6j22=w1000-no-tmp.jpg
    68.9 KB · Views: 171
  • 5aK3ARWxaHGLl7RsoBVya_-wgpBMxLnWS9KUnifDj0Qs7PmDXYkdOHD-qpynx-4inkUg1s2NzyuaRXhHBCj=w1000-no-tmp.jpg
    5aK3ARWxaHGLl7RsoBVya_-wgpBMxLnWS9KUnifDj0Qs7PmDXYkdOHD-qpynx-4inkUg1s2NzyuaRXhHBCj=w1000-no-tmp.jpg
    94.2 KB · Views: 171
  • 8rQNra3tSFB7o-eqZ6DmTQF6__0n0vUG00z5PxnJLUL9OyvTDzfxiRVlolPX5QvzC6lIvpPvRUZglR9Dxja=w1000-no-tmp.jpg
    8rQNra3tSFB7o-eqZ6DmTQF6__0n0vUG00z5PxnJLUL9OyvTDzfxiRVlolPX5QvzC6lIvpPvRUZglR9Dxja=w1000-no-tmp.jpg
    44.5 KB · Views: 171
  • _V_cYQg1520XlyiiBgZ2mFU7MT7vQLxNqwucQ-2ECXfVNkETOMU-B0uJ1EyO2bik6AEswNqslazNG8einy5=w1000-no-tmp.jpg
    _V_cYQg1520XlyiiBgZ2mFU7MT7vQLxNqwucQ-2ECXfVNkETOMU-B0uJ1EyO2bik6AEswNqslazNG8einy5=w1000-no-tmp.jpg
    56.6 KB · Views: 169
  • 6YgqTzwlpxYrDbWnUEPJHLtSuz_nPOFUeWKKJ0VpAhwxRZfVmPIdYoJzaFl6_REH5UNtPyBEyUzKDiivton=w1000-no-tmp.jpg
    6YgqTzwlpxYrDbWnUEPJHLtSuz_nPOFUeWKKJ0VpAhwxRZfVmPIdYoJzaFl6_REH5UNtPyBEyUzKDiivton=w1000-no-tmp.jpg
    90.1 KB · Views: 167
  • O5_tW5zAXoNNugh7AYKwVj3GTV2XA389-r5nBHgWbBn-Vmh4Y9b7j88Wk0XT3biYLUUHswXxXhyIKQPD4tq=w1000-no-tmp.jpg
    O5_tW5zAXoNNugh7AYKwVj3GTV2XA389-r5nBHgWbBn-Vmh4Y9b7j88Wk0XT3biYLUUHswXxXhyIKQPD4tq=w1000-no-tmp.jpg
    75.7 KB · Views: 174
  • TyMN3rykVmRwsOpDjC7unZyT3R0NMm6YPlvCSTMorVX3UbUMEjqHFWV-NdHUOp7C4Ee87Uob-WTL7SU-MYS=w1000-no-tmp.jpg
    TyMN3rykVmRwsOpDjC7unZyT3R0NMm6YPlvCSTMorVX3UbUMEjqHFWV-NdHUOp7C4Ee87Uob-WTL7SU-MYS=w1000-no-tmp.jpg
    38.4 KB · Views: 169
  • 1eHbCZp2KJiTrY9C1EtbGXD92eDgzshAxAasfmuMZJBjAzoDbs5p01Kv_7srIu1Yqo9BnB-9ZywkrRYNf7E=w1000-no-tmp.jpg
    1eHbCZp2KJiTrY9C1EtbGXD92eDgzshAxAasfmuMZJBjAzoDbs5p01Kv_7srIu1Yqo9BnB-9ZywkrRYNf7E=w1000-no-tmp.jpg
    77.3 KB · Views: 169
  • iHciyiluZBDot8PiUJyO9FSLbOk9KzqwTzEqh3vH3BOgfs6qHwBjltVf3JZCVkCbjVAbx-EDQ8pzolzwZfV=w1000-no-tmp.jpg
    iHciyiluZBDot8PiUJyO9FSLbOk9KzqwTzEqh3vH3BOgfs6qHwBjltVf3JZCVkCbjVAbx-EDQ8pzolzwZfV=w1000-no-tmp.jpg
    78.6 KB · Views: 179
  • 8X8GPCYJE3pQaPbc1011cilUV2HT5pqWsUGkpF5F__JDqkw6Su2QrD64kHNDgHXgs9blFL3ITCuRmpiZBWe=w1000-no-tmp.jpg
    8X8GPCYJE3pQaPbc1011cilUV2HT5pqWsUGkpF5F__JDqkw6Su2QrD64kHNDgHXgs9blFL3ITCuRmpiZBWe=w1000-no-tmp.jpg
    58.3 KB · Views: 166
  • _KxviWY9akVVwchbthHGVppTC-itVrokDAOCk74kCcrcMVE9iD19wnG5mCQBqM9DwRORibpXYzFquc4PwIy=w1000-no-tmp.jpg
    _KxviWY9akVVwchbthHGVppTC-itVrokDAOCk74kCcrcMVE9iD19wnG5mCQBqM9DwRORibpXYzFquc4PwIy=w1000-no-tmp.jpg
    58 KB · Views: 170
  • xykO7QdYVcHvf1GKKP8ETEvR1yvjpTjbG180DdkQJNqj9ug__FNJAcu9YFxqtYCzpL5DlcRoi-XxN5Lqe4A=w1000-no-tmp.jpg
    xykO7QdYVcHvf1GKKP8ETEvR1yvjpTjbG180DdkQJNqj9ug__FNJAcu9YFxqtYCzpL5DlcRoi-XxN5Lqe4A=w1000-no-tmp.jpg
    140.6 KB · Views: 170
  • oZL4PI7xL2DlYpntC172mI7iX130nbt6cpSZ3Kot-3U64VTk4bi3qvz5YmxBqbn8-iBd3o6pNfQaeSgPuYo=w1000-no-tmp.jpg
    oZL4PI7xL2DlYpntC172mI7iX130nbt6cpSZ3Kot-3U64VTk4bi3qvz5YmxBqbn8-iBd3o6pNfQaeSgPuYo=w1000-no-tmp.jpg
    58.9 KB · Views: 174
  • EQhlrTdlc-tN4rb-UXG0pQIq2RbyCOQ3AJ5qOGVlliUJA7G0CPdujmll5Kz6E-FI3GAbp-ywBxnmUsapnKA=w1000-no-tmp.jpg
    EQhlrTdlc-tN4rb-UXG0pQIq2RbyCOQ3AJ5qOGVlliUJA7G0CPdujmll5Kz6E-FI3GAbp-ywBxnmUsapnKA=w1000-no-tmp.jpg
    58 KB · Views: 173
  • 8tug7-MDaBgF0qJOnLMLFcrMP3JGUXLoAMLQ0aAU4F0bLM9cKimfOApYcZPtgTPsBeP5kblwFPQaEh4udI5=w1000-no-tmp.jpg
    8tug7-MDaBgF0qJOnLMLFcrMP3JGUXLoAMLQ0aAU4F0bLM9cKimfOApYcZPtgTPsBeP5kblwFPQaEh4udI5=w1000-no-tmp.jpg
    57.3 KB · Views: 166
  • AWhPyQS_khy4klHvJJ82gqcq7q1MU7281Q7yRVzLJYK4yhhPyGQDKRTFbG1heGwRHYQjeTg3vhy6JLB7Doy=w1000-no-tmp.jpg
    AWhPyQS_khy4klHvJJ82gqcq7q1MU7281Q7yRVzLJYK4yhhPyGQDKRTFbG1heGwRHYQjeTg3vhy6JLB7Doy=w1000-no-tmp.jpg
    59.9 KB · Views: 168
  • 2ROugus-FNiOL0OQULwBlmsIcjmFy5GfD1J6CU11lUGD2oQM-n3SQtCLRov10_YFyABURc7GQTnh3M6bTFQ=w1000-no-tmp.jpg
    2ROugus-FNiOL0OQULwBlmsIcjmFy5GfD1J6CU11lUGD2oQM-n3SQtCLRov10_YFyABURc7GQTnh3M6bTFQ=w1000-no-tmp.jpg
    48.8 KB · Views: 172
  • wee-5Yh8PxoP5cAQkBXv01IIk0t4ov6Q0c5r6Q4TmOn15mooJxZ_esmUN_r3cvvt9EfwKBgIkng5yYkzhBy=w1000-no-tmp.jpg
    wee-5Yh8PxoP5cAQkBXv01IIk0t4ov6Q0c5r6Q4TmOn15mooJxZ_esmUN_r3cvvt9EfwKBgIkng5yYkzhBy=w1000-no-tmp.jpg
    156.3 KB · Views: 169
Last edited:
Right Side Kicker Panel Box-off

Finished up the passenger side fender to kicker panel section this evening. The starting point:
mAeHOvtgq2OfpQcJvQUXW0GBRH03dqoxSTkL66yYnViAD-3E2ljuE82mBkNxm1RBTAKmvhSzF53wrKGcX7E=w1000-no-tmp.jpg


Piece 1:
wHwSYMEiiK7z89J8umKfaC6_MCIvF_DzUnxuIQ7dkBdIFxEFHqd1nyecyiE7qg1mR4Li-Ns8zG-j6IO8SKS=w1000-no-tmp.jpg

ETXrW0OnnrPCM2sG_uISn1yNCwTEG7comWDMo3HuPlvQ2-ift4cAnYeITyhG74RGQWNSS2xNSnVUqkcv1RI=w1000-no-tmp.jpg


Piece 2:
TQ89czZFJJyMjbDmfBmnqfN4iMDtbsNQq-KY8L4ufXQvSZd6W0uWffECXy-SICzekHs71X5bZjrH1-W337N=w1000-no-tmp.jpg

cPZIn5BUDTvruubqb2ibIH93cUE4qAdTQVRZex6t9e3FmN1Uu2jg8R4ME4PyLmjAAXmn0NWm6_C4Xh5ZKdW=w1000-no-tmp.jpg


Stopped welding to prime the inside:
DVGm6nFnSc5C6sqO8jljWstyyOm6pRcnk5MWd5NwcHgc2pmqUYbPY-z0_z59M0hS-WRRucWtNkxEbjajetg=w1000-no-tmp.jpg


Piece 3:
krzSsvWxkedDs6kiA6qZSwZUMFmEUvUPziFrBqZB7d9bYCzNmAz1nTMyHphqvApb3zV4PID-qxcEXD5sUSg=w1000-no-tmp.jpg

(primed the inside)
UQHccKNzmSZQfC-jxKE1kgkrolNdjCKYPFGz-r8diSBx5y63q_UVKYCfzbbQGOmlMuAx7s-ix0fAoDTWbkw=w1000-no-tmp.jpg

wwwMz1JNashUa9pbQ0detaKilDGgzcWeBIChS4IYYWcBgz-y3mHIGjgrn5T2jpFI7iDCDAFkRnV304wwziP=w1000-no-tmp.jpg


Finishing touches with some cutting and priming:
NRAk1TdJeit-96Wp3cHRRmgber-TOtcRIiKlis1WGmTsCaWGRPRzeGsqfP7WTyTwCkQNnDXJTdo54hJHxiF=w1000-no-tmp.jpg

dyXwbdWSa5q1qsgjchFybFVtbugP3QC_yqWR2iSBho_v-x2ZUsEwJplK-09mB7kd5kC_36hkQ2yYyVoNVG3=w1000-no-tmp.jpg

YiTy3yQ1I4n2VHU1FN_2_H-u5_XxWm75VanDJDlmo2ttv261D4aSVPy0bAVcvHcK4qKqmITU39LUHDhCoHi=w1000-no-tmp.jpg
 
Last edited:
Right Rear 1/4 Panel Rust Repair

I keep finding more sections of bodywork to replace. Luckily, I'm starting to get pretty good at this, so it doesn't take nearly as long as it did when I started... Both rear quarters need to be redone. I was able to finish up the passenger side this evening. It started out like this:
hOrATwN7CsFA1Tsy7x5A9b7TmLN11E7crHPOo5xL2qnv_i24I10FZaa7drsFJqiDSPUC48zBEIuRT-VNalN=w1000-no-tmp.jpg

kOsvQL7pb7gMCfbn0VuCpodbFBZf_mg5ONPrqBhVKuVv6R80u6GC7ycBnGvMErpxwIqtLFrMD0BE41-ZPSm=w1000-no-tmp.jpg


Did some cutting and gave it some wire wheel attention:
ljtnswKlHyb2TJDZvwIM0bBMtl8OGuP6j3yDhB44DGVfDee2gzMU4HYnHdLv2gFiNRcgHf-xbHITvmBUuaP=w1000-no-tmp.jpg


Added a new rust treatment tool to the arsenal to deal with areas that are really hard to reach, and where sand blasting would make a mess:
l4OS_dNMf63L4exCi6I8_4NQ0F56-nHh1ZXOMtxZHdOIffinmlnVU67_syC2sWDA8kHk5JsXkl_BtjtWaN2=w1000-no-tmp.jpg


Applied and dried. When it turns black it has done it's job:
lpYBZyGhKMYXUDyhMw_NCQt6co-4iH35PJuc3RI19MCPr37GKEbvDANFv0CJSrPlx-sAsEvdJbyAPkAhQzA=w1000-no-tmp.jpg

biUR_ymtFOhUWypQw1Plm9VNYNJ_06p7TY_jNDSyDEIAdbwPqZ_iutM0lC5ei7WUB0vcdcvD2kthIul0lh5=w1000-no-tmp.jpg


On to the familiar panel fabrication process:
vG3hRrCm5B7UB71xn8DrYcBJpM5zE1IEAAg1y5l126Mg2Kr7Xy8DvmvJt-lhY5KBSCwSpgAo_sno4n_kUAh=w1000-no-tmp.jpg

ngcx4GGWrqJisdY8V4O5BtyMTmqOjRLdTBrfD2hSohOsegIv7Y2ojOAmQqt6Nw1v_yudj1BbwuC-y84sxgD=w1000-no-tmp.jpg

tNNncVKf9OliQ0YRX5V96DIPKi3dAzmmvN51foFAxHg7tDP4lQWjVUiai8gn1P2wwomUkKfSU3FSTrSUm1D=w1000-no-tmp.jpg

zO20lT5DzNxtmiddjkGUVMnRZ94euwDrY-0jQGiWh1-j6gAoj0uw66O-HZZmwAq9N9RCZiFJpDN1JQL6TKG=w1000-no-tmp.jpg
 
Last edited:
I gotta be honest, I probably would have scrapped this after uncovering all that you've repaired. I can definitely respect the time and effort you've put into this. Keep the updates coming.
 
Man I'm doing the same thing but not that deep. I'm doing just enough to keep the moulding in in my 91 talon. Long term she'll be just fine props man for saving her.
 
I gotta be honest, I probably would have scrapped this after uncovering all that you've repaired. I can definitely respect the time and effort you've put into this. Keep the updates coming.

The thought did cross my mind. At this point I'm treating all this work as a good learning experience. Also, due to the rather poor initial condition of the car, hopefully the GVR4 community will forgive me when I chop the wheel wells and add fender flares to stuff in some 275 hoosiers for DSP.

As of now there are only two more major patch sections, including the one I've already started on. Then it's off the the races with my anti-rust arsenal, sanding tools, and a can of primer before painting the car. I'll definitely keep the updates coming.
 
Man I'm doing the same thing but not that deep. I'm doing just enough to keep the moulding in in my 91 talon. Long term she'll be just fine props man for saving her.

The repair on FUBAR definitely snowballed. Initially I was just going to do about what you're planning, but I got to work and one thing just led to another. I'll actually respect your repairs if you're able to control yourself and limit the scope of your work; it's difficult not to go to town when you see rust.
 
The thought did cross my mind. At this point I'm treating all this work as a good learning experience. Also, due to the rather poor initial condition of the car, hopefully the GVR4 community will forgive me when I chop the wheel wells and add fender flares to stuff in some 275 hoosiers for DSP.

As of now there are only two more major patch sections, including the one I've already started on. Then it's off the the races with my anti-rust arsenal, sanding tools, and a can of primer before painting the car. I'll definitely keep the updates coming.

Hell yeah. Chop it up. No offense, but nobody looking for a clean Galant shell will ever be in the market to buy this thing ROFL

I say tube it up. Chop off the front clip and start going baller status. Galants don't have the best weight distribution, so here's your chance to fix that. I'd also consider fuel cells, or any of the other mods that make for a nice race car, but typically aren't done because people don't want to cut up the car.

On one hand, it sucks this thing is such a rusty turd. But on the other hand, you get to chop it up any way you like with no f***s given. Not many Galant owners have that luxury, so why not take full advantage?

Keep up the good work. I definitely ain't judging you :thumb:

I appreciate the GVR4 "right to chop" blessing from a senior member of the community :)
 
Finished up the driver's side rear 1/4 weldment:
2751kA4kYF9kbQEaBpgPjLiC-nPAoKatVpFfIiOaD_n1yZfEmQ1Y770WXnx6G3gK38H8ZvQmJOw7qONMQVP=w1000-no-tmp.jpg

Y8jvVRBTaNwDv7EZsjkJXXuQoBx3hMX2gRc3cIjzcJNqE2ejBD97ExOlvb06AG3tisiGAOgb2qX2AISL7TU=w1000-no-tmp.jpg

0CRdgYuyRHrhi-QZ2RnXWHEMBfIAO97h6tIAsbTMvvk8ljdqqQ5O615dXU4WctpArRq2N898v_rH0egjnds=w1000-no-tmp.jpg

1-UJ4LBeB6-exgRKMtGHjhmmm1SHo98MjTxEKiSz5uFxlDepJni5HQVOrmfzuF-MoqocXbjRcbcNByvc9hM=w1000-no-tmp.jpg

PllTuCj6U1yI9OjcqOY9BDEEbD54ED3zL1gvccAfQme09YDodV2lhyE7m1GzNQvasvPIqGebHmzsNOJK0eK=w1000-no-tmp.jpg


Now I'm eyeing up the final major body repair, which is not only rusted, but is also bent up:
muiFg74qhlB_wNAu94KRMAY18hcV69_Pm_PpD8CvNw-xuiRBaaNHW6w9rcqmy-veEiZg-metJFPZoHTFUOD=w1000-no-tmp.jpg


It's supposed to look like this (straight):
upload_2017-8-24_23-17-16.png


I started in on it by cutting the spot welds on the back, then had to call it a night:
E9q3hyZk0YtFhkbhwLqprm6rFA2sKaU33wWXrwO8JBOJ_B5BAQ2xuacj8U_pW5lG9qRttJWYc6NYQQHWu8z=w1000-no-tmp.jpg
 
Last edited:
Rear Fuel Tank Support Replacement

Picking up where I left off. Got the rear section out:
GqhhDTIAQA2y1MUMOgX7YREX6ENRvua8yHEpjckIj70ifZnzV1p28q_vYdUIqKoGDDWm4iURajPF-5sgyP7=w1000-no-tmp.jpg


Cleaned it up:
jYwEmp8iWsnDH-EJ4TAwX2YJ9IAjcjwr3hojbm3PccCreb7d3rpT3blE46LMcFBzImeJMOZomdnMb65wqLG=w1000-no-tmp.jpg

teEoyKrGFj1ZsmVJt8pncQqfUoD5VKO1gWLdjuboHkTJxDVc0ymyYEtkeVKBS65hkmbe8lizEkAg1rISxNP=w1000-no-tmp.jpg


Welded in some studs and some patch sections and got it straightened out:
okKV6mQw4D4zQK6W1MC6yr3vR8IVAVyYd25LQBVvtZIug-WyTYGb5D2T02RDTB1C8_ksaPN5ZxM4tQgw75l=w1000-no-tmp.jpg


Primed and welded up into place:
Xpu83fScfYTzYHa3uBMpJXuDYlef9QMcSC_1Z5839O0ZxtAWfgIoBhm0ozPyIiv-aS3khHFaxZ7vHlH_XQ2=w1000-no-tmp.jpg

Vree5mRuflq_b_PoDWUxAJVgKpp0kH_J4FfBJnOJAk2fxF_o48KHeLN0sHu62BvW7kSvLp6FDPagwSdYYYV=w1000-no-tmp.jpg


Also had some time to start on a section of the underbody. Although sandblasting is faster on the front end, I've found the cleanup afterward to be just as time consuming as more labor intensive methods. So as long as you can reach a given area, whire wheel & corroseal:
M7ZyjhxADx67wSUIJ2CII0a1HAE7fLSB4fFCPcXTQtRt_UrXoDzBkT3Q2MVjhXeH7ouqukipJtOfxRtH2jT=w1000-no-tmp.jpg
 
Last edited:
Completed rear tank support patches:
JzJVgM4sr62DPWMEB-nng6LYaUh4DJRCBrExeOckd5Vltp5dlObdEgKaLwJ3smJ46-P7H19V3EAl067IlAg=w1000-no-tmp.jpg

J30vy9kB7cqGP6KKRLTXQBB7kg4lw_Nkt6q8k8taEsZ74ewkWb0aW-gZB14ayc51K6pLqJFG5E9MMyn1_lU=w1000-no-tmp.jpg

zC37CRknYl4WZatA62xphPzkSKXYKn39_377qsMV4KN5DVyimPOKY27bT-FKiT7kSCYFY2bBC9K8j4SDCjr=w1000-no-tmp.jpg

kgkfUpMlMNid__wB2mOqMprf6PB-xO3j9neVOP0mQfUQ7iSuQL8kXA_asPQbxB15Vrslqbt8rAQc8qhX47a=w1000-no-tmp.jpg


Finished up the plug welds for the rear tank support on the inside of the trunk:
LI7kjSJdBOA7DaDPiV9jwgouVC5zh_dG7ChEonW5pGIOCuOAish-g8NDx4L_qRhkWXq3wrHHJCRNvGUk410=w1000-no-tmp.jpg


Got about 1/2 way done with driver's side rear fender well patch job:
kufc4eo2sUeZRNEAtoZiKYjQ3jlS02AGEJs4bxGEzDh0-xtlmh04bMws2L98iLvDF1q44EPTaSnIAgE8fir=w1000-no-tmp.jpg


Got about 1/2 the trunk wire wheeled and corrosealed:
haiHmia2Abtyu0IF7BYte_HoKtWkhLQ6FIaS9hnMKaT4Y-MP0qnLb3r-8pkxNw26_kBycvttdECzsvta7lc=w1000-no-tmp.jpg

xtWLAItBFyvKcTUoM_RoFQ1T7ZGwIj45sTPOtzjOJrRpAK-bhmKnd3e92jBireOhU1uINK2lZi3gWN5vEIq=w1000-no-tmp.jpg


Also got the underbody wire wheeled and corrosealed in preparation for the front tank support weldments that will have to be done from scratch:
ASEKKo77astt4qp6gqXKdh2evHK6y2UqvO6cIC_0tE2JfBg5HM_2-HtwyrtIDlwfvo4MoXIXfqyk4BCg0N_=w1000-no-tmp.jpg

cGUSMxXLkZ9Wlz0vcokn2YYa4WJ11G3ic2WQIm6zsr5F3il2Ux-gFtog3xOTb1PHL_hYNG0FnQc98YnD77p=w1000-no-tmp.jpg
 
Front Fuel Tank Support Replacement

This is a picture heavy update so I'm gonna have to break it up a bit. Pretty much finished the rear section of the car this weekend :). Let's start with the front fuel tank weldments. Even though I'll be going with an aftermarket fuel cell, this setup will allow me to use a stock tank if I need to:
kV9ah-xUCCmGJIUNw6viSNg_P5Qi_IG0PTCVR0RC_gY-lxPbmCRDZh5pGOXrHwxmIQoVKUGL2e0EWTzq17g=w1000-no-tmp.jpg

UHfJWUlbcvDexYet-hWuAGI_Y4wBdMQI2TrguE0pg0l7mlc2Vt9dCFwl_-sKLUaFG1V8o-NrMiGhzZkae2w=w1000-no-tmp.jpg


Got the rear section thoroughly wire wheeled and corrosealed:
88uZoJsZdZHPE6InflX9ZGDIx485TTws8zjAWuIExwm8NwMm7CxYj5qAVyWLvVHFpQ5ehntrrBHCHi_IGAA=w1000-no-tmp.jpg

KUfmVaLhhPzLzWdGHMYo_Ym0d1QsQrwViJMTkrkFFM5pWirHCBSY8rDDvorl71WHpSbUYY5S8PSMliHMNNA=w1000-no-tmp.jpg
 
Last edited:
Support Vendors who Support the DSM Community
Boosted Fabrication ECM Tuning ExtremePSI Fuel Injector Clinic Innovation Products Jacks Transmissions JNZ Tuning Kiggly Racing Morrison Fabrications MyMitsubishiStore.com RixRacing RockAuto RTM Racing STM Tuned

Latest posts

Build Thread Updates

Vendor Updates

Latest Classifieds

Back
Top