The Top DSM Community on the Web

For 1990-1999 Mitsubishi Eclipse, Eagle Talon, Plymouth Laser, and Galant VR-4 Owners. Log in to remove most ads.

Please Support JNZ Tuning
Please Support Morrison Fabrication

My fuse box relocation (project log)

This site may earn a commission from merchant
affiliate links, including eBay, Amazon, and others.

This site may earn a commission from merchant affiliate links, including eBay, Amazon, and others.

I got only a couple things to say here:
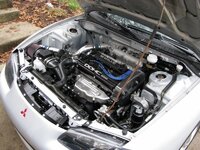
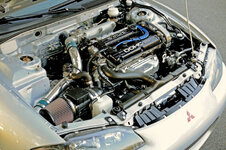
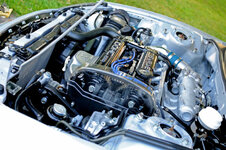
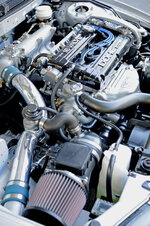
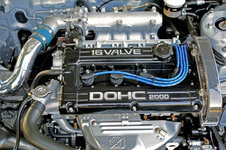
1) Bend the dipstick away from that manifold. You do still have an o-ring in there you don't want degrading quickly from excess heat and it looks like you're touching that bag. Air's a wonderful insulator. Physical contact results in conduction which is a wonderful way to transfer heat around.
2) Please add some sort of clamp to the dipstick to hold it in place. I swear I've told you this a thousand times. I don't know if it's your obsession with looking stock or not but you never ever ever want to have that pop loose and squirt oil on that ridiculously hot area as it will instantly start a fire and there goes your overly meticulous car.
3) It's good that the wastegate lines are done but are you sure these melted not because you didn't have heat shielding on them but because those lines were a cheap low temp material? Where did they melt exactly? Was it the point of contact with the wastegate (which gets incredibly hot, even in the upper half)? A set of silicone lines unshielded would have been just fine here and a lot cheaper. Better be sure the new material is up to snuff and not assume the heat shielding will save the day.
 
1. I'll look into it. Brian doesn't have a problem with his plastic dipstick touching his blanket, but it's still a good idea regardless.
2. That's been on my list for awhile and I have a spare dipstick to modify, I really should get around to it. Maybe I'll tackle that soon to give me a break from trying to figure out this ducting.
3. The material was not sufficient for the temperatures. It was my fault for spec'ing improper parts. The ss braided PTFE lines are rated for 450F max which is the highest I could find. I just looked up some silicone lines - looks like they're rated for about 350F. So I should be OK but only one way to find out.

I should also say that one of the reasons I picked the push-lock hose in the first place was because the ID met Tial's specifications. These ss lines do not, but Tial said they should work just fine in a relatively short plumbing distance. Plus plenty of people have used -4 before without issues.

Appreciate the input :D
 
Here is the next stage at trying to fix my overheating issue. This is what I started with (the headlights were taken out for ease of working, but everything is removable with them in place). I first installed two M6 rivet nuts in the lower radiator core support. I had these from my NRG fender washer kit and I only had to drill out the holes slightly to fit them.

1.jpg

2.jpg


I made these ducting pieces from 1/16” 5052-H32 aluminum.

3.jpg


Here is the lower duct installed. It slips between the upright brace and the lower core support, then the brace bolts back in like usual. The lower duct has foam on the bottom for the FMIC to sit on, and six M6 press nuts on the side wings for the upright ducts to bolt to.

4.jpg

5.jpg


The bulge on the lower duct is for clearance for the crossmember.

6.jpg


The uprights also have a single M6 press nut on each for the upper attachment point – this uses the a/c condenser bolt hole. The uprights attach to the lower with three bolts each. Each upright is covered on all sides except the bottom with rubber edge trim.

7.jpg


This shows how the front edges of the lower and upright pieces mate. The excess trim on the upright is to cover the front edge of the lower piece as well.

8.jpg


The trim tucks into the foam to fully seal the pieces to the FMIC.

9.jpg


The uprights are cut to go as high as possible and provide just enough clearance for the radiator bolts.

10.jpg


How the ducting looks all bolted up.

11.jpg


I never thought I needed a radiator upgrade, but the cheap one I bought wasn’t going to last for long. I decided I may as well upgrade since I was being forced to replace. I picked up a Koyo unit, which sometime in the past few years was apparently revised. They no longer have the 53mm R core for 2g’s; they now use the 36mm Hyper V core. covered the top tank in foil tape (you can see the difference on the ends and where the hose goes that aren’t covered). Then, I put thick foam on the tank.

12.0.jpg


I also put an EZ drain valve in place of the plug. I pressure tested the radiator off the car before installing and this leaked slightly, so I had to use the Koyo drain plug’s gasket to get a good seal. The reason is there is a ridge on the bung on the radiator so the valve’s oring didn’t get a good seat. I made a little bracket to prevent it from backing out since it didn't have anywhere good to safety wire it.

9004156599269713466-account_id=1.jpg


Here is the radiator installed showing the foam sealed to the top of the core support.

13.jpg


This is how the uprights seal to the radiator plates at the sides.

14.jpg

15.jpg
 
Last edited:
I also utilized the stock radiator ducting to help direct the air. Because of the odd shape of the bumper support, it was easier to modify this piece than recreate it. I hacked off the bottom portion and cut grooves in it. Also notice the Velcro in the middle section.

16.jpg


It goes in the car using the stock plastic screws.

17.jpg


Then the FMIC gets installed pressing up firmly on the plastic.

18.jpg


I made a little foam patch with Velcro on the bottom to cover up the hole for the top FMIC bracket.

19.jpg


This shows how the FMIC sits on the lower duct.

20.jpg


And a view from the back of the FMIC showing how the uprights seal to the end tanks.

21.jpg


Now we’re just left with this gap at the top of the FMIC end tank due to the slot cut in the plastic ducting so it could deform.

22.jpg

23.jpg


So I modified the stock crash bumper to fill this gap. I glued in pieces of Styrofoam backed by ABS plastic for support. The Styrofoam was painted black since you can see it slightly when the hood is up. There are also little pieces of foam on the crash bumper below the Styrofoam where it meets the end tanks.

24.jpg

25.jpg

26.jpg


The stock plastic ducting seals tightly to the inside of the crash bumper just because it’s such a tight fit in there.

27.jpg


The plastic ducting digs into the Styrofoam making a tight seal.

28.jpg

29.jpg


And lastly, I put foam on the bumper cover opening to seal it to the face of the FMIC.

30.jpg


I cut out the bumper and cover a bit more to let more air to the top section of the FMIC.

31.jpg


Pretty much all the air that gets in the bumper opening is getting through the radiator. I haven’t had a chance to drive it yet, but I hope it works!


I’ve had carbon fiber plates for the side air ducts for a while, and finally got around to putting them on. I glued them on with JB Weld plastic 50139 bonder. This is purely aesthetic to match the fog light covers. I keep the driver-side panel on all the time unless I’m racing since the oil temps stay low enough with the cover on.

32.jpg


I also replaced the oil cooler with a new one just in case.

33.jpg


And finally, I added two stock gaskets to the intake manifold thermal spacer. I'm now boost leak free.
 
Last edited:
I've never had overheating issues on the street. The only time I did was the track weekend I did last year. I would let it get up to about 240F before I would take it easy to let the temps come back down.
 
At this time I don't plan to cut the hood unless I have to.
 
Eric I absolutely love your car and your attention to detail is just amazing. Hands down one the cleanest 2G's I know of and your ingenuity and build quality is impressive to say the least. Keep up the great work!!
 
My Evo pump couldn't keep up with the new turbo, so I installed a DeatschWerks DW200 pump (255 lph). It is as quiet as the stock pump and fit nicely.

View attachment 306408
I've been playing the Subaru world too long. Will the DW200 (255lph) pump be enough for E85 and fueling those 2150's? I have a Walbro 255lph now and would love to go FlexFuel. If I can also have a more quiet pump changing the fuel setup then win/win!
 
If you want to max them out, no. But I was never anywhere near maxing the 2150's out and am now on a set of 1100's. The DW200 should be enough to support my goals on the 20g on E85 while still being able to use the stock fuel pressure regulator (limiting voltage at idle/cruise).
 
Another little update, although I didn't particularly enjoy this project. I installed the following parts (most of which I have had for years and just never got to it). The reason I never got around to this is because my rear axles were seized in the hubs. I finally found a trick that worked phenomenally:
http://www.dsmtuners.com/threads/ho...assembly-wheel-bearing.308941/#post-153640071

ARP rear wheel studs (fronts were done a while ago)
Prothane rear bushings
3g UCA's
New rear wheel bearings
Paul Volk toe arms (with boots)
New sway bar end links

I painted some of the pieces as well since they were showing their age and put some undercoating on the fuel tank shields.

1.jpg


2.jpg


3.jpg


4.jpg


I found a sweet deal on a new set of 17x9.5 +32 WedsSport tc105n's so I picked them up. They're wrapped in Hankook R-S4 255/40-17 tires. I used WedsSport lug nuts and Touge Factory hubcentric rings. These will be used mostly for track and I'll use the Volks on the street. Even though the 255 R-S4's are significantly wider than the R-S3's on the RE30's, I actually gained about 1mm of clearance to the rear knuckles. The tc105n's have plenty of brake clearance like the RE30's, so no spacers were required.

I also weighed both for comparison sake. Both tires were at 35psi.
17x9 +35 Volk RE30 with Hankook R-S3 255/40-17 (little tread left) = 40.6 lbs.
17x9.5 +32 WedsSport tc105n with Hankook R-S4 255/40-17 (new) = 43.3 lbs.

5.jpg


6.jpg
 
Last week was quite a busy week for the car and I which I dubbed as the "quadfecta" week. I'm really pleased with how the car has come along and this week proved to me that it can do it all :)

1. Wednesday:
Track Night in America event at PittRace. We got three 20 minute sessions on the track. I had no issues with the car at all. The wastegate lines didn't melt and the highest my coolant temps got was 210* so the work I did over the winter helped tremendously. Granted, the ambient temperature was about 60* so there is still the possibility the car will overheat on a hot day but I'm hopeful.

18893171_946234931167_5144668850219698754_n.jpg


18951515_946234911207_8957591194141011558_n.jpg


2. Saturday morning:
I took the car to a local Cars and Coffee meet. There were some incredible cars there! I found this video online and the guy has a funny comment about the car.

18951175_947208370387_5314889418168293676_n.jpg


Cars and Coffee Highlights (starting at my car)

3. Saturday afternoon:
Another autox at Pitt Race.

18951249_947208390347_3504308836765091384_n.jpg


4. Sunday:
I went down to Mason Dixon dragway with a bunch of friends for a test and tune session. The ambient temperature was over 90* so all of us were having slower times than we expected. My best launch was a 1.9 60 ft. so I definitely have some work to do. My quickest run was a 12.69 at 114mph running 29psi, and the fastest I ran was 115.6mph. The car did well, so with better driving on my part I'm hoping to shave a few more tenths off of that. I drag race very infrequently so I have much to learn!


Last edited by a moderator:
I had another HPDE at Pitt Race on July 1 with my brother - this was our first time in the Intermediate group. That was nice since the cars had a quicker pace so I rarely got stuck in traffic. But, I was still quick enough I didn't have to give any point-bys. I also got to take passengers along for rides which was cool. Things went well for the most part. I did have a little overheating about halfway through each session, so I would have to cruise the back straight to bring the temps back in check and then I'd be fine for another lap. Ambient temperatures were about 80F, so the priority for a vented hood has been raised. On one session I did have some fun with a Ferrari F430, though. He was in front of me to start, then he quickly gave me a point-by. Each lap I would pull away from him steadily until we reached the back straight when he would catch up since I was off the gas. And repeat! I talked to him later on and could tell he wasn't enthused being behind a little Eclipse, but I had fun! He said the car had about 500hp but he was running V12 tires so he had quite a disadvantage there, to be fair.

19983988_1492697150753061_8690300856012533880_o.jpg


I did end up slightly melting another wastegate line, but luckily no permanent damage due to ECMLink's new overboost protection feature. This line was rated for 450F. It fell apart upon removal for inspection.

19575197_954944691737_5285609953965478469_o.jpg


I had a spare with me but even after replacing it the boost wasn't under control. The car still drove fine so I drove it home and dug deeper last week. Even though I don't see any tears, the diaphragm is toast. I replaced it with a new one and decided to water cool the wastegate. Luckily, my Koyo radiator came with a 1/8" NPT bung near the upper radiator hose so I routed a line from there to the wastegate and got an M10x1.25 to -4 adapter to return the water to the radiator's drain hole. I had to remove my nice drain valve to do so, so if the water-cooling works and I keep it, I'll probably figure out a solution later to get my drain valve back. After replacing the diaphragm and all of the lines, boost is now in control again.

I would like to switch the lines to all-metal, but I'm afraid with hard lines I wouldn't be able to build in enough flex for engine movement (although it is very limited). I looked into Swagelok convoluted stainless tubing (flexible hard lines), but they want $200 per line and they still wouldn't be quite right. I'm open for suggestions on this!

20264799_963171385377_4791584007901241643_n.jpg


20170727_235755.jpg


I'm hoping the water cooling will prevent future damage to the diaphragm. I will also get a vented hood to keep engine bay temperatures lower. If both of those don't work, I see that TiAL now sells an MV-S wastegate with a fin pack for further cooling of the diaphragm so I could convert to that if necessary.

mv-sar.jpg


I also purchased a trailer of my own so I can stop borrowing my brothers. It's a 24' 2001 Haulmark.

20170625_133157.jpg
 
Last edited:
Stainless lines should give you some flex and would be more then enough for you, use the correct end fitting wether it be a 90* or 135* and get it pointing is somewhat the right direction it will be fine, when i go external i was going to use a turbosmart WG and stainless lines with dei heat sleeving,
 
Although I do think your ducting for the front mount/rad setup is very good and thought out. Don't you feel as though you are losing a lot of FMIC surface area from 1. the upper black lip on your front bumper. And 2. your crash bar taking up about 2-4" of top core surface area? I know you may not be overheating and everything is working. Wouldn't you benefit from trimming the black plastic on the bumper and cutting the crash bar out in a way that exposes the front of the core more?

This is how my crash beam was when i bought the car.
img_0882-jpg.jpg
 
No, I don't think I would benefit much from that. The crash bumper is cut underneath to allow air to go up behind the black mustache part on the bumper cover so the whole FMIC does see airflow, just not directly exposed from the outside. The mustache serves as part of the ducting for me. I remember reading in Maximum Boost years ago that the hole going to a cooler such as this can be 1/4 of the size of the cooler without efficiency loss. It would certainly be interesting to do a back-to-back test considering how many people cut the bumper cover and crash bumper for that exact reason, but my guess is the change would be negligible. At the end of the day, I'm running E85 on a conservative tune so I'm not even all that interested in keeping the IAT's really low. Heck, I used to run sustained 180F IAT's on the stock turbo and SMIC on the track for 20 minutes. With the current setup it stays around 110F during sessions.
 
Stainless lines should give you some flex and would be more then enough for you, use the correct end fitting wether it be a 90* or 135* and get it pointing is somewhat the right direction it will be fine, when i go external i was going to use a turbosmart WG and stainless lines with dei heat sleeving,
Are you talking about stainless hard lines? I've never used them before but I can't imagine they have much flex.
 
Are you talking about stainless hard lines? I've never used them before but I can't imagine they have much flex.
Not hard hard no, but they can work,
I was talking similer to what you have but much higher loads so say hydraulic lines as they are rated alot more for pulling apart or bursting, check out fork truck shops.

As for hard hard lines, they dont offer much movement but thats where you put a loop or kinks in the line so it allows movement, they used this technique in the olden days whe they fed fuel is copper or stainless tubes and the engines moved alot so it took up the slack uppon movement,

Both ways will work well, perhaps use stainless ptfe lines that use a ferral to lock it in the AN fitting! They dont seem to budge after that.
 
You consider putting a heat blanket on the entire length of the your SS lines going to the EWG? Something like the DEI Heat Sheath Gold to put over the line that looks like it's touching the exhaust mani blanket?

Just an FYI, I didn't cut the mustache to free up airflow to the intercooler, I cut the mustache so people could see it in their rear view mirror as I'm pulling around them. ;)
 
Just wanted to give you some motivation on the hood louvers. I have never seen another hood like mine and also never had any heating issues with it. I run a pretty big DVDT FMIC, A/C condenser and aluminum radiator. I will say that the cost to have it done is pricey. I've asked a few companies to replicate it and been quoted a nice price tag.
38704114017_large.jpeg
received_1178517348851412.jpeg
 
Just wanted to give you some motivation on the hood louvers. I have never seen another hood like mine and also never had any heating issues with it. I run a pretty big DVDT FMIC, A/C condenser and aluminum radiator. I will say that the cost to have it done is pricey. I've asked a few companies to replicate it and been quoted a nice price tag.View attachment 340181 View attachment 340182
Thats certain unique! Never seen anything like that
 
Support Vendors who Support the DSM Community
Boosted Fabrication ECM Tuning ExtremePSI Fuel Injector Clinic Innovation Products Jacks Transmissions JNZ Tuning Kiggly Racing Morrison Fabrications MyMitsubishiStore.com RixRacing RockAuto RTM Racing STM Tuned

Latest posts

Build Thread Updates

Vendor Updates

Latest Classifieds

Back
Top