The Top DSM Community on the Web

For 1990-1999 Mitsubishi Eclipse, Eagle Talon, Plymouth Laser, and Galant VR-4 Owners. Log in to remove most ads.

Please Support Fuel Injector Clinic
Please Support ExtremePSI

Modifying the Lower Timing Belt Cover

This site may earn a commission from merchant
affiliate links, including eBay, Amazon, and others.

This site may earn a commission from merchant affiliate links, including eBay, Amazon, and others.

greekgodchaos

15+ Year Contributor
517
129
Jul 4, 2007
Vancouver, Washington
Has anyone tried cutting their lower timing belt cover in such a way that if and when you need to take it off, you do not have to disassemble a hundred different things in order to take 1 cover off? I had this idea a while back and will probably do it to my cover, but here is what I had in mind:

You must be logged in to view this image or video.


Something along those lines where wherever the cut lines are, it would still allow for as much structural rigidity as possible so you do not have bits flapping about. Im also thinking of maybe fabricating some reinforcement bars/plates to go on the OUTSIDE of it to add more rigidity but also have them clear the outer belts. This is all theory right now and I will be playing around with this idea all the way up until I need to put it on for the completion of my build. I am taking a Solidworks class and I will see if I can come up with a better solution for what I'm trying to do. Any and all input would be appreciated. :thumb:

Main reason for doing this would be for easy access when it is your DD and you suspect something is running amok down there and you can't access it unless you know what it is you are doing. (Something I didn't know how to do before my build :shhh:)
 
It takes like 30 minutes to get the timing cover off. I don't see any reason to hack it up and have it hanging on there rubbing on the pulleys and timing belt.
 
Hmmm, maybe it was a first time thing for me then because it took me probably 2.5hrs to get mine off. granted several of the bolts were rounded and also the harmonic balancer can be a challenge to get off if you do not have access to a pneumatic wrench, at least for me it was.
 
The problem is even if you cut it like that your not saving an time besides a few seconds on the bolts that are no longer there your still going to have to remove all the same parts.

An like said above it only takes about 25-35 min to get all the parts off....

I dont see the point....
 
Who needs a timing cover LOL... Just run it without one plus it saves you like 50 lbs and will give you 50 plus HP due to weight reduction :) ... No that is a pretty cool idea sometimes those things can be a PITA if they have never been touched before. I say try it and keep us posted :)
 
Possible thought...

Plastic weld some tabs on there that will "lock" it into place. Like ___--___ The dotted line would be attatched to one of the covers to keep it from flexing in or out and help retain some solidness. If the added tab was on the lowest cover then in theory you could pull the bottom side of the cover, and naturally the top side would bend in towards the block and tabs wouldn't catch on anything...and it would slip right out.

I think this is about as good idea as the quick open/close valve on the oil pan drain bolt... Yes it will make life easier to a point, but the gains are not that glorious.
 
Who needs a timing cover LOL... Just run it without one plus it saves you like 50 lbs and will give you 50 plus HP due to weight reduction :) ... No that is a pretty cool idea sometimes those things can be a PITA if they have never been touched before. I say try it and keep us posted :)

Trust me this isn't some attempt to squeeze any HP out of it, this is purely for improving the accessibility that our cars severely lack in certain areas. :thumb:


Possible thought...

Plastic weld some tabs on there that will "lock" it into place. Like ___--___ The dotted line would be attatched to one of the covers to keep it from flexing in or out and help retain some solidness. If the added tab was on the lowest cover then in theory you could pull the bottom side of the cover, and naturally the top side would bend in towards the block and tabs wouldn't catch on anything...and it would slip right out.

I think this is about as good idea as the quick open/close valve on the oil pan drain bolt... Yes it will make life easier to a point, but the gains are not that glorious.


Hmmm that's an interesting idea, i just thought of a possible feature of somehow using those plastic "trident" snap fasteners like they have on some backpacks, bags, the ones with the squeeze sides, to secure the sections together maybe... much thought needs to go into this and a beer :p
 
Trust me this isn't some attempt to squeeze any HP out of it, this is purely for improving the accessibility that our cars severely lack in certain areas. :thumb:

These cars are extremely easy to work on, you should mess with a 3kgt or a 300zxtt and you will feel privileged to work on such a simple machine.
 
Don't use one..?

Definitely not an option for me. I am extremely paranoid as it is when it comes to my car, and considering that my Talon is my DD (my dad was kind enough to let me borrow his n/a Stealth during the build) I do not want something flying in there and ruining my engine. Especially since my build is basically new everything, I'm just not going to risk it.
 
sounds good i never ran without one and wont ive had too many issues over the years with the smallest things getting lost in my bay.
 
I think those would work pretty well. But I would imagine they would quickly break or fall apart with continuous weather changes and the heat from the engine?

I am thinking along the lines of a kick panel style, or most under dash covers and how they have little tabs on them to guide them into place as well as keep a flush line maintained.

Of course cutting the cover into pieces will creat voids where misc. dust, dirt, grease, water, etc. will be able to leak into the timing belt area. Maybe a fix for that is just drilling a 3/8...ish size hole in the bottom to let out anything that might find its way in there? And someone correct me if i'm wrong but from having a hole in the bottom a person could crawl under their car and visually see if that hole is blocked or plugged? If it is blocked or plugged by anything then you know you need to take at least the bottom cover off to see what's going on in there?

Hmmm that's an interesting idea, i just thought of a possible feature of somehow using those plastic "trident" snap fasteners like they have on some backpacks, bags, the ones with the squeeze sides, to secure the sections together maybe... much thought needs to go into this and a beer :p
 
On my black Talon all that I have is the lower section of the timing cover used of course to guard the bottom of the belt but mainly to do timing adjustments or whatever else.. The rest of it is non existent.. Would I do it on a DD? Probably not..
 
I think those would work pretty well. But I would imagine they would quickly break or fall apart with continuous weather changes and the heat from the engine?

I am thinking along the lines of a kick panel style, or most under dash covers and how they have little tabs on them to guide them into place as well as keep a flush line maintained.

Of course cutting the cover into pieces will creat voids where misc. dust, dirt, grease, water, etc. will be able to leak into the timing belt area. Maybe a fix for that is just drilling a 3/8...ish size hole in the bottom to let out anything that might find its way in there? And someone correct me if i'm wrong but from having a hole in the bottom a person could crawl under their car and visually see if that hole is blocked or plugged? If it is blocked or plugged by anything then you know you need to take at least the bottom cover off to see what's going on in there?

You bring up a valid point regarding the continuous temperature cycling affecting those clips (finally found a picture)
You must be logged in to view this image or video.


For where the cuts were I was considering to use some rubber hose and cut lengthwise so it would slip snugly over the plastic and keep anything from coming in...But your idea about having a hole in the cover...I like that :D I happen to be one of the lucky ones to own a boroscope so having a hole that would allow me to look around in there, it would probably need to be a 3/4" hole with a plug...but that way you could at least stick a flashlight in there and kind of see whats going on in there.

For those wondering why I am so adiment about doing this is mainly because before my build started, I was removing my Valve Cover check inside the head for anything wrong, and I accidentally dropped a bolt and it fell between the right side of the exhaust manifold and that metal plate for the timing belt cover and rolled under that metal plate (at least this is what I can recall from memory) and I just had one of those WTF moments, panicked, because it didnt drop all the way through to the floor, and I could not find it ANYWHERE, so I proceeded to try and remove my lower timing belt cover to see if it had fallen in there so I could take it out, long story short :)p) I never found it, but it did not seem to have gone into the timing belt cover. This is why I like the hole in the bottom idea the best right now, maybe even have 2 or 3 holes that way you could shine a flashlight through one of those holes while a buddy looks and tries to find anything out of the ordinary.

I am going to play around with this idea too, but right now I am having a jolly ol' time dealing with trigonometry and a nutty professor who loves to give 5hrs worth of homework a day :banghead: I will try and get some more sketches made up and hopefully a rendering I can post later this week. Keep the ideas coming though this is great stuff here :D

Does anyone make a clear lower timing belt cover?? :hmm: Lets get on that chaps LOL
 
You must be logged in to view this image or video.

Clear lower cover... I think you may be on to something there :thumb:

With a clear lower cover, that would eliminate the need for any holes at the bottom. Visual inspection would be 100x faster OMG

I'm looking at the bottom 2 lines and thinking if a joint similar to the one that connects the upper cover to the lower it would be good.

And if someone wanted to get crafty they could (plastic) weld some bolts/nuts to the outside/inside of either of the covers to ensure a better seal.

This sounds like a lot of work and honestly not really worth it. I don't think i'll ever attempt to make anything like this, but I can always brainstorm ideas :sneaky:

I think it is over complicating an already simple situation. The time spend thinking about it the timing cover could of been removed and installed a few thousand times. Once you do it a few times it's cake. Remove the upper mount, loosen the 4 bolts in the water pump pulleys, remove water pump, ps, and ac belt. Remove crank pulley, remove water pump pulley, remove ac tensioner bracket if equipped, remove the bolts holding it on and you are done.
 
Just practice taking it off and on LOL I can get mine out in 10 mins but my first time it was a pita. Granted my alt is relocated and I'm without powersteering. You have more time taking the water pump pulley off then actually wiggling the cover up and out.
 
Just practice taking it off and on LOL I can get mine out in 10 mins but my first time it was a pita. Granted my alt is relocated and I'm without powersteering. You have more time taking the water pump pulley off then actually wiggling the cover up and out.

I've mastered the wp pulley over the years. If you turn around with your back to the engine bay you can get your hand right on them and have all 4 out in less than 30 seconds. What can suck it aftermarket waterpumps and reinstalling the pulleys. When there is no alignment pin to line the 2 pulleys up.
 
A TIP SECTION:

Put the two pullies together with a bolt (or similar with a head) that is smaller in diameter than the holes in the WP flange.

The smaller bolt thread section then can slide easily in the existing holes on the WP flange.

Then put a piece of duct tape over the smaller bolt for the thread section can hold the two pullies together in alignment while holding it. You just made your own guide pin.

Then, you can do the other three bolts to finger tight, then remove the duct tape and smaller bolt to finish with the 4th one.

Tighten each bolt in steps across from one another so the assembly is equally tight on the flange on the WP.

Fun being a mechanic ... - DSM
 
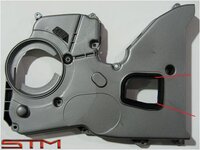
I'm not sure about all of this, however i did cut mine here (below) and that makes it to where you don't have to remove the engine mount which saves alot of time and patience.

i also dont use the bolt hole right next to the mount either, it holds perfect with the ones around it (not going to lie , i use 4 bolts one on each corner.)
 

Attachments

  • timing_belt_cover_6_bolt23.jpg
    timing_belt_cover_6_bolt23.jpg
    27 KB · Views: 732
I'm not sure about all of this, however i did cut mine here (below) and that makes it to where you don't have to remove the engine mount which saves alot of time and patience.

i also dont use the bolt hole right next to the mount either, it holds perfect with the ones around it (not going to lie , i use 4 bolts one on each corner.)

I like this idea :thumb:
 
I use a light coat of red wheel bearing grease to hold them together and on the water pump. I use a 10 mm ratchet wrench with a slight offset and break them free with the belt on then pop off the belt and spin them out by hand.
 
Support Vendors who Support the DSM Community
Boosted Fabrication ECM Tuning ExtremePSI Fuel Injector Clinic Innovation Products Jacks Transmissions JNZ Tuning Kiggly Racing Morrison Fabrications MyMitsubishiStore.com RixRacing RockAuto RTM Racing STM Tuned

Latest posts

Build Thread Updates

Vendor Updates

Latest Classifieds

Back
Top