PrimerPLus
10+ Year Contributor
- 1,160
- 20
- Jul 28, 2011
-
Tokyo,
Asia
Hello, well I will be beginning my "mini tear down" soon with removing the head for new gasket, and arp headstuds. As well as putting in my new South Bend Clutch TZ/B-Series Kevlar/Ceramic and Act lighten flywheel. So with that in mind, I have decided to post pictures of what I am doing and how it is coming along once I get started. I like input from people and I like advice. As the title says this will be my Daily Driver and I am shooting for 350-400hp. I would really like to see the 400hp. I will list what I have and then what I think I need/want. If you feel I need something or don't need something let me know Oh and yes I did/do my maintenance I don't wanna blow up my engine 1st pull
  . Also I just read the new thread on maintenance and I feel better knowing I did all that was recommended
 I will of course look over other parts while I am in the engine and probably ask questions once i'm there too.
So current list of mods:
1. DSM Link v3 Full
2. EVO3 16g
3.PUNISHMENT RACING TIAL 38mm MVS WASTEGATE + RECIRCULATED O2 HOUSING
4. Tial Q BoV 10psi spring
5. Ebay Intake - modified for Catch Can
6. Aeromotive Stealth 340lph Fuel Pump / drilled Siphon to 1/8" - with rewire kit
7. Hallman Pro MBC
8. FIC 1150cc fuel injectors
9. Aeromotive A1000 AFPR
10. PR FMIC
11. NGK Plugs/Wires BPR7ES Gapped 0.025"
12. AEM Wideband Uego
13. AEM Boost Gauge
14. AEM Oil Pressure Gauge 0-150
15. South Bend Clutch Heavy Duty TZ/B-Series Kevlar/Ceramic Clutch Assembly
16. ACT StreetLite Flywheel
17. OEM Throw out bearing
18. Drilled and Slotted Rotors
19. FP exhaust manifold
20. Fluidampr
21. Short SS Clutch line
22. 3" Turbo Back Exhaust
23. Fuel Lab fuel filter
24. Koni Yellow's with Ground Control
25. DKS 272 Cams
26. Fidanza Adjustable Cam Gears
27. Calan Catch Can V3
28. Speed Density - Omni 4bar / GM IAT / plug n play harness
29. B&M Oil Cooler
30. Mishimoto Radiator
31. .075 oil restrictor for Evo 3 16g
32. ACL Race Bearings
33. Rotating Assembly Balanced
34. Manley Pistons - Coated
35. Manley Valve Springs
36. Eagle Rods
37. ARP Headstuds
38. 3G Revised Lifters
39. K&N Air Filter - RC 5000
40. STM BSE
41.Cruise Control Delete / A.C Delete /
42. Fuse box relocated - Under Fender well
43. Galant Alternator 90Amp
44. EVO 9 Oil Filter Housing
45. KIGGLY HLA
Wish List
1. Water/Meth Injection
2. Thermal R&D Exhaust
3. SS OverFlow Can
4. SS PowerSteering Can
5. STM Radiator Brackets
Well I also thought I would list some fun stuff for the car too that aren't performance related
1. Symborski shift kit
2. B&M Short shift
3. Skateboard bearing shifter mod
4. Kenwood Deck, Rockford front and rear speakers / Skar Audio 12"sub / Skar Audio Mono AMP
5. RTM Racing Shift Knob -Mitsubishi Logo
6. Gates Blue Belts
7. Powder coated Metalic Blue Valve cover
8. Aerocatch locking hood pins
9. Kno Knoise Sound Barrier
10. Most parts have been powder coated Black / Some Metalic Blue
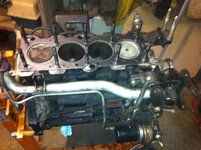
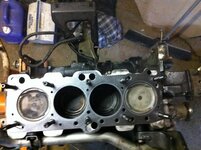
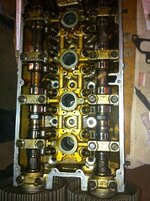
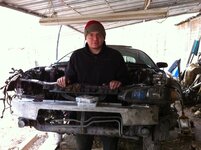
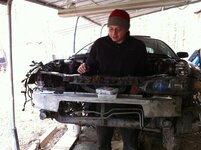
These pictures are old but I thought I would upload now and then you can see it during my install of most of the mods I listed and then the finished product.


Oh and yes I did/do my maintenance I don't wanna blow up my engine 1st pull . Also I just read the new thread on maintenance and I feel better knowing I did all that was recommended I will of course look over other parts while I am in the engine and probably ask questions once i'm there too.So current list of mods:
1. DSM Link v3 Full
2. EVO3 16g
3.PUNISHMENT RACING TIAL 38mm MVS WASTEGATE + RECIRCULATED O2 HOUSING
4. Tial Q BoV 10psi spring
5. Ebay Intake - modified for Catch Can
6. Aeromotive Stealth 340lph Fuel Pump / drilled Siphon to 1/8" - with rewire kit
7. Hallman Pro MBC
8. FIC 1150cc fuel injectors
9. Aeromotive A1000 AFPR
10. PR FMIC
11. NGK Plugs/Wires BPR7ES Gapped 0.025"
12. AEM Wideband Uego
13. AEM Boost Gauge
14. AEM Oil Pressure Gauge 0-150
15. South Bend Clutch Heavy Duty TZ/B-Series Kevlar/Ceramic Clutch Assembly
16. ACT StreetLite Flywheel
17. OEM Throw out bearing
18. Drilled and Slotted Rotors
19. FP exhaust manifold
20. Fluidampr
21. Short SS Clutch line
22. 3" Turbo Back Exhaust
23. Fuel Lab fuel filter
24. Koni Yellow's with Ground Control
25. DKS 272 Cams
26. Fidanza Adjustable Cam Gears
27. Calan Catch Can V3
28. Speed Density - Omni 4bar / GM IAT / plug n play harness
29. B&M Oil Cooler
30. Mishimoto Radiator
31. .075 oil restrictor for Evo 3 16g
32. ACL Race Bearings
33. Rotating Assembly Balanced
34. Manley Pistons - Coated
35. Manley Valve Springs
36. Eagle Rods
37. ARP Headstuds
38. 3G Revised Lifters
39. K&N Air Filter - RC 5000
40. STM BSE
41.Cruise Control Delete / A.C Delete /
42. Fuse box relocated - Under Fender well
43. Galant Alternator 90Amp
44. EVO 9 Oil Filter Housing
45. KIGGLY HLA
Wish List
1. Water/Meth Injection
2. Thermal R&D Exhaust
3. SS OverFlow Can
4. SS PowerSteering Can
5. STM Radiator Brackets
Well I also thought I would list some fun stuff for the car too that aren't performance related
1. Symborski shift kit
2. B&M Short shift
3. Skateboard bearing shifter mod
4. Kenwood Deck, Rockford front and rear speakers / Skar Audio 12"sub / Skar Audio Mono AMP
5. RTM Racing Shift Knob -Mitsubishi Logo
6. Gates Blue Belts
7. Powder coated Metalic Blue Valve cover
8. Aerocatch locking hood pins
9. Kno Knoise Sound Barrier
10. Most parts have been powder coated Black / Some Metalic Blue
These pictures are old but I thought I would upload now and then you can see it during my install of most of the mods I listed and then the finished product.
Last edited:
") I will have free time to get this thing going!
I will have free time to get this thing going!


 . I will tell you that 353whp is a lot of fun though