The Central Hub for DSM Community and Information

For 1990-1999 Mitsubishi Eclipse, Eagle Talon, Plymouth Laser, and Galant VR-4 Owners. This is where the DSM platform history is documented and archived. Log in to help us in our mission, and to remove most ads from the browsing experience.

20230707_193548.jpg

From Hero to Zhiro (1999 Sixbolt_16g)

This site may earn a commission from merchant affiliate links, including eBay, Amazon, and others.

July 2025

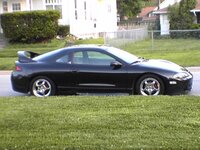
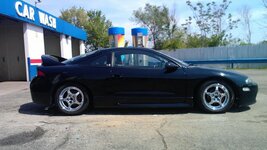
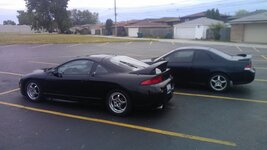
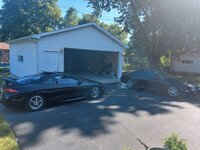
This car has come a long way in the last year and a half. Truthfully, when I got it back, I thought it would be a long time before I would be able to drive it again because I had convinced myself that I was better off finding someone else to do that work rather than diving in. Keeping a 25 year car on the road isnt cheap and requires a lot of devotion.The time that I didnt think I had, ive not only made, but have also made it part of my weekly routine. Glad my wife has a Honda, so I dont have two 25 year old cars giving me headaches.

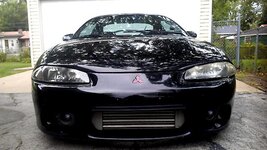
While Ive been working on the tune, Ive also been thinking about the next series of maintenance and modifications. Ive had a coolant leak from the lower Samco hose that has progressively gotten worse. I ordered a GPlus hose set but quickly found out while comparing that the lower hose on my car didnt match up and that it needs a 1g hose since its a 6bolt in a 2g. Not a lot of options out there and didnt really want to pay $125+ just to use one hose from a Mishimoto or HPS kit. I ended up just getting a rubber Dayco hose overnight from Amazon. The worm drive clamp i used on the Samco ate it up for some reason so i used the spring-style constant tension clamps. It wasnt like that when I reinstalled it a few months ago.

20250704_114726.jpg


20250704_114759.jpg


I let it idle and took it for a short drive to test it under pressure before the rain and heat started and seems like things are holding.

Most of the real issues in the series are the last of the things that were wrong with the car when I got it back from the shop.

1. Finish tune
2. Investigate coolant lower coolant hose leak
3. Instrument cluster glow gauges no working
4. WTF is causing that obnoxious creaking from my rear end
5. Finish projector headlight project
6. Paint hood
7. Wheel/tires

3. Instrument cluster glow gauges not working
I need to pull the instrument cluster and check the wiring for my gauges. They havent worked since I got the car back. Maybe they just forgot to reconnect something when they installed the cluster trim to hold the wideband.

4. WTF is causing that obnoxious creaking from my rear end
Ive also had this obnoxious creaking sound coming from the rear end since the day I drove it home. I originally thought it was going to be the top rear knuckle bushing on both sides but the creaking noise is coming from behind the wheels. Im having a hard time telling whether it is the knuckle/LCA bushings or the sway bar. Pulling on either one doesnt replicate the creaking. The shop installed the Volk LCAs w/links, trailing and toe arms so i never saw any install instructions to know if anything needed to be greased, etc(Sway bar bushing are definitely greased). Its hard to pinpoint because
1. it only happens when the wheels are on and the car is on the ground.
2. it is extra loud when the car rolls onto uneven ground like when turning into a parking lot. The noise is coming from both sides of the car.
3. goes away for a while after the car has been lifted.
4. Didnt happen when I put the new RM sway bar on with the old control arms and links, just now with the Volk LCA w/ imbedded links.
5. After 1 or 2 pushes on the corners of the rear end, the noise stops and doesnt start again until driving.

5. Finish projector headlight project
Ive had a set of headlights that I was working on before I had to get the exhaust side gaskets replaced. Lights were heated up and taken apart, but still need to get projectors and light source.

6. Paint hood
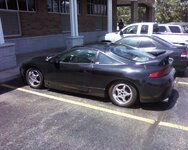
Car was left outside to bake in direct sun for 7 months and has some sun fading on some of the panels now. The white spot on the hood from when my friend left the car sitting under a tree with sap drippin on one spot before I bought he car from him got even more clear coat damage. So i want to strip the paint and probably do just a single stage black since its garage kept.

7. Wheel/tires
My 2 rear wheels are warped and hard for the tireshop to balance. Have been looking into new wheels for a long time, but Im admittedly extremely picky. If there was an exact copy of the stock 2g chromies in a 17", I wouldve bought them a long time ago.
 
Last day of a long weekend. Not trying to do too much work today, but i just had to know whats up with this rear end noise. Removed the sway bar and drove down the street. Noise didnt get any better so i think im now leanng towards the knuck bushings on both side unless anyone has another suggestion... I doubt that any of the rear bushings have ever been replaced in this car so probably better to do it now than later.

I compared my old sway bar with the RM...why is it so wide compared to the old one? Is wider better?

20250706_093151.jpg
 
Last day of a long weekend. Not trying to do too much work today, but i just had to know whats up with this rear end noise. Removed the sway bar and drove down the street. Noise didnt get any better so i think im now leanng towards the knuck bushings on both side unless anyone has another suggestion... I doubt that any of the rear bushings have ever been replaced in this car so probably better to do it now than later.

I compared my old sway bar with the RM...why is it so wide compared to the old one? Is wider better?

View attachment 769084
I dunno about better, but this is how things look on an AWD with stock LCAs
IMG_8716.jpeg

IMG_8717.jpeg
 
I dunno about better, but this is how things look on an AWD with stock LCAs
View attachment 769087
View attachment 769088

Thanks, i put the car back together for now.... I just dont have the time to deal with these bushings with the schedule that ive had lately. I took a run this morning to log the timing. WOT @ 1740sec.
Screen Shot 2025-07-13 at 2.22.00 PM.png


Question here. I have that little lean and rich segment at 3.6k-4k and 5k-5.4k, whats the right way to add/pull fuel here? Do i target the cells individually by tracking?
 

Attachments

Last edited:
Thanks, i put the car back together for now.... I just dont have the time to deal with these bushings with the schedule that ive had lately. I took a run this morning to log the timing. WOT @ 1740sec.
View attachment 769589

Question here. I have that little lean and rich segment at 36k-4k and 5k-5.4k, whats the right way to add/pull fuel here? Do i target the cells individually by tracking?
Tracking - and take a look at what cells are highlighted, and next to the highlight. Try to visualize a blurry spot around the highlighted cells, Are there any cells in the blurr that make a sharp jump, or could help if a smoother transition to its neighbors was adjusted. Try making a move in those in between places

Calibration at this boost level is looking pretty good
If WBFactor is -2% but it highlights 2 different cells, do i split the difference or would i subtract 2% from both?
 
1. Finish tune
2. Investigate coolant lower coolant hose leak
3. Instrument cluster glow gauges no working

4. WTF is causing that obnoxious creaking from my rear end
5. Finish projector headlight project
6. Paint hood
7. Wheel/tires

Gauges were working again.

20250724_171231.jpg


My friend came by to fix the radio in the Prelude and had time to check out my instrument cluster to see why the glow gauges werent working while I was in and out of meetings . Think it was a bad inverter. I had a spare one on the wire set that I had from messing up the first order i placed and after swapping it out we are back in business. Now if i can get rid of this rear end creaking, i can show my face in public again. 😅
 
Last edited:
Subtract 2 from both, or 2 from the dead center cell, and 1 from a surrounding cell
@Justin DuBois
What would I do in a scenario like this?

Im tracking the VE table around 262 sec and this particular cell starts off showing a little bit rich, but then ends up showing a little bit lean as I click through. That makes me unsure of whether to add or pull fuel for the cell. Ive been doing a couple of runs trying to tweak the table, but I seem have reached a point where I feel like Im flip flopping between lean and rich rather than qetting the two af ratios to merge. I understand not having large gaps when looking at the chart vertically, but maybe not as much understanding the affects of the adjacent horizontal values.


Screen Shot 2025-07-27 at 10.06.16 AM.png

Screen Shot 2025-07-27 at 10.06.39 AM.png
Screen Shot 2025-07-27 at 10.08.00 AM.png
 

Attachments

@Justin DuBois
What would I do in a scenario like this?

Im tracking the VE table around 262 sec and this particular cell starts off showing a little bit rich, but then ends up showing a little bit lean as I click through. That makes me unsure of whether to add or pull fuel for the cell. Ive been doing a couple of runs trying to tweak the table, but I seem have reached a point where I feel like Im flip flopping between lean and rich rather than qetting the two af ratios to merge. I understand not having large gaps when looking at the chart vertically, but maybe not as much understanding the affects of the adjacent horizontal values.


View attachment 770637
View attachment 770638View attachment 770639
First - It's close enough.
Second - Look at these two time indexes - notice how you are on the threshold of switching cells based on pressure at 5500
Screenshot 2025-07-27 at 12.23.34 PM.png


Screenshot 2025-07-27 at 12.23.48 PM.png


The only thing I might try in this case is to put [email protected] at 99. Your pressure continues to drop as the RPMs climb away from 5500, so that cell is getting used more than it tends to indicate.
 
Last edited:
Was looking at my Link logs and came across the DTC section where Im throwing a

P1500 General FR Terminal Circuit Malfunction

Screen Shot 2025-08-13 at 8.02.54 AM.png

Cleared it twice on Saturday and it still came back very quickly. Seems like it started showing up in the logs on 7/13 and hadnt noticed. Since then Ive been seeing low battery voltage values that seem to be getting progressively worse. I thought the rpms dipping when shifting out of gear while decelerating was going to be tuning related, almost stalling, but I now think the car is trying to stall out from loss of power. The car is now starting up with 12.0v,

Screen Shot 2025-08-13 at 7.53.42 AM.png

but when I give it some gas to get the car out of the garage, the voltage goes to the number high 13s to 14.1 where is suppose to be an maintains that level,
Screen Shot 2025-08-13 at 7.56.04 AM.png

but with some drops to 13s and high 12s while idling at lights after driving for a while. Battery checked out as good, so did the alternator, so now starting to look at the wiring and possible ECU damage. Adding it to the growing list of things I need to do. Got a week off coming at the end of the month, thought i was going to get to drive and enjoy, but guess not.


1. Finish tune
2. Investigate coolant lower coolant hose leak
3. Instrument cluster glow gauges no working

4. WTF is causing that obnoxious creaking from my rear end
5. Finish projector headlight project
6. Paint hood
7. Wheel/tires
8. Find the cause of low voltage
 

Attachments

Who checked out your alternator as good? I've had a few over the years check out good at the local auto parts store and they were actually bad. Without any further info I would almost bet it's the alternator failing.
 
Who checked out your alternator as good? I've had a few over the years check out good at the local auto parts store and they were actually bad. Without any further info I would almost bet it's the alternator failing.

Yeah, Parts store checked it.

Good news and bad news... I went out to the garage yesterday and did a quick check around of the wiring. it seemed like the plug on the front of the alternator had started to jiggle free because it definitely wasnt secure.I plugged it up and cold started it. Voltage was at 14.1 on startup. Let it idle to warm up and it acted normal. Didnt have time to take it for a drive.

Screen Shot 2025-08-13 at 6.51.26 PM.png


Work from home today so just came back from a short drive around town. Didnt throw the code and also didnt feel like it was going to stall out when throwing it in neutral and coming to a stop. However, I dont think these numbers for the alternator would be considered great by dropping down to the low 13 after coming back and idling in the garage with not much of a load on it (Radio on but not playing music, dash cam disconnected, no driverside fan running), its probably been dying a low death for a good while.

While I was under the car (STILL leaking antifreeze from somewhere 😡), I noticed that my front motor mount is looking pretty raggity. Sitting in the car idling im noticing the rocking going on too so gonna have to address those.

1. Finish tune
2. Investigate coolant lower coolant hose leak
3. Instrument cluster glow gauges no working

4. WTF is causing that obnoxious creaking from my rear end
5. Finish projector headlight project
6. Paint hood
7. Wheel/tires
8. Find the cause of low voltage
9. Rebuild or source a new alternator
10. Motor mounts
 
4. WTF is causing that obnoxious creaking from my rear end

Im diving into this task because im officially on vacation and have a whole week to get this done and possibly more done. Its been fairly easy removing the caliper and control arms since ive removed much of that earlier this year and hasnt had time to rust up. The upper knuckle bushings, however, are in terrible condition and the bolts are seized into the sleeves on both sides. I was able to remove the nut on both sides, but trying to pull the bolt out of the sleeve isnt happening so i used a cutting wheel and cut through it. But heres the last issue preventing me from pulling this knuckle completely out so i can hole saw or burn these bushing out...

20250823_112319.jpg


Im trying to remove the parking brake cable out and I figured i would ask before I do something that would open a whole can of worms if i dont have to. This parking brake cable.... I found the clip on the inside and removed it...

20250822_193354.jpg


I think its the spring is being held in by this clip on the front. Ive tried twisting it but the spring just turns with it,

20250823_112326.jpg


so my question is, do i need to remove the 4 bolts on the back to remove the hub? Or do i need to remove the shoes for the parking break in the drum? Or should i be able to do this without removing either? @pauleyman Since i know you did this recently...
 
You want to take the whole knuckle off the car? If you're replacing wheel bearing its probably bolt in. I didn't do that. Yes you have to undo the cable. I didn't lookup a procedure. I just did it so guessing it was kind of no brainer??

I dont remember the hub being in the way of the shoe retainers. Can you get a Pic of the back? I dont remember.
 
Last edited by a moderator:
You want to take the whole knuckle off the car? If you're replacing wheel bearing its probably bolt in. I didn't do that. Yes you have to undo the cable. I didn't lookup a procedure. I just did it so guessing it was kind of no brainer??

I dont remember the hub being in the way of the shoe retainers. Can you get a Pic of the back? I dont remember.
Wasnt planning on replacing the bearing,, but was wondering if i needed to take it off to get better access and make sure I wasnt gonna make more trouble for myself by doing so. Heres the back of the knuckle. I was gonna take it off so i could paint it and replace all three of the bushings. Looking at it some more, I think that cable actually runs to the other side of the knuckle instead of behind the clip that i had posted in the previous post. But its hard to see where its going It could possibly be the similar clip on the other side of the knuckle behind slightly behind the bearing. Its hard to find find how its routed and what holds it in place when i look around in other posts.

20250823_141123.jpg
20250823_141115.jpg
 
Last edited:
Wasnt planning on replacing the bearing,, but was wondering if i needed to take it off to get better access and make sure I was gonna make more trouble for myself by doing so. Heres the back of the knuckle. I was gonna take it off so i could paint it and replace all three of the bushings.

View attachment 772973View attachment 772974
I dont remember taking off the bearing. Im 99.9% certainties didnt because the backing plate was in the way. That being said I also dont remember the hub being in the way if the shoes but it probably was. You have to get the cable end free to get the cable out of the knuckle. If I recall shoes have to come off to do that. I advise taking pics so you get the orientation right upon reassemble. Springs suck.

I might haven't taken the dust cap off and just removed the hub but left the bearing. Sorry my memory isn't what it used to be.
I think i see what needs to be done... or at least i understand how it works and what its attached to. Shoe has to come off because the brake is attached to the far side.

@7:20 and 8:25
 
I think i see what needs to be done... or at least i understand how it works and what its attached to. Shoe has to come off because the brake is attached to the far side.

@7:20 and 8:25

Yup. Thats it. Who is this guy anyway? Everything was dumb clean.
 
Yup. Thats it. Who is this guy anyway? Everything was dumb clean.
I dont know., but thats the same thing i said. Makes me wantbto just go the extra mile and clean up everything so i dont feel inferior 😅 I think im being dumb about this tho. Removing these 4 bolt should just let me pull the whole drum from the knuckle becauae the parking brake is only attached to the backing plate and not the actual knuckle... So i removed them and this Haynes manual says i need to retract the shoes from the fully adjusted position, wh8ch im trying do now..Mght have to go look at the servive manual cause the explanation in the Haynes manual is pretty terrible
 
I dont know., but thats the same thing i said. Makes me wantbto just go the extra mile and clean up everything so i dont feel inferior 😅 I think im being dumb about this tho. Removing these 4 bolt should just let me pull the whole drum from the knuckle becauae the parking brake is only attached to the backing plate and not the actual knuckle... So i removed them and this Haynes manual says i need to retract the shoes from the fully adjusted position, wh8ch im trying do now..Mght have to go look at the servive manual cause the explanation in the Haynes manual is pretty terrible
You got some crusty buildup going there. Do you have access to a media blaster? If you blow up all four corners - you’ll start looking at the sub frame… its kind of one of those get real with yourself moments.
 
Last edited:
Defeated and shutout today. Made zero progress. The four bolts were easy to remove but the drum still doesnt come off the knuckle... Guessing its seized, so i guess im going to dive into take the drum apart tomorrow.

You got some crusty buildup going there. Do you have access to a media blaster?
I dont, but also dont know much about it. I know I dont have room in the garage for a blasting cabinet. Can it be done outdoors in the open air? If im taking things apart to this extent, its something i would consider doing.

If you blow up all four corners - you’ll start looking at the sub frame… its kind of one of those get real with yourself moments.

I dont think i understand what you mean here. Are u saying id understand the extent of the corrosiom after blasting it?
 
Defeated and shutout today. Made zero progress. The four bolts were easy to remove but the drum still doesnt come off the knuckle... Guessing its seized, so i guess im going to dive into take the drum apart tomorrow.


I dont, but also dont know much about it. I know I dont have room in the garage for a blasting cabinet. Can it be done outdoors in the open air? If im taking things apart to this extent, its something i would consider doing.


I dont think i understand what you mean here. Are u saying id understand the extent of the corrosiom after blasting it?
No no, not exactly about the rust - that I expect will clean up pretty well. I mean the rabbit hole of project - aka : and while you are there… more things to clean… oh look subframe bushings… Its how these things go. You got to get real about how deep you’re gonna go.
 
No no, not exactly about the rust - that I expect will clean up pretty well. I mean the rabbit hole of project - aka : and while you are there… more things to clean… oh look subframe bushings… Its how these things go. You got to get real about how deep you’re gonna go.
Oh lord yes. Im definitely a "while i have this off and while im in here" guy. I feel like ive already rebuilt half this car over the last year.
 
Add Value - Be Respectful - No Trolling - No Misinformation - Participate Often!
Support Vendors who Support the DSM Community

Latest Classifieds

  • For sale 2g 2G Mishimoto Radiator & Fan Shroud
    2G Mishimoto Radiator & Fan Shroud $200 + shipping and paypal feesYou must be registered to...
    • jersygsx
    • Updated:
    • Expires
  • For sale 2g 2G Power Window Switches ( tested and hardware included )
    2G Power Window Switches $55 + shipping and paypal fees* Tested 6/2/26 * Hardware included *...
    • jersygsx
    • Updated:
    • Expires
  • For sale VIRGIN 4G63 6-BOLT TURBO HEAD
    Came off a virgin stock AWD Auto 1G DMS (91), also have matching block and crank which are also...
    • The_Partout_Spot
    • Updated:
    • Expires
  • For sale 1G DSM 4G63 6-BOLT TIMING COVER
    Used, see condition in photos. Buyer covers shipping / fees.
    • The_Partout_Spot
    • Updated:
    • Expires
  • For sale Garage clean out
    Changing setups on the car and getting rid of some stuff as well that's been laying around. Will...
    • 92GSXtacy
    • Updated:
    • Expires
Back
Top