The Top DSM Community on the Web

For 1990-1999 Mitsubishi Eclipse, Eagle Talon, Plymouth Laser, and Galant VR-4 Owners. Log in to remove most ads.

Please Support ExtremePSI
Please Support Fuel Injector Clinic

2G ARP head stud install question. Studs not sitting evenly

This site may earn a commission from merchant
affiliate links, including eBay, Amazon, and others.

This site may earn a commission from merchant affiliate links, including eBay, Amazon, and others.

jakk220

10+ Year Contributor
1,319
312
Nov 13, 2010
Akron, Ohio
Ok so I have been having a lot of issues in the recent past with head gaskets blowing out. Being that this is my 4th head gasket now, I think I may have discovered a possible issue.

Before I installed my new l19 head studs, I ran a thread chase through the block. However I think that the chase may have bottomed out on the deck surface before it cleaned all of the threads. So I am in the process of making one out of an old head bolt to be sure.

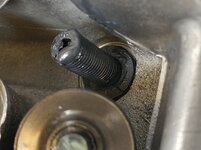
When installing ARP head studs, I was always told to put them in hand tight in the block and that is it. Which I have always done. However I just noticed that when I do this, I can still see a part of the un-threaded part of the stud (pictured below). This being correct to me would not make sense because if too much were showing, which is possible in this case, it would not torque the head down properly.

When I put more force into one of the studs, It went down to the point that the threads were actually down inside the head. This however took more force than I was exactly comfortable with so I backed it back out. I was scared of stripping the block out. At first it was hard to tighten down, then it eased up a bit. Which could be it hitting clean threads, but I was not risking it.

My Question is: When you install the ARP head studs, should some of the un-threaded part of the stud be visible and the picture is correct, or should some of the threads be down inside the head?

Note: the block and head have been decked before, the head a few times. But the machine shop said it is still within factory spec.

I am at a stand-still until I figure this out. Thanks.
 

Attachments

  • 1010161519 (2).jpg
    1010161519 (2).jpg
    274.2 KB · Views: 343
If you have blank portions of the stud above the washer, you won't be able to tighten it down to spec properly.

Have you made sure the block holes are clean and free of any debris that could have been packed in over the years?
 
If you have blank portions of the stud above the washer, you won't be able to tighten it down to spec properly.

Have you made sure the block holes are clean and free of any debris that could have been packed in over the years?

I ran a thread chase, brake cleaner, and some compressed air through the holes. Like i said though I think I need to make a longer chase so I am going to do that. I was just wanting to make sure that the blank part of the stud should not be visible so that I don't damage the block by trying to go too far.

It's weird because a majority of the studs are the same length. If i had to make an educated guess, I would say this is because they are getting caught up on where the stock head bolts stopped in the holes.

I have never before, but this time around I did use lube on the threads going into the block. I have heard of people doing it both ways but was not sure as to which way was the proper method. I just figured the studs would go in easier with some ARP lube on them.
 

Pauley I read that you were not supposed to use a tap on the holes in the block because it weakens them. I assume that is not true since you are suggesting it? I just read that on ARP's website.

Also I assume that you agree that the studs sitting the way they are is not right?
 
Last edited:
From ARP's Website:

I have heard that some people have had trouble with newly installed cylinder head studs leaking water. How do I make sure I don’t have the same problem with my new ARP head studs?


Prior to installing your new head studs, it is very important that you have clean threads on both the block and the studs. First, clean up all the threads in the block with a thread-cleaning chaser, NOT a regular tap. Thread chasers are designed so that they do not remove material from threads but merely remove debris and corrosion. Make sure you go all the way to the end of the threads in the bottom of the hole. Then clean out all the holes in the block with brake or carburetor cleaner to remove all the debris. Make sure the threads on the new studs are clean. Use a liberal amount of ARP thread sealer, high temp silicone or Loctite to ensure that there will be no air pockets that can cause leaks. Then follow the ARP instructions for installing the fasteners.


http://arp-bolts.com/p/FAQ.php
 
ARP sells a chase, and its like 50 bucks. Ouch. Luckily I am like 15 minutes from Summit Racing and they sell the right chase. It is 11x1.25 correct? If I have to buy the chase to not risk weakening the threads I will just cough up the money. If something can go wrong on my car, it will. Which is why its named Murphy.
 
I never saw anything from arp. I went to their site just now and it does mention a thread chaser. I used a tap and only got crud out. No new metal. Your results may vary.
 
That ARP thread chaser looks pretty pointed, wonder if it's going to do what you're looking to do, get the crud out of the bottom of the holes.
 
That ARP thread chaser looks pretty pointed, wonder if it's going to do what you're looking to do, get the crud out of the bottom of the holes.

I believe that it actually the shape of the bottom of the holes. I could be wrong.
 
You can chase threads with a tap if you have one already. You're confusing "chasing" with "threading". When you make a threaded hole a form tap will make a much stronger thread than a cutting tap. The threads in your block are already made so the tap will only cut out the crude. And the bottom of the hole has a "drill point" which is not as pointy as that thread chaser.
 
Last edited:
6 bolt-12Mx1.25
7 bolt-11Mx1.25

All I have ever used is a regular tap and not had issues. I just tapped a block this weekend I am sending to the machine shop for my friends next build. I don't expect any issues this time either.
 
Is that the shape of the bolts?

No your right its not. I suppose if I had a tap already it wouldn't hurt to use it. Ill be stopping by my friends house tomorrow so ill see if he has one I can borrow. If not ill probably just get the ARP tool I guess. I feel like either one should accomplish what I need it to do. Thanks for the info guys. Hopefully it will fix my issue. I will report back tomorrow with my results.
 

I never saw anything from arp. I went to their site just now and it does mention a thread chaser. I used a tap and only got crud out. No new metal. Your results may vary.

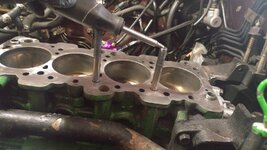
I suppose you could DIY it as some people have done. But I have heard that it is not as effective. I just used the ARP tool and it worked absolutely amazing. It was most definitely the cause of my recent head gasket issues. The bolts were all the same length and felt like they bottomed out, but really they weren't. The other chase I was using was not getting down fare enough to seat them. The picture below was before and after the ARP chase.

You must be logged in to view this image or video.
 

Attachments

  • 1011161440 (1).jpg
    1011161440 (1).jpg
    245.9 KB · Views: 116
No your right its not. I suppose if I had a tap already it wouldn't hurt to use it. Ill be stopping by my friends house tomorrow so ill see if he has one I can borrow. If not ill probably just get the ARP tool I guess. I feel like either one should accomplish what I need it to do. Thanks for the info guys. Hopefully it will fix my issue. I will report back tomorrow with my results.
I suppose you could DIY it as some people have done. But I have heard that it is not as effective. I just used the ARP tool and it worked absolutely amazing. It was most definitely the cause of my recent head gasket issues. The bolts were all the same length and felt like they bottomed out, but really they weren't. The other chase I was using was not getting down fare enough to seat them. The picture below was before and after the ARP chase.

You must be logged in to view this image or video.
Damn, there must have been a lot of crud in there. That'll give you a little peace of mind. :thumb:
 
Meh, what's a few inches, right?

Who ever knew a few inches could have such a big impact ;) hehe

Oh damn. That's a big difference. No wonder the headgaskets were crapping out on u.

Yeah no kidding.... I am so relieved that after 4 head gaskets I have now been able to figure it out. It was always "this could be it" or "I think I finally figured it out" but nothing was ever "This is it". Now I know this is it.
The pushing coolant would go away for a while, but it would always come back. I think that the head stud nut was contacting the washer a little bit and holding it down some. But it was no where near the torque it needed to be though. Now I can sleep better at night LOL.
 
Did any crud come out when using the chase?

Some did yes. It looked like there was a bit of corrosion and that was it. Which is why I think that it was from where the original head studs stopped in the block. Because all of them stopped at the same point too. When I used the chase, it would be smooth, then they hit a rough spot, and then went smooth again.
 
Support Vendors who Support the DSM Community
Boosted Fabrication ECM Tuning ExtremePSI Fuel Injector Clinic Innovation Products Jacks Transmissions JNZ Tuning Kiggly Racing Morrison Fabrications MyMitsubishiStore.com RixRacing RockAuto RTM Racing STM Tuned

Latest posts

Build Thread Updates

Vendor Updates

Latest Classifieds

Back
Top