The Top DSM Community on the Web

For 1990-1999 Mitsubishi Eclipse, Eagle Talon, Plymouth Laser, and Galant VR-4 Owners. Log in to remove most ads.

Please Support ExtremePSI

Resolved 2G AWD Fuel sending unit to feed line AN fitting

This site may earn a commission from merchant
affiliate links, including eBay, Amazon, and others.

This site may earn a commission from merchant affiliate links, including eBay, Amazon, and others.

red_devil

15+ Year Contributor
1,380
96
Jul 13, 2005
Richmond, Virginia
A dreaded fuel sending unit fitting question

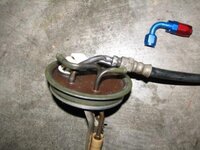
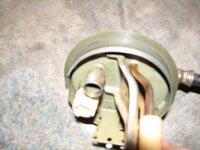
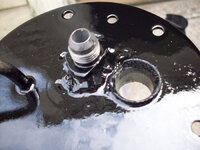
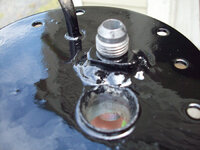
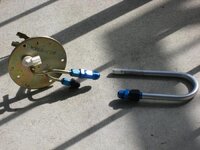
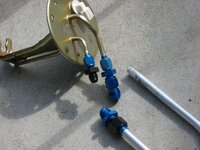
well I was trying to remove my fuel sending unit hose to install my STM tank to rail kit. And man is this thing tight. Sprayed it for a day with blaster, I used line wrenches and made sure not to bend the line and brake it. Well the damn thing is so tight that the line twisted. I removed the whole thing and thought about drying it off and adding heat but it's so twisted now that it will reduce flow.

I've seen people install a AN fittings inside the unit and was wondering what to use and how?

Or could I cut the line and weld a AN fitting on the pipe?
 

Attachments

  • fuel top.JPG
    fuel top.JPG
    28.9 KB · Views: 7,114
  • fuel under.JPG
    fuel under.JPG
    22.3 KB · Views: 5,813
Last edited by a moderator:
There is a downside to using this fitting. The hex portion on the -6 fitting is abnormally large and it makes it tough to weld around the side near the plastic plug. It's also plated, which sucks to weld. I have that exact same Earls fitting in my garage that I bought to use on 2gdanny's fuel pump assmebly, but decided against it after I saw how it fit.

For -6 AN, the fitting I recommend is made by Aeroquip, part number FBM2872 (same fittings shown in post #10). It's an unplated fitting (welds great) that is intended to be brazed onto a steel tube and the hex portion is very small, so it's fits comfortably on the top of the 2G fuel pump assmebly.

Another word of advice for anyone that plans to do this modification: Keep the heat a bit lower on your welder to prevent from melting the silver solder that was used to secure the tube on the plate from the factory. I haven't had the silver solder melt away on me yet, but it's definitely possible if you use too much heat.

i would just cut the tubing to where there are no kinks and temporarily attach the hose to the tube with a couple of hose clamps...then get this Earl s Performance 165056ERL - Earl's Performance AN to Tube Adapter Fittings - Overview - SummitRacing.com and you should have extra hose from having to reach farther to use for the fitting.
I know it doesn't mention it on Summit's website, but that compression fitting is only rated for a maximum working pressure of 50 psi. So, it's no good for our fuel systems, as every single one of us are exceeding that pressure when in boost.
 
Last edited by a moderator:
i don't know if that pertains to just that compression fitting or not but i used compression fittings to replace a section of my fuel line on my car and haven't had leaks.
 
i didn't see it on their site, but i can see how it would only hold 50 psi being aluminum.
 
You're right. It looks like they removed the "50 PSI max" footnote from their website, but it is still listed in their catalog. That's kind of strange... I can definitely remember that Summit had the same footnote on their site a while back too. I wonder if the fitting has changed since my catalog was printed...?
 
There is a downside to using this fitting. The hex portion on the -6 fitting is abnormally large and it makes it tough to weld around the side near the plastic plug. It's also plated, which sucks to weld. I have that exact same Earls fitting in my garage that I bought to use on 2gdanny's fuel pump assmebly, but decided against it after I saw how it fit.

For -6 AN, the fitting I recommend is made by Aeroquip, part number FCM2872 (same fittings shown in post #10). It's an unplated fitting (welds great) that is intended to be brazed onto a steel tube and the hex portion is very small, so it's fits comfortably on the top of the 2G fuel pump assmebly.

Another word of advice for anyone that plans to do this modification: Keep the heat a bit lower on your welder to prevent from melting the silver solder that was used to secure the tube on the plate from the factory. I haven't had the silver solder melt away on me yet, but it's definitely possible if you use too much heat.


I know it doesn't mention it on Summit's website, but that compression fitting is only rated for a maximum working pressure of 50 psi. So, it's no good for our fuel systems, as every single one of us are exceeding that pressure when in boost.

Aw man really. I ordered that Earl's -6AN weld fitting and it already arrived at my house. It difinately does have a large hex section. I guess I will have to make it work because I'm not going to order another one. I think I'm going to cut the tube slightly shorter than "red devil" did, leaving just a little nub to help center the fitting.

Someone should definately do a write up on this because there is not much information on doing this. I spent a crazy amount of time searching for what to use, how to do it, and then trying to make it all come together. This thread is probably the best one I've seen so far though. I was definately going to do a write up after completing it but if someone beats me to it that's fine, especially considering that the stock fittings always freeze together on these cars and its over $300 for a new fuel pump assembly. I think the total cost for my fittings and steel braided tube shipped to my door was like $60 plus they look damn sexy :rocks:.
 
Well everything is in and there are no leaks. I would recommend getting the AN fitting as low as possible as mine is a little to high and is hitting the boot that covers it. I just put a seal around the cover and used longer screws to give it some extra room.
 
Yeah, I would definitely recommend a 'forged' AN fitting over a 'bent tube' AN fitting for clearance under the cover.

Although this picture doesn't accurately depict size and bend radius, it at least shows the difference in design between the two. Forged fittings typically have a much tighter bend radius, therefore can fit in tighter areas.

You must be logged in to view this image or video.
 
Well I know its been a couple months but my dad is the one with the welder and its hard for him to find some spare time these days. I had to hack up that fitting pretty bad to allow room for some welding. Definately get the Aeroquip fitting instead of the Earl's. After all that it still ended up leaking in one spot (My dad is still learning how to weld). So now I ordered a -8AN bulkhead fitting to use for a non welding method. Also to anyone curious I picked up a non turbo fuel pump assembly to work with. They are nearly identical to the turbo but use a rubber tube that attaches to the fuel pump itself similar to the 1g. It can still be used if you are going to use the bulkhead fitting method though. This is good as there are a lot more available. I will post an update when I finish my new assembly.

Some pics of the one that leaks:
 

Attachments

  • 100_1736-(Resize).jpg
    100_1736-(Resize).jpg
    55 KB · Views: 385
  • 100_1743-(Resize).jpg
    100_1743-(Resize).jpg
    59.3 KB · Views: 373
  • 100_1738-(Resize).jpg
    100_1738-(Resize).jpg
    50.3 KB · Views: 369
Last edited:
UPDATE:

In case anyone was curious I finished my new fuel pump assembly. So far it has no leaks and is holding pressure fine. I used a -8AN bulkhead fitting and -8AN bulkhead nut, -8AN to -6AN reducer fitting, -6AN straight hose fitting, a 22mm viton o-ring for the bulkhead fitting as well as two nylon washers, a 5.8mmx1.9mm viton o-ring, and a 3/4 inch drill bit to fit the -8AN fitting in the pump assembly. I had to create a step towards the bottom of the bulkead fitting to fit the pump and the o-ring up inside of it. This also keeps the o-ring from moving out of place and sealing poorly. I used two thick nylon washers between the pump and the bulkhead fitting to keep the pump from moving any in the stock fuel pump housing. I highly recommend this to anyone that doesn't have access to a welder. It was very easy to do and so far is sealing fine. I can do a write up or post any part numbers if people are interested.
 

Attachments

  • 100_1823.jpg
    100_1823.jpg
    57.5 KB · Views: 476
  • 100_1822.jpg
    100_1822.jpg
    42.2 KB · Views: 455
  • 100_1817.jpg
    100_1817.jpg
    42.4 KB · Views: 437
  • 100_1809.jpg
    100_1809.jpg
    59.9 KB · Views: 446
  • 100_1807.jpg
    100_1807.jpg
    59.4 KB · Views: 435
I know it is an old thread... but a friend came up with an idea that is MUCH simpler.

1/2 NPT nipple welded to the sending unit
1/2" NPT FEMALE x 1/2" hose barb

with a female NPT 1/2 barb on the end going to the pump
1/2" NPT FEMALE x 1/2" hose barb

and then on the other side, a 90 degree fitting going to a compression fitting to connect to 1/2 hardline.
Male Threaded Adapter Elbows And Brass Compression To NPT(M) Adapter Elbows - Cole-Parmer Catalog

Run the 1/2 hardline to the front and switch to -8AN in the engine bay. $20 for fittings, maybe $20-$25 for hardline. Going from 1/2 pipe to -8AN is the only thing I haven't figured out yet. I have to go to -6AN into the bottom of my Fuel Lab filter so eventually a solution will be found.
 
I know it is an old thread... but a friend came up with an idea that is MUCH simpler.

1/2 NPT nipple welded to the sending unit
1/2" NPT FEMALE x 1/2" hose barb

with a female NPT 1/2 barb on the end going to the pump
1/2" NPT FEMALE x 1/2" hose barb

and then on the other side, a 90 degree fitting going to a compression fitting to connect to 1/2 hardline.
Male Threaded Adapter Elbows And Brass Compression To NPT(M) Adapter Elbows - Cole-Parmer Catalog

Run the 1/2 hardline to the front and switch to -8AN in the engine bay. $20 for fittings, maybe $20-$25 for hardline. I have to go to -6AN into the bottom of my Fuel Lab filter so eventually a solution will be found.
I'd have to see it done to be convinced.

2G's have their pumps mounted directly below the pump hanger, so there's not much room for fittings and adapters and such. And we don't have much room above the plater either. These limitations really limit the possibilities for plumbing.

But with that being said, you can get a weld fitting for $4 and be done with it. -6 hose isn't that expensive either. I guess I just would never consider this to be complicated or expensive:

attachment.php


Going from 1/2 pipe to -8AN is the only thing I haven't figured out yet.
When you say "pipe", I assume you're referring to aluminum tubing. If so, that part is easy. Earls part number 165008.
 
Hopefully someone responds fast. How do you remove the white fuel pump connector from the housing? I bent my feed tube and have everything off the housing except the connector.

Thanks,
Wade
 
Get a little dremel bit or dremel cut-off wheel in there and cut away at the pinched area of the Fuel Pump Assembly.
When you're ready to install, hold the plug in place well, and put a nice bead of JB Weld around the same area all around the white plug.
 
Hopefully someone responds fast. How do you remove the white fuel pump connector from the housing? I bent my feed tube and have everything off the housing except the connector.

Thanks,
Wade
If you can, post up a picture of the underside of the plug, and I'll show you how I do it.
It's tough to explain without a picture. ;)
 
What I did was drill a small hole where the pinched area is (being careful not to go through the connector) then got some needle nose pliers and bent the rest outwards. Then when I installed it I just bent the area all back again and it held shut.
 
^^^ That's killer idea.
I wished I would have done something with that damn siphon hardline while I was in there.
Man, what a PITA that is to work around when you're threading the AN Fittings onto the male bungs...
 
I got it, I just stuck a flat head screw driver in and bent them out, the oring was what was holding me up.
 
Just wanted to throw in my 0.02 on how I converted my system to AN Fittings. Using a 37* flaring tool I trimmed off the existing flares and removed the OEM threaded fittings. Slid on the new AN tube nuts and sleeves, flared the ends and it was good to go.
 

Attachments

  • pumpbracket_an-3_small.jpg
    pumpbracket_an-3_small.jpg
    54.7 KB · Views: 307
  • pumpbracket_an-4_small.jpg
    pumpbracket_an-4_small.jpg
    58.3 KB · Views: 324
I have had it installed for some time now - I admit I had to trim some of the sheet metal under the rear seat for ease of install. I need to snap some pictures still of how it looks.
 
Any updates? Lots of unique ideas flowing in this thread :)

99gst_racer, when using the Aeroquip fittings, what 90* fitting did you use? Also, was it a pita to get the cover back on over the 90* fitting?
 
Support Vendors who Support the DSM Community
Boosted Fabrication ECM Tuning ExtremePSI Fuel Injector Clinic Innovation Products Jacks Transmissions JNZ Tuning Kiggly Racing Morrison Fabrications MyMitsubishiStore.com RixRacing RockAuto RTM Racing STM Tuned

Latest posts

Build Thread Updates

Vendor Updates

Latest Classifieds

Back
Top