The Top DSM Community on the Web

For 1990-1999 Mitsubishi Eclipse, Eagle Talon, Plymouth Laser, and Galant VR-4 Owners. Log in to remove most ads.

Please Support ExtremePSI
Please Support STM Tuned

My fuse box relocation (project log)

This site may earn a commission from merchant
affiliate links, including eBay, Amazon, and others.

This site may earn a commission from merchant affiliate links, including eBay, Amazon, and others.

I got the suspension on and set up, and got a set of wheels. Other than that it's pretty much still the same.
 
Wow Headache for whoever reads all the way thru to hear, but has the best info thru it all so if you made it to hear your doing well. Keep up the good work great read through.
 
nice...im currently resurrecting my friends build and he didnt wire tuck the car at all. all the did was modify the harness for autronic since thats what he was running instead of link but i will be using dsmlink so instead of trying to mend the harness back together i decided to go out and get a harness and tuck/depin it before putting it into the vehicle. this means i will be picking your brain sax LOL dont worry ive been a mechanic for years so im not clueless. its the details ill need your opinion on. thanks in advance
 
Thanks for making one of the best build threads on the site! :thumb: The amount of effort and dedication put into this project is simply amazing. Now I MUST say! You should seriously consider creating those wire harnesses for some kind of profit. I know that 99% of the DSM community would actually pay a pretty penny for a harness of that quality and size and not have the headache of cutting, splicing, and soldering. Also deciding what wires go where, connecters, and such and such. Not to mention you could single handedly be the reason for a new cleaner stage in DSM build threads. :thumb: If you ever decide to actually create some or offer some kind of wire harness service please let me know! I would love to shell out some cash for one of those. :hellyeah:
 
Last edited by a moderator:
Awesome thread. Love the attention to detail you did! Fantastic work!
 
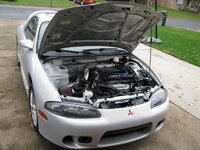
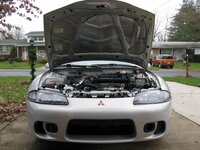
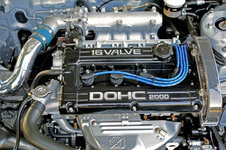
Ok, it's been way too long since the last update but I started working on the car again recently.

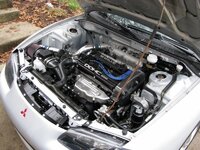
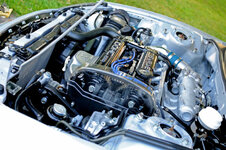
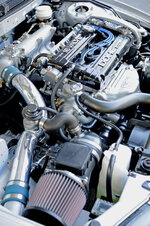
Awhile ago I polished my Greddy intercooler pipes (got them used from a friend). Here is a before and after type shot.

View attachment 95993

View attachment 95994

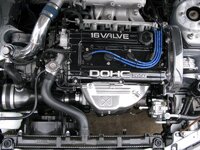
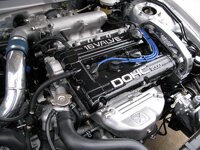
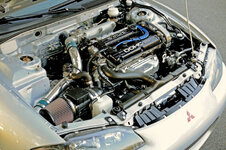
And I modified a 1g bov to fit the Greddy flange. See here for more info. Blasted and powdercoated it midnight black chrome.

95911d1244435088-punishment-2g-ic-pipes-no-1g-bov-love-img_8488.jpg


My ECU harness is now 95% done, the other 5% will be done at the same time as the fuse box harness. The connectors I'm using are Deutsch connectors from laddinc.com. I use a special crimper to crimp all the terminals. Any empty spots in the connectors are filled with plugs to environmentally seal the connectors. Every position in the connectors is numbered so I made a chart of which wire goes where, making maintenance easy in the future. I think there were only 2 wires that needed lengthened, the rest were shortened by at least 2 feet, sometimes up to 4 feet. By using the connector I was able to keep soldering to a bare minimum, mostly just on the power and ground wires (grounds were all moved inside cabin). The injector clips all go into one big connector so I can remove the harness without unplugging the individual clips. The injector connector mounts to the bottom of the intake manifold with a bracket from laddinc. If anybody is really interested in the connectors I can give more info on them, but they are really nice. I threw in a picture of my alternator plug from Ballenger Motorsports, great prices and service there and the crimper I got from there is really nice. Also in the pictures is where I mounted the power transistor and injector box, underneath the relays near the ecu. I liked this spot because it kept all the electronics in the same general area. I'll post pictures of the harness installed next time I put it in.

View attachment 96005

View attachment 95995

View attachment 95996

View attachment 95997

View attachment 95998

View attachment 95999

View attachment 96000

View attachment 96001

View attachment 96002

View attachment 96003

View attachment 96004


A lot of hours went into that harness and each wire was placed precisely. I went through and checked every wire in the harness to verify it went to the right place; it was a good feeling when they all were right LOL I'm now working on the fuse box harness. First I need to mount the fuse box. I found a good place for it so I'll show that once I make mounting brackets for it. Then on to redoing the wiring on the harness.

Oh, and I picked up a used copy of v2 dsmlink for a good price too so I'm set there.

I really want to bring my car to the 2nd Annual Northeast DSM Meet on August 8th so that's my goal. After I finish the fuse box harness (hopefully this week), I want to pull the engine out on Sunday. Then I'm (hopefully) going to paint the engine bay to make it look nice again and paint all the front suspension stuff, powdercoat a few more random pieces, relocate the battery, and put it all back together.


I realize this post was a few years ago, but do you have info on where you got the cannon plugs from? I've been wanting to do this for when I do my wire tuck later this year. Thanks, looks great.
 
Last edited by a moderator:
Man, I saw this thread bumped and was hoping Eric had finally done something with the car since it was his birthday, hoping maybe his bro bought him a turbo or something.

sigh.. back to hoping for me..
 
All right, all right, here's an update. It looks like I've forgotten to consolidate some things in here over the past couple years…


(6/2010) Fire extinguisher mounts
We made up some brackets to mount a fire extinguisher to the passenger seat. Thanks to Craig for making this happen.
http://www.dsmtuners.com/forums/road-course-autocross/365123-fire-extinguisher.html

attachment.jpg


attachment.jpg


attachment.jpg


(6/2010) Adjustable sway bar end links
http://www.dsmtuners.com/forums/152221948-post19.html

attachment.jpg


(7/2010) Vacuum block (already posted in this thread)
http://www.dsmtuners.com/forums/152320673-post602.html

attachment.jpg


(12/2010) Distribution block

One 14ga fused input each for ground, constant power, accessory power, and illumination, and 16ga outputs (9 ground, 3 constant power, 7 accessory power, and 1 illumination). Used for switches, gauges, etc.

IMG_0419 [640x480].JPG


IMG_0432 [640x480].JPG


IMG_0440 [640x480].JPG


(3/2011) Quick release bumper
Ugly, but well worth it. We also changed out the stupid plastic screws holding the fender liner to the bumper with knurled head screws so they’re easily removable by hand.
http://www.dsmtuners.com/forums/new...mper-quick-release-removal.html#post152496426

4.JPG


(3/2011) Evo 9 OFH / Setrab oil cooler (already posted in this thread)
http://www.dsmtuners.com/forums/152527852-post637.html

attachment.jpg


(4/2011) VEI Gauges

I used a stock bezel that was modified to make room for the gauges to fit, then also modified to sink it back into the dash by 1/8". Then, I glued a piece of CNC cut 1/8" ABS plastic to the front with special glue made just for ABS plastic. This way it's held in the dash using 3 of the 4 factory clips, no screws are seen from the front (like most aftermarket pieces), and the hazard lights switch is still mounted in the stock fashion. I did have to cut the threaded posts on the back of the bezel down by 1/8", too. I used a hot knife for the modifications. The plastic was scuffed with a fine scotchbrite pad to remove the shine and make it blend with the dash better. The ABS plastic was used because the texture on it resembles the stock piece.

I have oil pressure, oil temperature, water temperature, m/t temperature, wbo2, and boost gauges. The switches are for fans and my LC-1 (with integrated status light), and the warning light below the middle gauge is for water pressure.

attachment.jpg


attachment.jpg


attachment.jpg


(8/2011) PST 2-piece CF driveshaft
I had been having a problem with some random gear noise.
http://www.dsmtuners.com/forums/drivetrain-tech/369570-sporadic-gear-noise.html

I finally tracked it down to the driveshaft, and after disassembling the driveshaft entirely the carrier bearings looked fine. I believe the lobro joint was the culprit, so I decided to upgrade. I tried to install Frontline Fab front and rear driveshaft loops as well, but the front one wouldn’t work with this driveshaft since it eliminated the rear carrier bearing rather than the front one (angles were different than the 3.5” DSS it was designed around), and the rear loop wouldn’t work at all with the stock fuel tank.

attachment.jpg


attachment.jpg


attachment.jpg


(4/2012) DG suspension, RM sway bars, SPC UCA’s, RRE lower stress bar, alignment, corner balance
Took long enough, but I finally got my suspension installed. I had to make bump stop spacers to compensate for the lack of travel from the SPC UCA’s, and the rear tire-to-fender spacing. After racing, I’ve found the front UCA’s rub the wheel well undercoating just the tiniest bit, so I’ll need to add more spacers at some point. Or better yet, find a good solution for UCA’s.
http://www.dsmtuners.com/forums/handling-tech/434894-bump-stop-spacers.html

attachment.jpg


12.jpg


13.jpg


Marked the SPC UCA’s with the mill to make adjusting easier.

14.jpg


15.jpg


The RRE bar didn’t fit properly, took some extra washers to make it work.
http://www.dsmtuners.com/forums/han...-install-rre-lower-tie-bar.html#post152977124

16.jpg


We finally picked up some stuff to do our own alignments and corner balancing:
http://www.dsmtuners.com/forums/han...er-balance-weight-scales-alignment-tools.html

Rear coilovers dropped all the way with stock fronts, just for funsies :p

17.jpg


3179 lbs. with stock wheels, ½ tank of fuel, and me in the car.


(5/2012) Carlisle Performance and Style autocross
Just an informal local autcross run by NICO at a car show. First time racing the car!

18.jpg


19.jpg


20.jpg


(6/2012) Mason Dixon Dragway Test and Tune
First time drag racing the car. Best of 14.556 @ 94.83

21.JPG


(7/2012) 17x9 +35 Volk RE30 with 255/40/17 Hankook R-S3 tires
www.dsmtuners.com/forums/road-course-autocross/432775-help-me-pick-wheel-tire-size.html

I spent a year looking for wheels, but finally found the perfect ones for me. And they happened to come with the tires I wanted and center caps. I checked clearances and these wheels will work with Evo brakes, Stoptech big brake kit, and everything TCE offers (including the Plus 5 with the 13.3" rotor) except the Plus 5 with 14" rotor. Right now the bump stops are set up to prevent the tires from getting into the fenders, but I have a fender roller ready to go when I get time. Then I can get some shock travel back in the rear.

attachment.jpg


attachment.php


attachment.jpg


(8/2012) 2012 Buschur DSM Shootout, 3rd place in OS (street tire) autocross
The shootout was AWESOME and the autocross was a super-fun track :hellyeah: I learned that I love these tires, but they are most definitely NOT meant for rain. We hit a bit of rain on the way home and my situation was not good, and of course Brian is cruising right along with the Star Specs!

With the newfound grip from the sticky tires, I saw some nasty oil pressure drops. The worst dip I saw was from 78psi down to 17psi with engine rpm slightly increasing. Hopefully this doesn’t equal doom too soon. I have a Kiggly HLA regulator to put in, but I’m not expecting it to do much for this issue. I don’t have any data points from a stock setup, so I might be worrying for no reason :hmm:

25.jpg


26.jpg


27.jpg


(8/2012) FIC 2150cc injectors
Got a deal on these I couldn’t refuse! I ran them on gas first for a few days:
http://www.youtube.com/embed/WIdSGufQnBE

Since then, I’ve been on E85. Awesome injectors, not much else to say.

28.jpg


(9/2012) Mason Dixon Dragway Test and Tune / 100,000 miles!
It took me 5 years to put 2,600 miles on the GSX, but she is finally broken in! I crossed the 100,000 mile mark on the way to the track on 9/29/2012 and had a great day racing.

29.jpg


Changes since 6/2012 drag race = wheels, injectors, E85.
Best of 13.543 @ 100.00. Dropped 1 second and picked up 5 mph with E85 and wheels!

30.jpg


(9/2012) Fuel pressure sender
I installed one of these on top of the stock fuel filter to log fuel pressure:
P51-100-G-B-I36-4.5V-000-000 SSI Technologies Inc | 734-1007-ND | DigiKey

This is the same sensor I use for oil pressure, just 100psi instead of 200psi.

P1050678 (Medium).jpg


This adapter was used, slightly modified for better flow:
http://www.summitracing.com/parts/rus-640700


(10/2012) Dual Calan 1L catch cans, Hal single -10 oil cap
I’ve had the catch cans on for quite awhile, but I finally decided to pick up an oil cap from Hal rather than modify a valve cover right now. Both are high quality pieces and I’ll definitely have to upgrade to Craig’s new catch cans at some point!

31.jpg


P1050692 (Medium).jpg


P1050695 (Medium).jpg


(11/2012) Powermaster 140A Alternator with XS Volt one-wire internal adjustable regulator
I got tired of my Saturn 200A with stock 2g pulley not putting out enough voltage at idle. So I contacted Powermaster and they built me a 140A alternator with their XS Volt one-wire internal adjustable regulator. Had a few hiccups with this, but we’re getting close.

Saturn 200A w/ 2g pulley, grounded alt. case, and S wire hookup:
750rpm idle – 12.0v
Everything but idle – 14.7v

Powermaster 140A with w/ 2g pulley, grounded alt. case
750rpm idle – 14.2v
Everything but idle – 14.5v
Voltage can dip slightly if rpm drops after a rev

I haven’t touched the adjustable regulator yet, but I will try raising it up at some point. At a 750rpm idle, I’m right on the edge of the alternator’s power output curve on the low end.

33.jpg


I think that pretty much gets us up to date. I’ve done some other smaller things along the way, but not too worthy of noting. And for the last 3 months, I literally have not laid a hand on the car.

Immediate plans for the next couple months
I want to race a FATT event at Summit Point Raceway on 3/29/13, so I have some work to do to get ready:
• Port Evo OFH / change oil
• Install new harmonic damper
• Install spare brake pads (EBC Yellowstuff) and change fluid to ATE super blue
• Install Southbend SS pressure plate, TZ/B disk, ACT flywheel, and other clutch related parts
• Change transmission fluid to Diaqueen
• Heat tape wheel weights and reinstall, bring Evo wheels with Star Specs on as backup for rain LOL
• Install FP 17psi wastegate
• Heat wrap radiator hoses
 
Last edited by a moderator:
Nice Update!

Have you though about running a 1.9'' pulley on your new alternator? I can't remember if it was 1.5'' or 1.9'' but i don't see nothing less than 14.9v on mine, and the one wire self regulated charge quick in lower RPM due to the smaller pulley now, or maybe you have it already and i just missed it?

I got my 160amp through Motor City Reman and asked for the smaller pulley and i got it for free for some reason, i was getting ready to pay, but all of a sudden the world turned pink on me. LOL
 
I'm using a stock 2g pulley. I have measurements somewhere around here, but not handy. I'd have to find my spreadsheet to see what the 1.9" pulley would do, but it would certainly make the alternator spin faster than it's rated for at 8000 engine rpm. Going larger is certainly a possibility if I'm not happy with the stock pulley, and just hope nothing bad happens up high. With the limited time I've driven with this alternator on, I've been pleased. The only time the voltage really drops detrimentally is when the rpm drops below 750, for example when putting into neutral from a higher rpm, or revving. But I'll continue to play with it.

I'll have a new update soonish. Just finished putting a clutch in and have a few smaller things to button up.
 
Finished buttoning up the car today.

Put 3M Aluminum Foil Tape 425 on my wheel weights to protect them from heat from the brakes.

1 (Medium).jpg


Installed an FP 17psi wastegate to try to get the t25 to hold more boost. Although the wastegate I got is new, the person I purchased it from misplaced the rod end, so I got a new one here and picked up a new clip too. The wastegate didn't work to hold more boost - the turbo just can't do it.

2 (Medium).jpg


3 (Medium).jpg


New clutch setup:
  • ACT Streetlite Xact Flywheel
  • South Bend TZ/B-Series Custom Clutch Disk
  • South Bend SS-Series Pressure Plate (media blasted by TMZ)
  • Competition Clutch Forged Steel Clutch Fork
  • ARP flywheel bolts
  • OEM TOB, master cylinder, slave cylinder, etc.
  • ATE Super Blue fluid
  • Diaqueen transmission fluid
  • Three-Speed Scatter shield

4 (Medium).jpg


Swapped from a mbc to ebc using ECMLink. The solenoid is mounted to a bolt that was drilled and tapped, then installed in the scatter shield.

5 (Medium).jpg


P1050630 (Medium).jpg


6 (Medium).jpg


Ported my Evo OFH. Reduced the maximum oil pressure from 98psi to 80psi.

attachment.jpg


Thermo-Tec 14020 Thermo-Sleeve on radiator hoses.

7 (Medium).jpg


And a new harmonic damper as preventative maintenance.

Got it started up today and got 35 break in miles on the new clutch. Everything feels great so far, and the clutch feels like stock except a bit grabbier and downshifting is nicer with the lighter flywheel. Should be ready to get on the track soon once I get the clutch broken in.

P1050689 (Medium).jpg


P1050704 (Medium).jpg
 
Last edited by a moderator:
Looking good. Your car continues to be the standard of perfection. :thumb:
 
I'm confused as to why you have all these mods on a T25. Never understood it.

Not enough money, not sure what he wants/what exists that will meet his goals, and wants to make sure all supporting mods were done first.


Eric, what inputs are you logging your oil pressure and fuel pressure on?

Oil pressure - Rear o2
Fuel pressure - Baro
 
I'm confused as to why you have all these mods on a T25. Never understood it.

Not enough money, not sure what he wants/what exists that will meet his goals, and wants to make sure all supporting mods were done first.

Yup, that's pretty much it with money being the biggest issue. I still have a lot more supporting mods to go before I can upgrade the turbo - fuel pump and intercooler are the big ones, and I have no idea what turbo I want. Although, the Borg Warner EFR-7163 looks purty :D

But before I even think about those, I need better brakes and racing seats!
 
I have read this entire thread, every post.... And as others have said,"hot Damn! That car is clean and sexy!"

Kudos to you for being so thorough in your build AND posting in detail. You have lit the fire under my ass to get going on my 1g. And you have set the bar high!

Do have a question for you, as I haven't been able to locate an answer. In doing my wire harness over, a lot of the sensors share a common power supply. They are all branched in to I think two wires off the mpi relay. How did you tackle this? Did you leave them all together? Maybe used a power distribution block for them?

This is where I have paused because I'm not 100% as to how to go about it. Any tips would be much appreciated.

Mike

I did not use a distribution block for this, just cut and shortened/lengthened wires as necessary, then soldered them back together.
 
I have read this entire thread, every post.... And as others have said,"hot Damn! That car is clean and sexy!"

Kudos to you for being so thorough in your build AND posting in detail. You have lit the fire under my ass to get going on my 1g. And you have set the bar high!

Do have a question for you, as I haven't been able to locate an answer. In doing my wire harness over, a lot of the sensors share a common power supply. They are all branched in to I think two wires off the mpi relay. How did you tackle this? Did you leave them all together? Maybe used a power distribution block for them?

This is where I have paused because I'm not 100% as to how to go about it. Any tips would be much appreciated.

Mike

I just tackled this in my tuck.
Now this is all for a 2G but this is how I did it. There's 3 powers, one from the MFI relay, an ignition and +5V for sensors. There's also chassis and ECU grounds.

Basically I traced everything back and soldered them into on wire to pass through the connector on my firewall.
 
Support Vendors who Support the DSM Community
Boosted Fabrication ECM Tuning ExtremePSI Fuel Injector Clinic Innovation Products Jacks Transmissions JNZ Tuning Kiggly Racing Morrison Fabrications MyMitsubishiStore.com RixRacing RockAuto RTM Racing STM Tuned

Latest posts

Build Thread Updates

Vendor Updates

Latest Classifieds

Back
Top