

MorrisonFab
Supporting Vendor
- 354
- 1,362
- May 28, 2017
-
Johnson Creek,
Wisconsin
Follow along with the video below to see how to install our site as a web app on your home screen.
Note: This feature may not be available in some browsers.
For 1990-1999 Mitsubishi Eclipse, Eagle Talon, Plymouth Laser, and Galant VR-4 Owners. This is where the DSM platform history is documented and archived. Log in to help us in our mission, and to remove most ads from the browsing experience.

This site may earn a commission from merchant affiliate links, including eBay, Amazon, and others.
 ).
).")
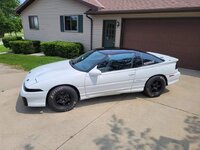
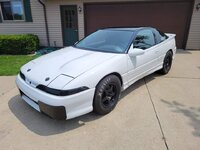
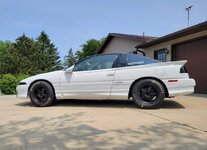
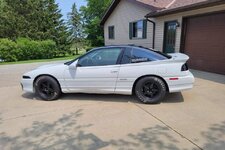
THERE is something so satisfy about a freshly painted car

Where are you getting your new carpet from?
") )
) Looks fantastic! I will say in regards to your finger take a trip to Home Depot, or Walmart and they have spray grips that give you a little trigger contraption to place on top of the spray paint can. It will make a night and day difference! Rattle canned an old 76' Chevy one night to make it all the same color and my finger would have fallen off if I didn't have one of these!
https://www.homedepot.com/p/Rust-Ol...Comfort-Spray-Grip-Accessory-241526/100670383
 that's genius. Love how people keep coming up with cool solutions to old problems.
 That came out friggin' great. Thanks for sharing all the photos.Ok, so I followed this thread on how to properly paint my plastics.
But oh my word, the things that weren’t mentioned are that 1.) your spray finger will ache for like days, and 2.) it takes several days for this process. Start early in the morning.
I followed his instructions exactly. I bought the recommended products.
View attachment 610382
And I shook those cans like my whole life depended on it for the required amount of time.
The first part was easy, take ‘em out and wash with soap and water. I had already done that previously when I got the car to clean it all up but I did it again and got every nook and cranny with a heck ton of q-tips. Then I used the plastic pre-cleaner which picked up anything I may have missed and removed my dirty fingerprints.
Then I wet sanded them with NO PRESSURE and constant wet. Man, this was messy. I had the plastics on my lap and the water was just flying around everywhere. I should have thought about this better but nope, I did not.
Then I sprayed those babies with a hose to clean them off again. Dried ‘em with a clean towel and let them sit overnight because I started late in the day and ran out of time.
View attachment 610393
Ok so the next day came and it was time to apply the adhesion promoter and as told in the linked thread above, I shook the sh*t outta that can. Shook and shook and shook. One light spray was sufficient.
Then I waited three hours.
Next came the primer, and again, that can was SHOOK. Sprayed one light coat, waited an hour, and sprayed the final coat.
Then the 24 hour wait period began. And since I started my blasted process late, my 24 hours was 8:30pm. Would not recommend. I have sufficient lighting in our shop but it was still very annoying.
The exciting part is finally here: Paint! After diligently shaking the can, I sprayed my first coat. The thread recommended waiting at least an hour but more is better so I waited overnight before doing the second coat since my first coat was at 8:30pm. The first coat made me nervous as it was so light. I thought it would take ten coats, ha! But the next day I applied the second coat and the black started to show. Then after an hour, the final paint coat was applied and it looked really good!
View attachment 610383 View attachment 610388
So, after the final paint coat, we are met yet again with another 24 hour wait period before applying the clear coat. I applied three coats, waiting an hour in between each. Then I let everything dry for 48 hours before even looking at it again.
View attachment 610391 View attachment 610392
Overall, it was a lengthy process but I’m super happy with the outcome. I didn’t take many photos because i was just focused on getting it done and doing it right. I’ll have to do this process all over again with the two pieces I’m picking up from my friends at Performance Partout at Kevin and Katie’s event this month (and the one piece I forgot in the car, sigh).
Looks fantastic! I will say in regards to your finger take a trip to Home Depot, or Walmart and they have spray grips that give you a little trigger contraption to place on top of the spray paint can. It will make a night and day difference! Rattle canned an old 76' Chevy one night to make it all the same color and my finger would have fallen off if I didn't have one of these!
https://www.homedepot.com/p/Rust-Ol...Comfort-Spray-Grip-Accessory-241526/100670383
Thank you!! I was really nervous because his instructions were so.... firm and seemed kind of intimidating. But I was so happy with how they turned out, even if it was A LOT.That came out friggin' great. Thanks for sharing all the photos.
 , and with all the prep that you would expect from a clueless teenager. It turned out awful.
 Ps - all updates from here on out will ONLY be on my tuners thread.


