


Ludachris
Founder & Zookeeper
- 8,854
- 4,702
- Nov 12, 2001
-
Newcastle,
California
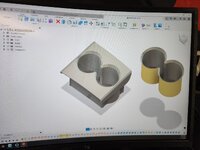
It's coming along nicely. Keep at it!That why I'm printing in pla at the moment. I print the individual sections of the part then test fit and modify and reprint. Now with adding the radio bezel area i noticed that I've ran in to another issue and that is all these layer lines because of the arcs while printing in flat orientation. So I'm going to have to put the part on the build table in a way to minimize the build layers while maintaining strength. I when I get past the build stage I'm going to try different types of plastics. First one will be a ABS plastic it holds up well in a cars interior, then I can use acetone vapors to smooth out the plastic and help smooth out the layer lines.
View attachment 769350
 I kid, I kid.
")