The Top DSM Community on the Web

For 1990-1999 Mitsubishi Eclipse, Eagle Talon, Plymouth Laser, and Galant VR-4 Owners. Log in to remove most ads.

Please Support Morrison Fabrications
Please Support Morrison Fabrication

My fuse box relocation (project log)

This site may earn a commission from merchant
affiliate links, including eBay, Amazon, and others.

This site may earn a commission from merchant affiliate links, including eBay, Amazon, and others.

Here's everything I ordered:

Eastwood Co. - Hotcoat Powder Coating Deluxe Kit
Eastwood Co. - Hotcoat Performance Kit
Eastwood Co. - Mini Regulator 60 psi
A bunch of these:
Eastwood Co. - Hotcoat Bottle and Lid replacement set 3 pak
And this book (although it's currently lost):
Eastwood Co. - Beginning Powder Coater's Handbook

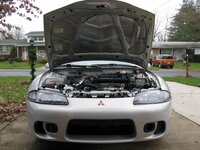
The gun comes with great instructions, then the book gives a few extra tips but wasn't all that helpful. Here are the steps I do: Blast the piece, blow it off with compressed air, spray it down good with brake parts cleaner (cheaper than the Pre Painting Prep stuff Eastwood has), let it air dry, tape off places you don't want coated, hang the piece from the oven rack with wire, I usually preheat the piece in the oven for 5 minutes or so just to make sure all the brake cleaner is dried off, put the alligator clip from the Hotcoat box on the wire holding the piece up, hold down the button to charge the piece, pull the trigger to spray, after done spraying check pieces carefully with a flashlight because now is the easiest time to fix problems, cook pieces per instructions with powder, let cool. Sounds like a long process but it's easy. Let me know if you have any questions on it, I'll do my best to help you out.

You can check out this video:
YouTube - Why is Powder Coating better than painting?

Powdercoating is sooooo easy, everyone can do it. The Eastwood gun is probably one of the most affordable ones out there. It's far from perfect but I'm happy with the results I'm getting. I mean, they're just car parts LOL


Little update:
Forgot to mention I coated my hood latch too. This was tricky since I couldn't remove the moving parts on it, so I couldn't coat it all and missed some spots. I ended up going over the missed spots with some paint. Lubed the 3 springs and hinges before reassembling.
(I don't have a good picture of it.)


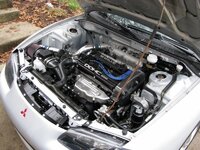
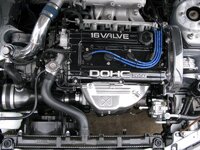
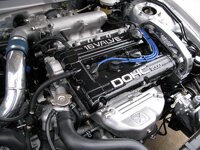
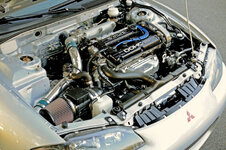
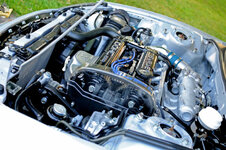
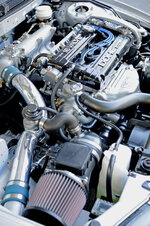
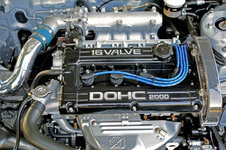
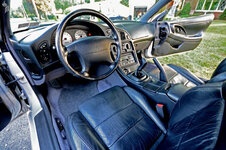
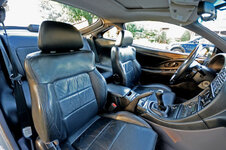
Got my coated parts installed back in the interior, installed true B&M shifter, OEM heavy leather shift knob, and Symborski shift kit. Lubed everything in the shifter assembly with white lithium grease. Also installed a new gearshift linkage bushing (MB307949, see here) in case my old one was worn.

IMG_7340.JPG


Also installed new balance shaft bearings in the engine making sure to rotate the bearings to block the oiling holes. The front bearing was easy but the rear one was a pain.
 
Last edited by a moderator:
Thanks for the info, I really appreciate it.

That shifter assembly looks 100% cleaner than OEM. I've seen the shifter assembly on a 2 month old DSM and there was already some rust forming near the shifter base. This really is almost a ground up restoration and it's amazing to see you do it so well without a huge budget.
 
Blasting and powdercoating my own parts is a HUGE money saver. With all the parts I've done, can you imagine how much it would cost to have them professionally done??


Another manifold (without cracks!) is on it's way courtesy of housegsx. Thanks Erik!!
 
I think it's pretty amazing that our cars are getting old enough to be sliding into that resto/rebuild category.
I think you went the right way with the B&M short throw shifter. I really liked the quality and ruggedness of mine! I did the Symborski kit and the Machv underhood sealed cartridge bearing kit. I complimented mine with a Greddy superheavy weight shifter knob. My Talon shifts better than any car I've driven before including some BMWs. Supertight, clean efficient shifts, no slop.

Nice build. Very very clean.

I have an eBay shifter for awhile on my car. I was driving in the city during rush hour, my tranny locked up when I went to shift and broke my shifter clean off the plate. I was having tranny problems before so it was just a matter of time before it failed, but I wasn't expecting the shifter itself to get f**ked in the process. Very cheap. Went with a B&M afterward and never looked back. Well worth the money.
 
So I don't have to constantly say this, a dab of Blue Permatex threadlocker is being used on pretty much every nut and bolt in the engine bay unless I specify otherwise.

Finished the transmission up. Put the last 2 shifter brackets on and installed new axle seals. Reused my old pivot ball and fork because they looked good, got a new throwout bearing and clip. Grease everything up good with MP grease during reassembly. All rubber/plastic pieces on trans were cleaned with Armor All.

IMG_7499.jpg


IMG_7415.jpg


Bead blasted the ends of my shifter cables and sprayed them with Dullcote. Installed Speed-Source shifter cable bushing kit, used some anti-seize between the bushings and the cable rings. Also reinstalled the powdercoated firewall bracket for the shifter cables. Cleaned cables with Armor All.

IMG_7432.jpg


IMG_7441.jpg


I cleaned out the intake and exhaust ports with compressed air and taped them off. I finished tapping every hole on the block I wanted to, so the threads are nice and clean. Installed my exhaust hardware (from ssstuds.com). All of the studs got a dab of nickle anti-seize before installing them, except the bottom middle one which I used Permatex #2 on since it leads to an oil galley.

IMG_7461.jpg


I couldn't wait to see it on so I installed my intake manifold with ssstuds.com hardware and Hondata gasket. This isn't torqued down yet - I expect I'll have to remove it at some point to do wiring. The intake is too good looking to be bolted to that head! I wish I could make the head nicer but I think that's as clean as it will get.

IMG_7473.jpg


I purchased a 1g Unorthodox alternator pulley thinking it would work on my Saturn alternator, but it doesn't - the shaft hole in the 1g pulley is too small. I also found that a 1g pulley has a slightly larger diameter than a 2g pulley. For right now I just put my stock 2g pulley on the Saturn alternator because the shaft holes are the same size, but I hope to get a 2g Unorthodox one some time. I also purchased a Jay Racing Saturn alternator relocation kit today. If all goes well, the engine will be assembled this weekend!
 
Last edited by a moderator:
When you are spraying the items being powdercoated are you spraying them in the oven?
 
No. I spray them while they're hanging from the rack on my engine hoist, then move the whole rack into the oven.
 
OMG 
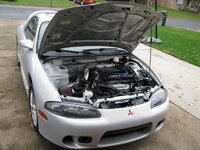
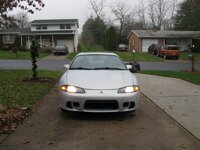
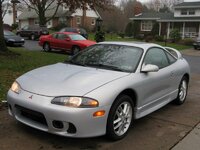
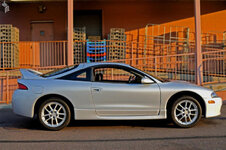
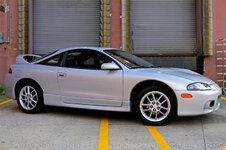
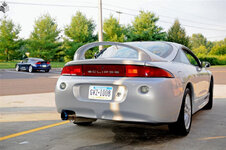
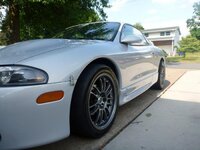
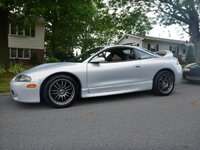
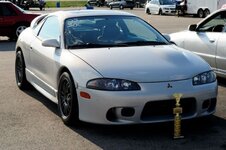
that car is so clean..good job man
 
Alright, I have almost finished up my rewire....Theres a couple sensors that Im not sure what they are and I would like to take them out if I can.....

Heres the pictures.....

n34309990_35907746_4205.jpg

n34309990_35907747_4568.jpg


n34309990_35907748_4917.jpg

n34309990_35907749_5222.jpg


n34309990_35907750_5570.jpg

n34309990_35907751_5877.jpg


So far heres what I have eliminated, I also pulled the ecu connectors apart and pulled the pins out so I didnt have to cut them, just trying to make it look factory........Im pulling the rear o2 sensor wire as I type.....
n34309990_35906568_5188.jpg


Thanks for the help guys....

-Kevin-
 
The brown connector is for grounding timing I believe. I think I used it when checking base timing before I got DSMlink. Neither Eric or I know off hand whether it can be eliminated since he doesn't have this connector.

Here's info on the blue and black connectors.
http://members.shaw.ca/dsm.1000q/Engineprimer/2G/fuelpumptestconn.htm

The blue one can be eliminated. You just need to keep the two wires going to the plug connected.

We're not sure on the fuel pump connector (black one), but I'm guessing it can be eliminated as well. I use DSMlink or my cruise control switch to turn on my fuel pump, so I have no need for that connector. I'd have to look at the wiring diagram to say for sure though.
 
Hmm....Well looks like I will leave all three of them in the harness and just hide them.....Ive got the rear o2 sensor left that I need to delete then I will be done.....

However, for two more questions, I need replacements for two parts.....

first, the plastic piece that the wire harness grommet attaches to and clips into the body.....
n34309990_35915501_1431.jpg


Second, The little plastic zip tie things that hold the wire loom to the body of the car......I dont know what these are called and cant find them....
n34309990_35915502_1745.jpg


Thanks for the help....

-Kevin-
 
I believe MB920120 is the part number for the plastic piece for the harness. You can find this in:
Chassis Electrical > Wiring and Attaching Parts on page 5.

You can check page 6 for the plastic clip thing. Or call up an OEM parts place (ExtremePSI, JNZ) and ask.

Cant thank you enough man, for some reason I could not locate the plastic grommet in CAPS.....But I have found it and will be contacting JNZ tomorrow to see if they can get a couple for me.....

:thumb::thumb::thumb:

BTW: Thanks for all the info you have provided between this thread and your tech article on wiring connectors....I couldnt and wouldnt have done any of this without it.....

-Kevin-
 
The engine is officially coming together. I'm waiting on a few last-minute OEM parts before I can finish assembling everything. I also have a bit of fab work to do and a few kinks to work out. I'll post up details of the build with plenty of pics within the next few days.

P1070001.jpg


P1070002.jpg


P1070014.jpg
 
Last edited by a moderator:
Ya, I wish that too. Just can't afford it right now :coy:
 
I have one coated already. I'm waiting to put it on so I don't scratch it up while installing the engine.
 
Turbo assembly:

Time to put the t25 back together. All the holes on the housings were tapped first. I had made marks of how the housings lined up when I took both my turbo and my friends apart, but I ended up using my housings and my friends CHRA so the marks were useless. First step is to put the compressor housing back on. I used the 2 turbo water lines to figure out how to correctly clock the housing. No snap ring pliers can deal with the turbo snap ring, so I made my own tool which I compress with a set of vice grips while using another set of vice grips to tighten the first set. Bit of a process.

IMG_6348.jpg


I had the crack on my turbine welded up.

IMG_7505.jpg


Then finished porting and polishing it.

IMG_6421.jpg


I blasted the turbine and exhaust manifold, then painted them with VHT flameproof primer and flat black paint. They were cured in my oven per VHT's directions.

IMG_6418.jpg


The turbine housing was put on - 4 bolts and 2 1/2 moon pieces. I flushed the water passages on the turbo by pouring water through it. Then I flushed some oil through the turbo by filling the feed hole with oil and blowing about 10psi compressed air through it. I did this several times. Then the feed and drain fittings were put on.

IMG_6448.jpg


IMG_6446.jpg


And the water lines and wastegate were bolted on. I forgot to order the stud for the turbo to o2 housing so the o2 housing isn't torqued down tight yet. I blew compressed air into the wastegate to make sure the flapper wouldn't hit the o2 housing and it was fine. I'm using an Evo o2 housing gasket because I don't like the shape or material of the Megan Racing one. Here is a comparison shot of Evo, stock, and Megan. The Evo has a more appropriately sized wastegate hole than the Megan. There is still some overlap but not very much.

IMG_7511.jpg


The flanges on my Megan Racing o2 housing were AWFUL so I resurfaced them on my Dad's disk sander. I polished the inside of the o2 housing because I wasn't happy with the finish. I also had bolts welded to the o2 housing for the downpipe so I don't have to use 2 wrenches to tighten them down. The completed assembly:

IMG_6444.jpg
 
Last edited by a moderator:
Motor mount:

Pretty simple here. New tensioner arm, tensioner pulley, idler pulley, and hardware.

IMG_6359.jpg


Front case / oil pump:

First, cleaned the front case and oil pump cover thoroughly. New castle plug and o-ring. Tightened with a screwdriver and hammer.

IMG_6379.jpg


IMG_6380.jpg


Permatex cup and core plug (red threadlocker) used on balance shaft plug.

IMG_6381.jpg


IMG_6385.jpg


Crank seal and oil pump seal installed. These were installed dry because I couldn't find anything compelling on the forums to suggest using anything on them. Hope they don't leak!

IMG_6389.jpg


Balance shaft stub bolted to gear with the bolt inside the lip.

IMG_6391.jpg


Gears coated with Redline assembly lube and placed in front case. I made sure to line up the marks on the gears, though I've never seen mention of this on the forums :confused: The manual said to do it, so I did.

IMG_6377.jpg


IMG_6400.jpg


I thoroughly cleaned the 2 surfaces for the oil pump cover. NO gasket or RTV is used on this surface during assembly. I also put a bit of assembly lube in the oil pump cover. Think I have enough lube yet LOL

IMG_6405.jpg
 
Last edited by a moderator:
Then the oil pump cover was bolted down. I used an allen head screw that Tatanko gave me (thanks again!) instead of the factory phillips head screw. I stripped mine taking it out and didn't want to deal with that again. See here for more info. And finally the oil pump sprocket was bolted on.

IMG_6373.jpg


IMG_6406.jpg


Oil filter housing:

I blasted both oil pressure sensors and sprayed them with Dullcote. The filter housing was already ported and blasted so I cleaned everything good and installed the spring and plunger back in. The sensors were reinstalled with Permatex thread sealant. The oil cooler was blasted (turned out weird, looks orangeish) then powdercoated clear. Then it was bolted back on with plenty of blue loctite on the big bolt to the filter housing.

IMG_6449.jpg


IMG_6450.jpg


And here we have a motor itching for parts to go back on it.

IMG_6458.jpg


IMG_6461.JPG
 
Last edited by a moderator:
Front case first. Greased up crank and put some oil on the inside of the crank seal. New dowel pins installed on block. Copper spray the gasket and a bit of black rtv at a few points so the gasket will stay in place on the engine. (I forgot to put the one bolt on the front case until a few steps later.)

IMG_6468.jpg


Oil filter housing. Copper spray and a bit of rtv.

IMG_6472.jpg


Water pump. Copper spray and a bit of rtv. The long bolt in the front usually holds the alternator bracket in place too. Since I relocated my alternator the bolt didn't have enough threads to just hold the water pump in place with no alternator bracket. So I used a die and put more threads on the bolt, then cut off a few threads at the end of the bolt. Worked great.

IMG_6474.jpg


Timing tins.

IMG_6490.JPG


Motor mount.

IMG_6502.JPG


Instead of using the balance shaft sprocket I used an oem spacer behind the trigger plate. Then put on the crank sprocket and ARP crank bolt, timing belt tensioner, and CPS. I'm waiting on a new trigger plate before I can tighten down the crank bolt for good. I also later removed the tensioner so I can put my lower timing belt cover on. The pin in the tensioner stuck out too far and I'm not ready to pull it.

IMG_6505.JPG
 
Last edited by a moderator:
Support Vendors who Support the DSM Community
Boosted Fabrication ECM Tuning ExtremePSI Fuel Injector Clinic Innovation Products Jacks Transmissions JNZ Tuning Kiggly Racing Morrison Fabrications MyMitsubishiStore.com RixRacing RockAuto RTM Racing STM Tuned

Latest posts

Build Thread Updates

Vendor Updates

Latest Classifieds

Back
Top