The Central Hub for DSM Community and Information

For 1990-1999 Mitsubishi Eclipse, Eagle Talon, Plymouth Laser, and Galant VR-4 Owners. This is where the DSM platform history is documented and archived. Log in to help us in our mission, and to remove most ads from the browsing experience.

DSC_0611.jpg

Street Build '97 Eclipse AWD GS-T (2006 to Present)

68HTA and a stock 7-bolt block, trapping 127mph.

This site may earn a commission from merchant affiliate links, including eBay, Amazon, and others.

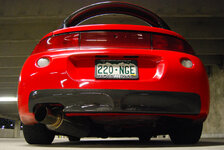
Thanks. That's my problem too. Every time I walk passed the car in the garage I look at it and want to spend more money on it. :coy:

It's always something!

:dsm:
 
man that's a lot of time and money in there LOL
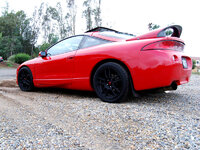
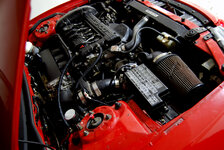
, tryin to do the auto to manual conversion my self, seems easier on pics then actually doing it LOL
 
Very inspirational build. Just read the entire thread and actually subscribed just to comment on this. But, six months and no updates? Hope all is well.
 
Thanks for the compliment. I forgot about this thread to be honest, it looks like my last update was from March '12 so actually over a year ago and coming up on two. Lots of changes have been made it's just trying to play catch up to get the thread to current is a PITA.

Thanks for reminding me, I'll toss a few months worth of updates in here this weekend.

:dsm:
 
10MAR2012 - FIC 2150's and FP Exhaust Manifold Install​
On E85 and flowing 48lbs/min my FIC 950's were maxed, I even had to turn up my base fuel pressure to 50psi to stretch the injectors enough to keep IDC's below 100%. I decided that I never wanted to buy new injectors again and I got a good deal on a set of 2150's so I jumped on it.

attachment.jpg


I also jumped on a Forced Performance exhaust manifold sale I couldn't pass up and since my stock 2g manifold was getting cracks in the collector it was time to upgrade. While I was at it I installed new exhaust manifold studs/nuts and a copper gasket.

attachment.jpg


:dsm:
 
11MAR2012 - Calan CC Install​
After years of running a VTA RRE catch can I decided it was time to fix my blow-by issues once and for all with a sealed can. I didn't have a lot of cash to spend on AN fittings and welding bungs on my VC so I took a cheaper route. I tapped the PCV valve threads to 1/8"NPT and re-used fittings off of my old IM. The lines to the valve cover are 8AN and fit over the brass barbed fittings perfectly.

attachment.jpg


:dsm:
 
14MAR2012 - Fabricating Battery Tie Down To Subframe​
Depending on which track I ran at I was always sweating passing tech because I never truly had the battery tied down and secured. It was basically wedged in between a bolt sticking out of the firewall and the strut tower. I decided it was time to get creative and figure out a way to secure it to the subframe without having to weld anything or spend a lot of money on an aftermarket piece. I got the idea to use a N/T DSM tie down when I was at the junkyard shopping for one and noticed it was considerably shorter so I grabbed a few of them to play with. I also thought I'd try using my OE battery tray and somehow bolt it to the existing holes that are used to mount the charcoal canister.

Here's what I came up with... I was so proud of my results I did a write-up for other 2g owners with the same dilemma I had. http://www.dsmtuners.com/forums/articles-parts-fabrication/430531-mounting-battery-subframe.html

attachment.jpg


attachment.jpg


attachment.jpg


:dsm:
 
24MAR2012 - Another Trip To Barona, This Time With My DSM
It had been over a year since I ran my car down any tarmac and I got the car prepped as much as I could and went to the local 1/8th mile. In the past year I hadn't done much to make the car faster but I still wanted to see if I could set a new PR without breaking anything.

Barona was sponsoring a Mustang's vs The World event and I couldn't miss it, I love beating up on some domestics with my 'stock appearing' turbo. From the get go it looked like it wasn't meant to be though, I split a heater hose and sprayed coolant down the back of my entire engine bay. Fortunately though, we were less than a mile from an Auto Zone and they happened to have a preformed radiator hose that worked perfectly to wrap the lines. Below you can see the trail I left rolling up into the parking lot. There's nothing like rolling in with a bunch of DSM buddies and repairing your car on the way to the track, great times. :D

attachment.jpg


We got back out on the road and continued on our way to the drag strip, a friend took a nice rolling shot of my car on the way there.

attachment.jpg


I made it through tech with the new battery tie down (WOOT!) and it was time to race. Of course, on that first pass in over a year, you know it's a good idea to roll out of the hole and get a feel for the car again but I said "f' it" and thought I ended my day early because of it. I launched with the new Shep IV trans and ACT Twin Disk and got some serious wheel hop, then the car shut off and wouldn't start again so thank goodness I had a few buddies to push me off the 60ft.

attachment.jpg


Things worked out though. We determined that the connector on the back of my CAS and starter was loose and, because I launched so hard, both of the connectors came off. Which is why the car died off the line and I couldn't get it to start. We took zip-ties and secured both and went in for round two, this time though I made a shakedown pass and rolled off the line like I should have to begin with. Lesson learned. Watch the video, hopefully you like it.

DSC_0138.jpg


DSC_0145.jpg


DSC_0152.jpg


:dsm:
 
05APR2012 - Evo III Throttle Body
I contacted the best throttle body builders in the business, Brian (snowborder714) and his brother Eric (turbosax2), and asked if they had a Evo III TB lying around that they could rebuild for me and powdercoat. Luckily enough they did and a month later is came in the mail along with a 3D puzzle of the Empire State building... LOL

Brian and Eric pulled the emission ports then tapped/plugged them, deleted the FIAV but kept the ISC, installed the mil.spec shaft seals, had Justin at Detective Coatings powder coat it satin black, and then assembled it with all SS hardware. What a great piece...

DSC_0164.jpg


DSC_0168.jpg


DSC_0170.jpg


But because Brian is a smart-ass he sent one incorrect piece with the puzzle making it completely useless. To think, I wasted 15 minutes and a beer making it too... :f-u:

DSC_0172.jpg


:dsm:
 
I was using a 1g N/T but the shaft seals were leaking really bad. 1g N/T's are a dime a dozen at the junkyard but all leak without being properly rebuilt, which I had never done. Brian had a Evo III TB in stock and said he'd rebuild it for me so I jumped on it. Same thing as a 1g N/T except it came from Japan... ;)

:dsm:
 
Ah sweet love the build ive been watching it over the years, and watched the progress its really impressive and functional, and looks good doing it.
 
10APR2012 - Evo III TB Install, Tial BOV & Catch Can Check
I installed my freshly rebuilt Evo TB quick.

DSC_0231.jpg


DSC_0234.jpg


But ever since I installed my Tial BOV something didn't seem 'right' about how it functioned with the car in vacuum. At idle the entire BOV would be open which I didn't like but I ordered the correct spring for it so it should be functioning like it's supposed to right? Wrong. I emailed the Tial rep after I observed my friends Tial BOV while his car was idling and his wasn't open, then I pulled mine apart and what do you know. It had the wrong spring in it.

My car pulls -17in/Hg at idle with my current cam setup and when I ordered the BOV I reviewed their chart to make sure I got the correct spring color, which was supposed to be silver (plain). Tial BOV Spring Chart

Look what I found. Tial agreed to send me the correct spring if I sent the black one back, which was nice at least.

attachment.php


While I was under the hood I thought I'd take a look at the new catch can and see how much fluid was in there after a few hundred miles of daily driving and a weekend at the track. To my surprise, there was hardly anything in there which was never the case when I ran the RRE VTA can. I was sold on Calan sealed can.

attachment.jpg


:dsm:
 
20APR2012 - Installed Hoosiers For The Track
After taking the car out to the track in March and getting a feel for the twin disk I felt like I needed some more practice launching, this time I wanted to try it with my Hoosier DR's. The local 1/8th mile parking lot track located at the San Diego Chargers football stadium was doing a test and tune night so I thought I'd give it a shot. I had never put my DR's under the car before and luckily I had two 5mm spacers lying around or else I couldn't have ran them. You'll see in the photos how tight things were on the rear knuckle.

DSC_0249.jpg


The tires I run on the street are 245/45/17 Bridgestone Potenza RE760's and the Hoosier DR's are 245/45/17's too. You can quickly tell once I started to set the car down on it's tires a spacer is needed on the rears.

DSC_0252.jpg


DSC_0254.jpg


DSC_0286.jpg


The trip to the track was a frustrating one. I hadn't really tried my NLTS so I thought I would activate it and I couldn't get my damn foot off the clutch pedal coming off the line so every time I'd launch my car would continue to hold the RPM's that my NLTS was set at. Me, being a dumb ass, couldn't figure this out until after leaving the track frustrated and posted a log of it happening on Link's forums and a member quickly pointed out what was happening. I guess I really do have a heavy foot.

log.2012.04.20-08.elg

To say the least I never got a clean pass with the DR's. :|

:dsm:
 
Finally, UPDATES!!! haha. Curious to know why you had to run spacers though being that the tires are the same size. Difference in wheel widths perhaps?
 
Finally, UPDATES!!! haha. Curious to know why you had to run spacers though being that the tires are the same size. Difference in wheel widths perhaps?
Hoosier DR 245/45/17
Diameter: 26" / Section Width on a 8" rim: 9.8"
Potenza RE760 245/45/17
Diameter: 25.7" / Section Width on a 8" rim: 9.6"

I think the above specs have something to do with it since the rims that the tires are mounted on are exactly the same Evo IX 17x8 with a +38 offset. If I were to buy Hoosier DR's again I think I'd go with their 225/45/17.

:dsm:
 
That's exactly what it has to do with. Even though tires are advertised at a specific width (e.g. 245mm/9.64567 inches in the case of Corey's tires), their actual section width can vary. This is why when you purchase wider tires that could possibly rub, you have to do the math to see what you can get away with in conjunction with your wheel width and offset if you don't want to use spacers.

Another example is the Direzza Star Spec ZII's. In a size 255/40/17, you could assume the width of the tire is 10.0394 inches (just convert 255mm to inches). However, if you look at the actual section width spec, it's 10.3" (taken from tirerack.com). That's 7.62mm extra that you have to account for over the advertised width, which is not something you can just ignore.
 
Makes more since now. I never understand those offset etc. In the future, if you don't mind, I would like to possibly pm you or contact you in regards to certain things that you have done already. Hince, the awd/mt swap, your experiences with using certain parts, etc. I'm so eager to mod my GST now..and I just got it yesterday haha.
 
PM's don't help other members on our board with the same questions you may have. That's why we encourage everyone to search the forums for answers to their questions first and then post a thread if they can't find the answer.

:dsm:
 
Add Value - Be Respectful - No Trolling - No Misinformation - Participate Often!
Support Vendors who Support the DSM Community

Build Thread Updates

Latest Classifieds

Back
Top