

Vegas Smith
20+ Year Contributor
- 5,193
- 3,155
- Dec 2, 2002
-
Houston,
Texas
Don’t cut the bumper. It’s not worth it for your car to look like crap.
Follow along with the video below to see how to install our site as a web app on your home screen.
Note: This feature may not be available in some browsers.
For 1990-1999 Mitsubishi Eclipse, Eagle Talon, Plymouth Laser, and Galant VR-4 Owners. This is where the DSM platform history is documented and archived. Log in to help us in our mission, and to remove most ads from the browsing experience.

This site may earn a commission from merchant affiliate links, including eBay, Amazon, and others.
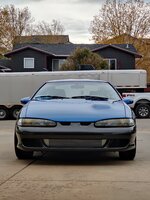
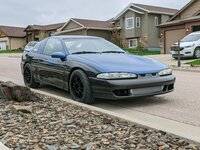
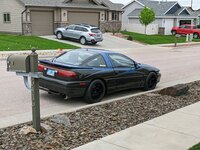
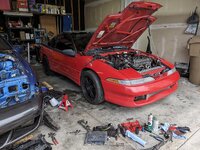
I really don't want to. But how does everyone get to use more than 40% of their intercooler?Don’t cut the bumper. It’s not worth it for your car to look like crap.

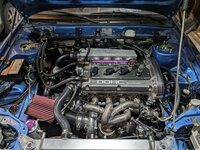
Picked up vacuum line from orielly's and got the wastegate lines made.
View attachment 700438
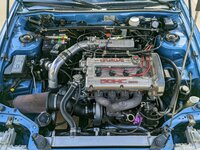
Air filter should be here today
tried troubleshooting the canlambda and why it flashes back and forth from 0.00 to 1.52 lambda.
I verified that the CAN settings are correct, following the setup instructions, and i verified that i have a 120ohm resistor between CAN h and CAN l, AND verified that that theres only ~60ohm between them while the car is powered on but everything seemed to be right.
the ONLY thing I can think of is that i tested the ground continuity at the pins for the Lambda module and its getting like 40ohms of resistance. Which is really odd because the entire CANbus is grounded at the same spot to a bolt behind the radio. I tested the ground at the CANGauge harness and its only like 2ohms or something like that. Im probably going to post in the link forums for some help on this unless someone here knows maybe what might be going on.
no matter how you hash it, 40ohms is MUCH MUCH too high for a ground i think. I may have to add another ground to the chassis. Currently the only one is on the firewall off the remote ground terminal thats in the engine bay. i think ill add another ground in the trunk right where the fuel pumps are grounded at.
I'll admit I really don't understand how many grounds you should have and where. Like do I need one on the engine block too? The Manifold?Oh yeah, adding more grounds is definitely a good idea. Super cheap and easy, too.
I think there are maybe 2-3 stock. I'd double that. Strut tower to t- Stat housing, battery ground to chassis (OE mini strap off of post to firewall and one to trans bell housing), T Stat to trans, Alternator housing to chassis, chassis to intake and/or TB.I'll admit I really don't understand how many grounds you should have and where. Like do I need one on the engine block too? The Manifold?


As in what kind of tuning strategy? Or have someone tune it?Nice, how do you plan to tune it?
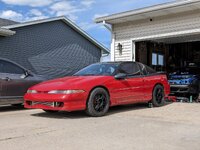
Part of me wishes i would, but honestly i have been so worried that something catastrophic was going to happen i just wanted to rip the bandaid off and get it out of the way in case something was wrong.Nice. That’s exciting man. I almost legit did the same thing to mine but the wife talked some sense into me and advised against rushing. That way the first start also means the first drive.
Excited for you brother!


 I reached back out to them again about it and NOW they said that i also need to have the Switched input that activates the relay also on a 12v switched source.... So ill have to undo almost everything i did yesterday to fix that. But i think i have an easy solution though.
Thanks I appreciate it! I'll admit it hasn't been easy but I guess that makes it all the more enjoyable.That is awesome! Way to persevere and plow though all that you've done. It's a lot of work and the learning can be a lot of fun. You'll have plenty of time to get it even further dialed in and looking forward to hearing about it!
Attempted to bleed my brakes but it was kind of a disaster. I have one of the central pneumatic Vacuum bleeders it seemed to work okay but my bleed valves suck because they don't seal against the caliper great when you crack them open. The bleeder was just sucking in air.
I really might try this when I bleed them again. I just caked the threaded part of the bleed screw with grease to seal it but it was like a 20/80 hit or miss.Although it seems like overkill, we remove the bleed screw and teflon tape the threads before reinstalling into the caliper. It really does improve the seal of the bleed screw and eliminate the false air bubbles when bleeding.
Enjoying reading your build. Congratulations on getting it running!
I wonder how something like tru-blue (thread sealant) or the like would work here, works great in plumbing situations with fluctuations in temperature and vibrations.I really might try this when I bleed them again. I just caked the threaded part of the bleed screw with grease to seal it but it was like a 20/80 hit or miss.

I had the ECU switch the ground for the relay and then the switched input for the relay connected to constant 12v and when the ECU turned off it grounds all the ISC outputs which then completes the circuit.I have my Link ecu supply the switched ground and both 12v pins are connected to battery, therefore, you only need to connect to ecu once.
I might have to look into that as well.I wonder how something like tru-blue (thread sealant) or the like would work here, works great in plumbing situations with fluctuations in temperature and vibrations.
How could you tell it was doing that? Now that I think of it I may have changed my setup to switched 12v as wellI had the ECU switch the ground for the relay and then the switched input for the relay connected to constant 12v and when the ECU turned off it grounds all the ISC outputs which then completes the circuit.
I ran an actually 12v switched power from the cab to the relays so it only gets 12v when the key is on and now the fans are happy
Well if the switched 12v I put is connected to constant 12v power (directly to battery like mine was) then it would ALWAYS be telling the relay to turn on. And then when the the ground would be connected (ECU pulls the ISC outputs to ground when turned off) to the relay it would complete the circuit and the fans would turn on with the key offHow could you tell it was doing that? Now that I think of it I may have changed my setup to switched 12v as well

