The Central Hub for DSM Community and Information

For 1990-1999 Mitsubishi Eclipse, Eagle Talon, Plymouth Laser, and Galant VR-4 Owners. This is where the DSM platform history is documented and archived. Log in to help us in our mission, and to remove most ads from the browsing experience.

IMG_2936.JPG

Street Build ITFLYS - 1Gina2G

ITFLYS - 95GSX 2.0L 6-Bolt Crank with 2G pistons, 1G TopEnd, with 2Gb-CamSensor and a Kiggly-CrankSensor - TD05H-Bastard 20G - E85 w 1000cc inj. ~25psi. Street driven track day car.

This site may earn a commission from merchant affiliate links, including eBay, Amazon, and others.

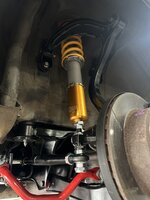
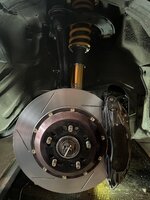
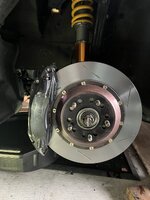
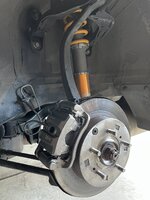
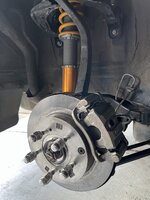
Regarding of control arm bushings - check out the questionable quality control on the oem parts I sourced from Canada!

One curved arm had no paint? WTF
C820861E-3672-4818-9BB1-B695F5660D49.jpeg


And the shock fork bushing wasn’t pushed all the way in on the front lower control arm!?
5735A86E-FC6B-4342-AB09-605A1AC56802.jpeg


It’s a good thing I’m not using the factory bushings - What the hell Mitsu!
 
Last edited:
Looks like both those compression arms are non oem. Also the inner mountings are to square to be oem which are wider and rounded ends! Someone bend one of these arms they thought were oem and we determined it was not oem after being told it was.

The lower arms are hit and miss if they push it all the way in, the later units were done differently and mine were in an angle also but not by much, i think its more for the fork angle, they also used a sealer under the bj cap to stop water getting past the seal. These were part of the recall arms they done ( at least here in europe they were )

Polybushes can be used for sideways also but tend to need a thickerwall and not be flat against the mounting walls.
 
Some have been asking for details on the dash cluster so I’m adding the link here for the side post with pictures.

I have been working on locating a second bright LCD for Pilink++
I have the Pi computer setup so that if a second display is detected, it will extend the “desktop” which allows me to dedicate a frame buffer at a lower resolution full screen for the Race Capture app.
24AF1257-70F2-4EC4-AED7-10A5FEBD8C71.jpeg

Here I have two displays active: The large one is just a standard 24” desktop display at 1080p for testing purposes, and the small one is the Desview display running 720p
73E47C78-80A6-48BD-8E37-5C17927F022B.jpeg
 
Last edited:
Warm weather has me back in the now empty garage, while the Eclipse is still in the shop.

Add a shelf to the wall, and…
E971ED62-6A4B-4938-9A45-28A5565DFE4A.jpeg

I pulled down the door caps that need refurb.
7A81DAC3-38F3-406A-A3AB-6965AD4F3EB7.jpeg

Somehow, I need to remove 3 clip mounts from the white one, and repair the black one.
B581853E-DC27-4DCA-85B3-9E85A808E6F6.jpeg

8CDE7B51-6608-4D7A-99E8-7A12E3500500.jpeg
 
Still looking for a machine shop
Give WORKS motorsports a call. They are at Sonoma raceway and when I have visited them in the past for dsm parts they always have a crap load of 4g63 cars there. They race as well so I am sure they know someone in the bay area that can do some machine work for you.
 
Not too much progress yet, still thinking about how I want to do this. I have visualized the cuts I want to make, and am thinking on how best to align the pins without the car as a template.
 
Yeah - probably going to see how much a long sheet of lexan will cost to make a jig. Nobody has created transparent aluminum yet

If 2 feet x 4 feet is big enough, the .005" thick stuff is pretty cheap!

https://www.tapplastics.com/product/plastics/plastic_rolls/thin_gauge_polycarbonate_sheets/541

I used to live near the Tap Plastics store in Bellevue WA and bought a .005" sheet there for $5 ! Several years ago.
Looks like you are in luck. There are a bunch of locations for Tap Plastics all around the SF area.
 
I didn’t get any Lexan yet, but Rich got his Blasting and Powder coating going again - More parts for the motor stand:
CCF2A027-717A-42FE-853E-00CDA2EA9921.jpeg


The 20G parts are almost ready for assembly. This cartridge was media blasted clean, zinc cold galvanized, and then Steelit top coat. Not sure the finish will last, but it’s a worthwhile experiment.
D39F2B3F-C284-4F8C-9485-4FFA938FC036.jpeg
 
Last edited:
Alright then - separated the spinning parts, and started assembly:

retainer on the turbine shaft
60E8BAED-D43F-4A07-95DA-AAA0790802E3.jpeg


Heat shield and bearing 1
EACFF1DE-66A1-4713-B481-5383D8F005C9.jpeg


Flip it over onto a large tape roll with a paper towel under the turbine shaft for support:
926FE416-8C0B-4F44-B02C-85AA076DC5C5.jpeg


Drop in the 2nd shaft bearing and the first thrust bearing, line up the marks:
5D9DE9BE-ADDB-41AC-A6FD-AE761D9612BD.jpeg


Thrust plate and o-ring
E667D9BE-D36F-47C1-B18E-932AF5B7928D.jpeg


2nd thrust bearing with retainer and oil baffel
C650B931-1E6B-4B26-A1EE-C5CDC893F273.jpeg


Press into place and secure with c-clip
0405740E-176E-43DB-B00A-F3A711D316D2.jpeg


Install compressor wheel, and align marks:
598B2345-88F0-4A14-AAB3-1FBAFEFEE490.jpeg

94CE1133-00B4-4983-8660-9BB94A84529B.jpeg

Install o-ring and compressor cover:
219B83F1-5514-4878-A938-D4D11913CFF1.jpeg

81B3F86B-B5EA-4BCD-B885-D36D1C47E74B.jpeg

8C75EC18-A646-42CC-AA52-41AE695B9858.jpeg

D65017AD-24D5-45F4-9F1A-7CBF346272A3.jpeg


Unfortunately, with the large c-clip installed, the rotating assembly is touching the cover, and the assembly won’t spin. 🧐
E3AA276E-859E-4857-B95B-2B6DDC0E8C59.jpeg


Hmmm
 
Add Value - Be Respectful - No Trolling - No Misinformation - Participate Often!
Support Vendors who Support the DSM Community

Latest Classifieds

Back
Top