The Top DSM Community on the Web

For 1990-1999 Mitsubishi Eclipse, Eagle Talon, Plymouth Laser, and Galant VR-4 Owners. Log in to remove most ads.

Please Support Rix Racing
Please Support STM Tuned

Supplies needed for first fiberglass project?

This site may earn a commission from merchant
affiliate links, including eBay, Amazon, and others.

This site may earn a commission from merchant affiliate links, including eBay, Amazon, and others.

Ludachris

Founder & Zookeeper
8,060
3,086
Nov 12, 2001
Newcastle, California
Alright guys, I'm looking at my first fiberglass project and I want to place an order today so that I can get started on it next week. I need some help selecting the materials. Here's what I want to do:

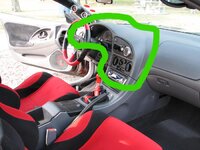
Make a partial mold of the 2g dash - mainly the curved par that surrounds the gauge cluster. I'll attach a photo that describes it more. So the idea is to make a mold and create a working part that I can then take and cut and modify, by adding on to it and shape the edges to fit a 1g dash. So obviously, the edges don't have to be perfect because the edges will be created in the second step.

The goal is to keep it fairly lightweight so I don't want to have any heavy framing. I'm planning on using epoxy and fiberglass to create the mounting points and the attachment points for the finish pieces like the heater vent panels, etc. Since this car is more a race car it doesn't have provisions for actual heater ducting and very few buttons/controls are in use. I plan to cover the entire piece with foam and vinyl so the finish doesn't have to match or look like the stock texture.

So, what all will I need to get started in terms of materials, and how much? Please be specific, as I've never done this before. I was planning on ordering from Fibre Glast Developments after seeing them come up in various forums. Hopefully they have everything and can ship fairly quick.

Thanks guys!
 

Attachments

  • dash-mold.jpg
    dash-mold.jpg
    60.6 KB · Views: 476
Here is what I would start with if I was a beginner:

5 gal pale of resin w/ catalyst (follow mixing instructions....if too much catalyst is added it will bubble and smoke in the cup. a little extra is ok but dont go overboard)

3 yards of chop mat (chop mat can be torn or cut to contor better to corners)

Plenty of good latex gloves

Cheap Walmart 2" paint brushes (not the foam ones)

2" blue or green painters tape (for automotive, not home)

Spray glue

Heavy duty aluminum foil

Thick plastic drop cloth

Mixing cups

Paint stirrers

Air bubble roller (6" wide)

Respirator

Glass outside and on a sunny day. The sunn will help kick the resin faster.

That should be about it
 
Hi, I have been meaning to post a fiber how to but been extremely busy, and now I have my mother very close to her final days.

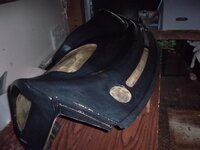
Take a look at my build and there I have a Photo of the dashboard prepared for the mold, I have finish the mold and have the gelcoat and first layer in, hope to put the rest of material this weekend and pop it out by monday.

The piece you want to do is the most difficult part since there are a lot of channels and angles.

As far as materials you will have more than enough with 1 gl of resin and unless you are planning on making more than 1 or 2 pieces do not buy the resin in larger quantities as once you open the can it deteriorates.

You will also need the gelcoat for your mold, here you can use exterior grade instead of mechanical since you will not be making a lot of these i guess.

The chop mat you will need is called 3/4 oz. do not buy any heavier.

Work with strips of 3 to 4 in. to go around and between the grooves.

Do not make it too hot and do not work out in the sun, give yourself time until you get a little experience.

The preparation of your plug is the most important part.

You will need:

acetone do not work w/o this.
release wax
PVA poly vinyl alcohol
1 and 2 inch cheap brushes Home depot not harbor freight
Wjsh had time to go deeper but I must leave now.

You are trying to do a difficult piece.

Call me if I can be of further assistance.
 

Attachments

  • SAM_0431 - Copy.jpg
    SAM_0431 - Copy.jpg
    36.5 KB · Views: 303
Hi .

Take a look at my build journal,"98 Talon tsi road racer".

I just posted pictures of the dashboard, the plug, the mold, and the part itself, of course it still needs to be trim and cleaned.

I think this is the first time this has been done, I had searched before I did it. and did not find anything.

The weight of the original is 24 #, when I am finish with mine it will be around 8, so I think it is worth it.

It turned out better than expected, of course some wrinkles and small bumps, a little putty and be done, since this is going in my race car I dont need a perfect piece.
 
I will add to this. If your building a mold use tooling gel coat. If you are planning on building several molds invest in a gel coat gun. Invest in a spray gun for PVA. When I first started my biggest problems came from lifting, voids of PVA and gel coat from brushing it on. After you lay the first layer of gel coat wait until it gels to the point that you can leave a finger print but doesn't come off on your finger. Dont wait any longer as the gel coat will shrink and crack. Then start laying your chopped strand mat. Do not lay a ton on all at once it will over heat and warp. And rip it, do not cut it and have no cut edges. The cheap poly resin is good for molds but I use epoxy for products.
And pre plan everything! You can get 1" chip brushes at lowes and Walmart but I get them for dirt cheap in bulk on eBay and you will use a lot of them.
Have a good respirator, gloves, safety glasses and a fan. Do not do this outside in the sun. Also invest in a good gram scale they are cheap on amazon to properly measure resin and MEKP. Counting drops sucks. Mix in small batches. Cure time is effected by temp so keep that in mind.
Look at the forums on www.fiberglass.com there is a ton of useful info on there.
 
i agree with everything you have said, except that, unless you are building a mold for production, you do not need to go to all that expense, true that tooling or mechanical gelcoat is the way to go but it is a lot more expensive than exterior grade gelcoat, and for a 1,2,3 piece run it is not, in my opinion worth it.

Also nowdays you have brushable gelcoat which I may try soon and see how it works.

A gelcoat gun is a blessing, but it is almost useless when making small parts, the time in cleaning and cost of acetone I can not justify.

After I have let the gelcoat set, I only lay a 3/4oz. mat next and let it kick before I apply any more material. that way I avoid excess lumping and shrinkage.

Another thing I have been using is just the strands that are sold by the pound, these loose strands I use them on grooves or hard to get the mat to conform to shape.
For MEK I use syringes that come mark with ccs, but I only get those at my supplier since the others the rubber inside disintegrate.
 
This is just from my own personal experience and I guess I should have stated that. I had to make a mold several times until i figured out what was going on and spraying the gel coat gave me a consistant coat even on small molds with the best results. I just ran into to many problems with brushing on the gel coat. The gun is a $ hit at first but its easy to clean and just toss the resin cup when done. And the time and materials I lost having to remake the mold justifys it for me.

Yes the tooling gel coat is more expensive and thats what its meant for so I just stuck with it. Making composite parts have never been cheap for me, when I tried to cut corners it ended up costing me in the long run.

arrowhead that is going to be a hugh mold! You have alot more experience than I do to tackle that.
 
I have always been interested in doing a little fiberglass work, what are you all using for making molds? I had to sell my 2G shell i bought but picking one up in the spring to build up. I already have a spare dash and thinking since this will be a road race car a light dash might be nice, amybe with some gauge mounts. I guess I have plenty of time to practice so lets put it to some good use.
 
You are thinking of starting with a difficult part, I would advise to start with something simpler until you get more practice, it takes different materials and tools to be able to work with the fiber.

Here are the pics of the mold and final part for my dash board if you would like to see more look under my build in road racers, 98 Talon road racer.

You will have to go there to see them since they can not uploaded here again.
 
Support Vendors who Support the DSM Community
Boosted Fabrication ECM Tuning ExtremePSI Fuel Injector Clinic Innovation Products Jacks Transmissions JNZ Tuning Kiggly Racing Morrison Fabrications MyMitsubishiStore.com RixRacing RockAuto RTM Racing STM Tuned

Latest posts

Build Thread Updates

Vendor Updates

Latest Classifieds

Back
Top