
The Central Hub for DSM Community and Information

For 1990-1999 Mitsubishi Eclipse, Eagle Talon, Plymouth Laser, and Galant VR-4 Owners. This is where the DSM platform history is documented and archived. Log in to help us in our mission, and to remove most ads from the browsing experience.

20250827_154519.jpg

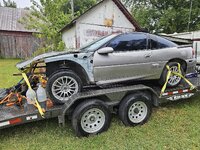
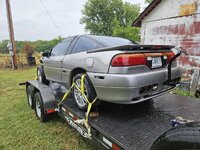
Old Grey, The Racecar

Well here is the latest of the "herd", a 1992 "racecar". It has been started, it's up to someone to finish it. Instead of going to a HAM Radio swap meet, I went to Topeka KS to pick up this "Gem". It's rough & missing parts.

This site may earn a commission from merchant affiliate links, including eBay, Amazon, and others.

I Cleaned My Balls and They Leak
(I thought that was better than "My balls are leaking") ROFL
Yeah that's what I said. While I was cleaning the 6 bolt crank oil passages (it took 7 flushes to come out clean), I noticed when I applied air pressure and blocked one of the rod and main holes, I could see "bubbles" around the press fit "balls" in our cranks. It was pretty obvious that it had been this way, as crud was kinda forming around them. I am NOT worried and I bet all of my other stock cranks leaked a little too. Anyway, just something I noticed while cleaning today.
My picture shows the 1st - 4th flush results. The last 2 were just making sure I felt like it was clean.
Just reporting in on progress. My block should be back next week, I assume. 🤞
Clean your dead end crank throws!
Pops ✌️
Junk from the crank is what killed my first built engine for my 2G. It's crazy how much can be found in there.
Looks great painted, looking at your photos makes me want to build another 4G LOL.
 
You should build another! :thumb:
I did a short video.
Pops ✌️
 
what exactly are your plans for “Old Grey” Marty? If you don’t mind me asking.
Possibly putting one of my unknown auto transmissions in and figure out how to get the sheet metal to hang on the tube front end Jeremy. It will take some time, as it is a "project" that I have never built before. Time will tell, I am sure. It is a "good" question, for sure. :hmm:
Marty
 
I got a little ahead of myself and forgot to clean out all of the head bolt and main cap bolt holes, readying them for studs, so I am running a cleaner bolt (I cut 2 slots into a stock bolt with my dremel, it works good) thru all of them. Dam glad I am as 2 or 3 head bolt holes were pretty nasty and tough to get to start. Now they are silky smooth. I had just set up for ring filing when it dawned on me that I had forgot to do that. I'll file rings tomorrow. :idontknow: :banghead::thumb:
Pops

20260131_122013.jpg


20260131_122034.jpg


20260131_124359.jpg


20260131_125838.jpg


20260131_125858.jpg
 
Here is what my bore cleaning rags/paper towels look like when I am done cleaning the bores with ATF,.so you all can see its a bit messy and a lot of prep goes into actual "assembly". ✌️
I cleaned all of the hone grit out of the bores with ATF, a detergent/oil. I clean each cylinder by hand, scrubbing ATF into the walls to release all of the honing leftovers that come out as a Grey color, not pink. Clean each bore until all the fluid comes back out nice and clean, like out of the bottle. This makes sure your rings don't get ate up by that stuff when you get it started and the rings are scraping it off of the cylinder walls.
Just some stuff I do and to each there own. It works everytime and no smoke on startup. Rings will last because they didn't run any if that hone grit by them, damaging them.
Pops

20260130_105716.jpg


20260130_105848.jpg


20260129_173542.jpg
 
Love the info Marty. Keep it coming! Can’t wait to actually get to that part and get hands on implementing all this info I’m trying to absorb. Will stick much better once I’ve done it. :talon:
 
Yeah, if you take your time (don't forget all these LITTLE, yet big things) its just nuts/bolts/screws and a ton of measurements to make triple sure it's all good.
Funny, I HATE body work prep and love painting, yet I don't mind one bit the prep work on an engine. Its a must and gotta be CLEAN! :thumb: Thanks for following along!
 
I'm just a shout away! :thumb: Glad to help if I can.
 
It was ring filing day today. I checked the initial gaps then proceeded to crank away on the manual filer. It took over an hour to do the top 4 rings but only about 15-20 minutes to do the 2nd rings. The 2nd rings are much softer, ductile material, so they file WAY TOO FAST. I almost over filed one but got away with changing which bore it went in, so I got lucky that I was just a smidgen too big for the cylinder I had it in to start with. It was a 3 hour day by the time I got finished and had installed the balance shaft bearings 90* out to block the oiling holes, prepping for a BSE. I documented it so everyone could see but you can't see the time and slowly getting the rings bigger. If these rings had been installed as was, they were WAY TOO TIGHT, so always check your ring gaps!
Pictures of the day as follows. The 2nd picture is of the original gap size (.008"-.010") and the 3rd picture shows my top gap at .024"
Enjoy, I'm done for the day! This post is picture HEAVY. Those bearings are the ones that were in the motor that came with the car. Yuk....
Pops ✌️

20260201_103128.jpg

.010" Gap
20260201_122722.jpg

.024" Gap
20260201_124515.jpg


20260201_124551.jpg


20260201_130729.jpg


20260201_130848.jpg


20260201_150808.jpg


20260201_140750.jpg


20260201_140758.jpg


20260201_140855.jpg


20260201_140903.jpg


20260201_141026.jpg


20260201_142555.jpg


20260201_142602.jpg


20260201_142606.jpg


20260201_142611.jpg
 
I skipped supper and got the crank sitting in the block, I'll triple check clearance's again tomorrow and if all is good, I'll put the studs in. She spins SMOOTH! I'll be cleaning the crank one more time before she's installed. I have paper towel lint that I have to get rid of.
It's been a busy day, my back says QUIT!
Pops ✌️

20260201_190106.jpg


20260201_190511.jpg


20260201_190756.jpg


20260201_191205.jpg


20260201_191322.jpg


20260201_191600.jpg


20260201_191612.jpg


20260201_192108.jpg


20260201_192402.jpg


20260201_192408.jpg


20260201_190128.jpg
 
Today's work was cleaning and installing the oil squirters with new crush washers, putting the ARP main studs in, after they got a bath in BPC, and getting the Kiggly girdle on. I goofed up 2 oil rings when I was filing rings (I normally never touch them but these were too tight, .008" gap), so I ordered up another single set to get that straightened out and then I can start putting in pistons. :thumb: The main bearings clearances came out to .002"-.003", and is a SMOOTH rotating assembly!
Pops

20260202_190201.jpg


20260202_190217.jpg


20260203_165846.jpg


20260203_165859.jpg


20260203_165927.jpg


20260203_170358.jpg


20260203_170642.jpg


20260203_171818.jpg
 
The spare set of rings came in today so I will be taking my time on the ring filer. My rod bearings came out at the .002" range but I am going to try some .001" oversize bearings that I just happened to have "in stock" and see if I can get .003" on those.
I made an update video for my progress on my IG account. It can be seen here -
Pops
 
The Ole Grey cars shortblock spec shèet.
Screenshot_20260211_175847_M365 Copilot.jpg


20260211_142049.jpg
 
Well the shortblock is almost assembled. I need to clean my oil pan and paint it and get the rear main seal in its housing (thank you @enriquez2000 ) and get it installed.
Progress my friends!
Pops ✌️

20260215_123159.jpg


20260215_125558.jpg


20260215_125749.jpg


20260215_130519.jpg


20260215_130525.jpg


20260215_130535.jpg


20260215_131850.jpg
 
Action speaks louder than words so here is the shortblock doing a little spin. Everything had assembly lube or oil on it so this wasn't a "dry" spin, but it is the only one I do until its time to have oil pressure and fire her up. I can turn it by hand, with all of the slugs in, so she should "sing" and rev quick! I do like the "plateau" hone, it is smooth. 👍
Video is over on YT.
Enjoy!
Pops ✌️
 
Ok, its been a while since any update, and there are reasons why. I had a goofy front main seal with a kinked spring, several of the front case bolts wanted to STRETCH at 180 INCH POUNDS, and I had my RTV on, bolting down the oil pan, had 4 bolts left, and SNAP, one broke with hardly any pressure on it. After stretching 3 front case bolts (I watched the inch pound torque wrench start to show LESS torque, so I backed them out), I decided to replace ALL of the front case hardware. My son, who welds more than I do, was able to extract the broken oil pan bolt by welding a flange nut to the nub that was left sticking up. Thanks son, good job! NOW, I am ready to go back to the oil pan and RTV to button up the bottom end. Boy, after that one snapped, I had one hell of a mess with all of that RTV. I ruined 4 rags, at least and had it all over me but I needed to get that stuff off since the shortblock was assembled and I couldn't feel good about using a wire wheel when the RTV was dry. Today, I need to run my M6x1.0 tap into the one oil pan hole as it is still a bit snug when I try to run a new bolt in. I am just happy I caught all if the issues (I hope, but pretty sure 🙏👍).
Thanks for following and next I will be saving up for a set of Cams, Springs and Valves for the top end build. 😎
This is picture heavy since I took too long to update things.
I also bought some new DSM apparel and liked the "Not Stock" shirt! It's a nice Gildan t-shirt!
Pops ✌️

Screenshot_20260323_093710_Gallery.jpg


Screenshot_20260323_093627_Gallery.jpg


Screenshot_20260323_093512_Gallery.jpg


Screenshot_20260323_093409_Gallery.jpg


Screenshot_20260323_093345_Gallery.jpg


Screenshot_20260323_093309_Gallery.jpg


Screenshot_20260321_154800_Gallery.jpg


Screenshot_20260321_154823_Gallery.jpg


Screenshot_20260321_154559_Gallery.jpg


Screenshot_20260321_154353_Gallery.jpg


Screenshot_20260321_162901_Gallery.jpg


Screenshot_20260321_155036_Messages.jpg


Screenshot_20260321_155051_Messages.jpg


Screenshot_20260322_170218_Gallery.jpg


Screenshot_20260321_163123_Gallery.jpg


Screenshot_20260321_163141_Gallery.jpg


20260326_091330.jpg
 
Add Value - Be Respectful - No Trolling - No Misinformation - Participate Often!
Support Vendors who Support the DSM Community

Latest posts

Build Thread Updates

Latest Classifieds

  • For sale 4G63 3 inch Magnaflow SS high flow cat
    3 inch Magnaflow stainless cat. High flow. 18.25 inches. Flange holes are 4 1/8 center. Has...
    • Galant665
    • Updated:
  • For sale 4G63 Forge Motorsports BOV
    Original Forge Motorsports bov. Adjustable with over 80 clicks on the dial. Nice to use for...
    • Galant665
    • Updated:
  • Wanted 1g 1991 Black Cherry Eagle Talon
    5-speed
    • bamatalon
    • Updated:
    • Expires
  • For sale Misc Left Over Parts
    Hello, I have a few left over parts for sale, these do not include shipping, please pm me for a...
    • r3dmak
    • Updated:
    • Expires
  • For sale Alpha Injection Clinic 2200cc for 4G63 DSM/EVO
    I have a set of Alpha Injection Clinic 2200cc high z injectors for DSM/EVO. I am stepping up to...
    • spoolinpos
    • Updated:
    • Expires
Back
Top