The Central Hub for DSM Community and Information

For 1990-1999 Mitsubishi Eclipse, Eagle Talon, Plymouth Laser, and Galant VR-4 Owners. This is where the DSM platform history is documented and archived. Log in to help us in our mission, and to remove most ads from the browsing experience.

BZS_7393 borító.jpg

Mitsubishi 'Itsabitshiti' Eclipse

EUDM Gsi Eclipse. Turbo conversion done with 16G and other small upgrades.

This site may earn a commission from merchant affiliate links, including eBay, Amazon, and others.

April 2023 update

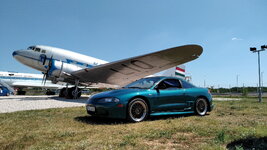
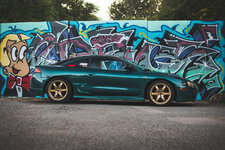
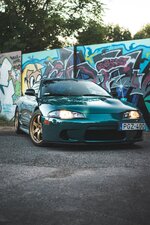
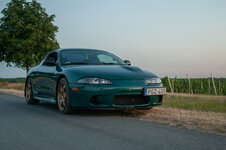
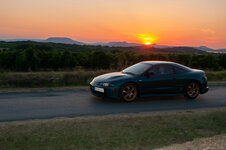
I finished intalling the ducktail on the DSM, and it looks like it's always been there :) At first I was nervous about the outcome, I've never seen a 2g with ducktail in my life. But the end result is even better than I expected, It really gives the car a unique look.

337315420_1368677917244883_3263971017764549688_n.jpg


In the meantime I found a set of front Evo Brembo brakes for a good price. They are in a bit rough shape, but they were only about 400 USD, and they came with a set of Ferodo DS3000 pads with about 80% life left. I'm going to sell the race pads, and slowly start gathering the parts to rebuild the brakes and install them.

20230318_162148.jpg
20230318_162137.jpg


I also managed to get the car on the racetrack for the first time :D It really is a blast to drive on the track, the tyres (Michelin Pilot Sport 4) are sticky enough, the 4g63 can easily pass an MX-5, or a Fiesta, and the OEM seats also hold me suprisingly well. It was all fun, until about 8 minutes later the engine started to knock on full throttle. I tought it was some kind of overheating, so I came off the track as soon as I could, and let the engine cool for about 1 hour. After that I went back for another session, but it started to knock again, and now it started almost immadiately :oops: So I tried to push a bit, but then I let it go, and came back for cooling again. I tried it once again, but the same happened.

I cruised home from the track, checked the oil and the spark plugs but there is no evidence of damage. I went under the car, and everything is dry, it looks the same before I did the track day. I did a 2 hour drive since then and the car feels normal during cruising, no weird noises, no twitching, nothing, but the knocking is still there when I do a pull. This weekend I will do an oil change, I will also change the coolant water and add Motul Mocool to it, maybe that will help a bit. I contacted my friend who flashed the ecu and we will look into the timing too. I hope I don't have to take the whole engine apart after one afternoon on the track...

Kakucs_0325_96.jpg
Kakucs_0325_142.jpg

Kakucs_0325_143.jpg


I will be back if I have update on the engine or the brakes, If anyone have other suggestions of what should I check, I will appreciate the help.
 
It turns out, my knock sensor couldn't take the heat on the track. Also it was never changed so it could be expected to go wrong anytime. I went to a local shop and they had a Mitsubishi knock sensor on storage, but it was the md304933 OEM number. (It is for the 3g Eclipse and other 4g64 engines) I decided to give it a shot, but the frequency is different, so it picked up all types of knocks, sometimes even when idling, so I do not suggest using it.

It took me some time to find a new oem knock sensor (md300670), but I got one and installed it, and the car is working normal now, I still have one more trackday planned this year, I hope it survives :D After that I will upgrade the cooling.

20230423_085507.jpg
20230423_093307.jpg


You can clearly see the difference, and how bad my old knock sensor looked when I pulled it.
 
Looks great. I love the color and the wheel/tire setup. I love reading the European threads because it reminds me how easy it is to source parts here in the US. You guys really have to plan ahead and do it right the first time. I respect that a lot.
 
Thank you Tina! It is harder to build these cars here in Europe but not impossible, sometimes you just need a little creativity :D Like I wanted a new 3bar map sensor, and learned here that the GM 3bar MAP is an easy swap, but it's very hard to find here in Europe. So instead I went with a Ford Mondeo 3bar MAP, which was way easier to find, and I also found the characteristics of the sensor online.

20230519_184042.jpg


Meantime I also gathered all the parts for the evo brake swap, so all I need now is time to rebuild and repaint the calipers the I will install them :)

Also finally decided to get myself an ECMlink chip :D So now I can get rid of the knock. I've set it up, and it's extremely useful. I've already adjusted my TPS, and started adding my WBO2 and the Mondeo MAP sensor. I still need to figure out how to set a new sensor up properly, they are not reading accurately at the moment, but I'm consantly learning. The chip came with pre-loaded timing and fuel maps (I think it's the factory fuel and timing maps of the 2g), I went out for my first ride with it, and the knock is gone. I still need to log in different conditions to confirm everything, but it's better already.

I also found that the EVO 8 base maps might be a bit better for the 2g, and as I am using EVO 8 pistons and rods, I figure they me better for me too. So I will try that. I just started learning ECMlink things, but it is very exciting, so I will surely have a lot a questions :)

20230603_110934.jpg
 
Good stuff Pat. FYI you can find Chinese GM 3bar MAP replicas everywhere for like 10 bucks, they work the exact same; that's what I got for mine. I also got a used IAT sensor off a 1984-1990 Jeep Cherokee / Wrangler. Those use the SAME exact scale as the GM IATs from that era, in fact the sensor itself is built by GM but has a Chrysler number on it. The part number is 3300 2382 or the aftermarket equivalent is Tomco-12134. I bet you have plenty of those in Hungary. It cost me like $5 and with a nice clean it works and is very quick to temp response (ball in cage style). Both those sensors have an option in the drop down menus in DSMlink.

Good call on the EVO 8 map. Personally what I did was I loaded that up, kept mostly the pre-spool (off-boost and boost building region) part with slight tweaks to give me more torque from the get go, and then I significantly leaned out the WOT target AFRs since the EVO one runs pig rich as usual. What I've found is these motors respond very well to lean mixtures as long as you aren't retarded with the timing (no pun intended LOL).

Once again congrats on the ECMlink. It's by far the best thing you can buy for these cars I think!! :hellyeah:
 
Thank you Stefan!

I'm new to changing things in the map, where should I exactly look at when I want to change the WOT AFR target? I plan on ising this evo base map and slowly changing things after logs, but if I can get a step ahead I would be happy with that. I might be asking some more questions about that later in private messages :D

Thanks for the tip with the MAP and IAT sensors, I will fiddle around with this Bosch sensor, try to make it work. I can see the volt output it gives, and have the linear diagram for it, so I think I think I can calibrate it. But if I cannot, I will order a chinese GM 3bar MAP.

Ps.: You didn't change the evo base timing at all? Was it good for you as it was?
The stock DSM base timing is 5 deg, and it also has 5 deg idle timing. The EVO 8 uses 8 deg of idle timing but I do not know how much their base is, probably 5 as well. On a 2G even with DSMlink we cannot change base timing since it's hard coded into the ECU. What I did was run the 8 deg of idle timing in the first 2 cells which gives me a stronger idle (more torque) and it affects how quick the car feels off the line. I experimented with even higher numbers such as 12 and 15 (most modern cars run around 15 idle timing) but that messed up with my other values such as airflowperrev so I brought it back down to 8.
 
I had some time to work on the car, so I've done the Evo front brake swap. I done it with changing to Galant Knuckles, I also added Russel SS brakes lines, and mounted the OEM Evo dust shields. One hole is a bit off, but with a small cutting and a bigger washer, I could easily solve that problem.

20231228_144556.jpg
20231228_144625.jpg
20231228_144746.jpg
20231216_141237.jpg
20231217_110653.jpg


And as I had the stock EU spec GS calipers, the Outlander calipers, and the Evo calippers lying around, I did a nice comparison picture of them :) Sadly I don't have the OEM discs, but they are even smaller.

20231216_155734.jpg


I also worked on the upgrading the cooling system after I had some overheating issues last summer. I added heat insulation to the water pipe in front of the engine. It's secured by a Velcro tape, and I used some clamps just to be sure. It's really not that apparent, but I hope it will help.
20231216_143740.jpg
20231230_182717.jpg


I bought a Mishimoto Radiator, but I decided to use the OEM fans, I did the research here, and learned that a slim fan doesn't really make a difference. I added padding to the radiator fan housing to let less air escape.

20231216_152227.jpg
20231230_182457.jpg


I'm planning to use more heat insulation on the underside of the engine, mostly around the exhaust area. I will also design, 3D print and insulate a custom air box for my air filter, which is just casually hanging around in the engine bay right now, thus sucking in the hot air.

I will also add Steel brake lines to the rear brakes, change the rear upper controls arms (they are corroded) with new bushings, change the trunk lift supports, do a big clean and I will be ready for the 2024 season :)
 
Last edited:
Last weekend I had some freetime so I took the rear brakes apart, I got new pads and discs, and since I alredy head the Russel SS kit for the rear too, I swapped that too. I wouldn't say the rear brakes were in bad shape but now they are brand new.

Speaking of bad shape, I noticed earlier that my rear right control arm was pretty much devastated. So I got one in better shape, cleaned and painted it, so I was just waiting to swap it out. I managed to do that now so that's one more thing off the list :D

20240203_125158.jpg
20240203_125200.jpg


Oh, and also for an update, I got myself a genuine MHI big16G, with OEM O2 housing (I got kinda annoyed by the screamer pipe I installed), so now I'm gathering parts for the support mods and getting ready for a turbo upgrade finally!

416174561_752808829733858_5885605627508525582_n.jpg
 
You got "annoyed" by the screamer pipe?!?! Bro. come on, it's the BEST sound mod you can do to a DSM and it frees up a bit more horsepower :D.

I can't see from the pic, but is that a "42" or "47" casting on the 16g? You're gonna have to ditch the stock side mount cooler now and run a front mount.
 
Yep It's way to loud, and also dumps a lot of hot air right under my engine bay. I'm doing everything I can to decrease my engine bay temperatures, so I thought the OEM O2 pipe will help with that.

The police is also getting more strict with checking modified cars here in Hungary, and it wouldn't help if I blast by them with a fully open dump pipe LOL :D. My car is still illegally modified (very much), but my exhaust is actually not that bad, I want to keep it quiet under WOT too, so I will not raise any suspicion.

I am planning to port out the OEM housng, but I'll keep the screamer too, so I will still have the option to swap it out.

It a "42", so a regular big 16G. I did some research, and learned that I can keep the SMIC until about 16 psi, so that's my first goal. Then I'll see how it performs and how quick it overheats. The FMIC would be good, but I'm not confident that I can find/make the cutsom piping, brackets and venting needed for it.
 
I highly suggest you look into fitting a front mount Pat, look at some of my custom intake pipe setup if you want to get a better idea of how it will look. The 42 16G is fine but 16 psi on it will be waaay more than 10 psi on the T25, and the T25 already heat soaks the side mount if you stay on the gas for longer. I feel you will be knock limited a few degrees lower than compared to a front mount, so you may have trouble even breaking the 300 bhp mark. Just my assumptions. At least install the intake air temp sensor before your TB and see what intake temps you get. I would say anything over 25-27*C after cooler temps will not be optimal. My regular temps were 15 on a cold winter pull and 20-22 on a very warm summer day with regular pulls and a warmed up cooler.
 
I appreciate your help, I will put the front mount, and the AIT on my list then. (might as well go speed density then)

As I said I want to do everything to lower the temperatures, so the FMIC will help too. But this takes a lot of time with all the measuring and the welding (possibly), so I will postpone the turbo swap to next winter.
 
Ok, so long time no see—time for an update! :D

I managed to get my hands on a big 16G last year, so this winter's plan was to install it, so I can finally have some high boost fun this season!

I started gathering the supporting parts. Here's the list of things I changed:
  • 16G turbo
  • FMIC setup with custom 2.5-inch piping
  • Custom 2.5-inch downpipe
  • OEM O2 housing (I ditched the old screamer pipe)
  • IAT for later SD operation (not wired in yet)
  • New, smaller air filter (the old one was too big, didn’t fit anymore)
  • FIC 850cc injectors
  • Fuel pump rewire mod
It sounds like an easy job, but I did run into some issues—especially with the custom piping, as my welder friend got super busy. So I had to wait a lot for the pipes to be welded. So this is going to be a long post! :D

The first issue was with the two J-pipes I got with the turbo. They were both designed to support an SMIC setup (so they are bent to the passenger side). I searched for other types of pipes, found some, but I decided it would be easier to DIY and bend it the right way myself than to order a new part from the US.

20241201_155837.jpg
20241201_161220.jpg


Even the smaller, shinier one wouldn’t fit. I have a Mishimoto radiator with OEM fans, so it's tight in there. I decided to cut the black one up, rotate it a bit, then weld it back together. Now it fits nice and tight between the two fans.

Messenger_creation_DC4AB2D2-7C3D-4F31-A685-1A55BB279C6F.jpeg
Messenger_creation_B061C325-0F42-44B9-A952-09BA0520018E.jpeg


Next challenge—figuring out how to fit the FMIC to the car. I read that you can fit a smaller one to the front crash bar, but I didn’t even have one, so I sourced that first. Then I made a bracket to hold my intercooler to it. It turned out pretty great. It looks almost like a factory intercooler with the bumper on.

Messenger_creation_9179209F-7774-45C6-A343-9C5428FBBF61.jpeg
20250315_153712.jpg


Now the challenge was to get the air from the turbo to the intercooler and then all the way back to the engine! I had some pieces from my old intercooler hard piping, but they clearly needed tweaking. I was also concerned about how to curve the piping to the front of the car and then back. So I got my leftover pieces together, measured everything, ordered more pipe pieces, measured again, cut, and sent them off for welding. It could’ve turned out better, but this will get the job done.


20250315_153419.jpg
20250315_154412.jpg

20250412_124005.jpg
20250412_123942.jpg


Then, while routing the piping to the engine, I hit the fuse box. :banghead: 
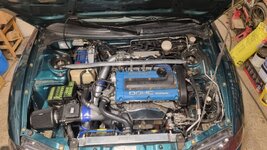
I had an EUDM NA Eclipse to begin with, so my fuse box looks like the one from the 4G64—it’s bigger and sits right in the way of the air filter when converting to turbo. I had previously rotated it to the side wall for the SMIC setup, which worked fine back then. But now it was blocking the forced air from reaching the engine.

IMG_20181110_154105.jpg
IMG_20200510_185305.jpg


I never liked the location anyway—it was more exposed to water, and even though I never had issues, I wanted to eliminate the risk. So I built a small bracket and relocated it to where the stock GST fuse box goes. Since mine is larger, I found that my big ass aftermarket air filter no longer fit, so I ordered a smaller one. Now everything has its own place.

20250329_142550.jpg
20250329_145946.jpg
20250412_124019.jpg


With air finally reaching the engine, I installed my new GM IAT sensor—but I didn’t wire it in yet. The only guides I found include eliminating the MAF and switching to SD operation. Even though I have the hardware (ECMLink and MAP sensor), I’m not ready to dive into SD tuning just yet. So for now, the IAT is just installed but not wired in.

20250412_123927.jpg


After all that, I realized my J-pipe was missing a nipple—I didn’t have a source for the boost for the wastegate and manual boost controller. I searched the forums and found many possible solutions. Since there was already a hole on the turbo right beside the air outlet, I decided to use that. I drilled it through, cut a thread into it, found an old nipple, cut matching thread into that, and glued it in place. It looks OEM now.

20250222_161941.jpg
20250315_153405.jpg
20250315_154358.jpg

Next up: the fuel pump rewire mod. I ordered the kit from STM, so I had everything I needed, they even have small guide to the package. There are many ways to do it, but I decided to cut the wires further back, lift the white bracket, and hide the soldering inside. I bolted the fuse box to the side and found a solid ground point at one of the rear seat bolts. I think it turned out great, and I didn’t even have to cut the rubber lid over the fuel pump—that was something I really wanted to avoid. The pictures look rough, but it’s just dirt—not rust—from under the seats.

20250315_185048.jpg
20250315_185054.jpg
20250315_185111.jpg
20250315_185123.jpg


Then came the moment of truth: I started the engine—and it fired up surprisingly easily! No issues whatsoever. Idle was perfect. I let it warm up, shut it off, and moved on to fitting the front bumper. I wanted to keep the mesh to protect the intercooler from debris, so I trimmed the bumper for better clearance and glued the mesh back on.

The bumper was tough to fit. The intercooler cleared, but I think the front crash bar was hitting the bumper in the middle. I had a 2Ga crash bar, but I’m you can see I'm running an aftermarket 2Gb bumper. I didn’t know if there was a difference, so I started cutting the styrofoam. It was still a tight fit, but I managed to make it work.

20250413_094949.jpg


Once everything was installed, I fired up ECMLink. I had a few things I wanted to tackle. I reset my MAFComp and started tuning—first at idle, then cruising, then half-throttle. I hit 48% throttle, and the engine already felt super strong. This turbo moves way more air than the T25! ECMLink estimated 196 hp at around 7 psi, which seems like a healthy number. I set the turbo for 14 psi, but it was a busy day, so I didn’t get to do WOT pulls or even wash the car. That’s the plan for this weekend—I can’t wait to see what the 16G can really do! For now, this is where things stand. It may seem like a long post, but it’s 4–5 months of work crammed into one update.

Oh—and in the meantime, I got my hands on some EVO 8 Recaros (leather package ones). I’ll be making custom brackets and installing them too. After that, I think I’ll stop with the mods for now and just enjoy the car. :D

received_1204450664106512.jpeg


I’ll update the thread once I’ve done the WOT pulls and have the final verdict on the build—or if anything goes wrong! :D

20250412_124019.jpg
 
I managed to make a pipe from the BOV to the intake. I cut two pieces of rubber hose and connected them together, securely taped it around, and installed it. It stretches a bit but it fits, I guess it will settle.

4f266d30-049f-421b-984e-596911f38875.jpeg


After that I managed to test the car thoroughly, I set the MAFComp then gave the car some WOT test runs. But for my dissapointment, the wastegate always kicked in at 8psi no matter what I did. I have a Turbosmart manual boost controller (you can see it in the picture above) but no matter what I did with it, I couldn't get past 8 psi. If anything the car now felt a slower then before with the T25 :|.

Then I thought I must have a massive boost leak, but I couldn't find any with my boost leak test. So I did some research, and now my main culprit is either the BOV or the Manual Boost Controller. I also had another look at my logs, and found out that the 16g airflow at 8 psi is about the same as the T25s' at 15 psi. (around 190 gm/s), so that can't be a coincidence. Now I ordered an aftermarket wastagate acuator, that is equipped with a 14 psi spring, but it comes with a spring kit, so I will have further flexiblity. With this I can eliminate the MBC and I hope now I can build up enough pressure the hit 14-15psi!
 
Okay, so I got the aftermarket wastegate actuator.

It even came with a set of springs, so I can choose how much boost I want.

20250510_202210.jpg
20250510_201707.jpg
20250510_202228.jpg


I decided to go with the 1.2 bar srping (18psi), got rid of the MBC and directly routed my turbo boost outlet to the actuator like this:

20250509_221358.jpg


After the test drive I found out that I'm only getting 0.8-0.9 bar boost (12-13 psi). Which was a step in the good direction but still it was weird that I was not getting the boost level where the spring is rated. I have a separate boost meter and a 3 bar MAP sensor so I can log boost in ECMlink too. Both feed from the intake manifold and show the same value. I did a boost leak test again but nothing. I guess there is a few psi pressure loss in the system anyways.

So next step, I made the actuator arm a bit shorter, and swapped out for the 1.5 bar srping (21 psi). Now the car boosts 1.0-1.1 bar steadily (15-16 psi). Still there is a 5 psi loss somewhere, but now I am finally happy with the performance! :D The car pulls great, definitely feels stronger then with the T25, and I am logging no knocks or issues. So I'll leave it like this and see how it works on the long term.

This weekend I am heading to a welder who specialized in installing racing seats and making brackets, so I will soon have the Evo Recaros in the car!
 
Okay, so I got the aftermarket wastegate actuator.

It even came with a set of springs, so I can choose how much boost I want.

View attachment 764829 View attachment 764830 View attachment 764831

I decided to go with the 1.2 bar srping (18psi), got rid of the MBC and directly routed my turbo boost outlet to the actuator like this:

View attachment 764832

After the test drive I found out that I'm only getting 0.8-0.9 bar boost (12-13 psi). Which was a step in the good direction but still it was weird that I was not getting the boost level where the spring is rated. I have a separate boost meter and a 3 bar MAP sensor so I can log boost in ECMlink too. Both feed from the intake manifold and show the same value. I did a boost leak test again but nothing. I guess there is a few psi pressure loss in the system anyways.

So next step, I made the actuator arm a bit shorter, and swapped out for the 1.5 bar srping (21 psi). Now the car boosts 1.0-1.1 bar steadily (15-16 psi). Still there is a 5 psi loss somewhere, but now I am finally happy with the performance! :D The car pulls great, definitely feels stronger then with the T25, and I am logging no knocks or issues. So I'll leave it like this and see how it works on the long term.

This weekend I am heading to a welder who specialized in installing racing seats and making brackets, so I will soon have the Evo Recaros in the car!
I would test the actuator itself and see if it opens when it's supposed to.
 
Yes I ordered a brake bleeder vacuum pump for that. It can generate pressure too. But it hasn't arrived yet. When it arrives, I will check precisely. All I could do now is use my air compressor to check before installation if the actuator works at all, but that pushes 50 psi, so it's not good for precise measurments.
 
I solved the boost pressure issue by buying an EBC. Now I can control my boost pressure freely! I can also set boost gain, so the 16G kicks in sooner. I set it to 1.1 bar at the moment. I don't think I will be raising it; I tried 1.2 bar, but the clutch slips during hard acceleration. I have a factory-spec Exedy clutch, I don’t want my car to tear itself apart, and I’m happy with the performance and comfort this clutch provides. I don’t want anything more extreme.

1751899170831.png

And also, now that real summer has arrived in Hungary, I started to notice some serious overheating. As the weather got super hot (34-36°C), my coolant temps started to reach 112°C after about 30 minutes of highway driving with the AC on (that’s where I set my ECMLink to flash the CEL). Even if I wasn’t using the AC, it still got too hot after about an hour. So, taking a 2-3 hour trip took considerably longer with all the stops and waiting for the car to cool down. :(

I did some research on this and found that some guys experienced the same results after installing an FMIC. Some people discovered it was a general issue like a clogged water system or a bad water pump, but I had no issues in colder weather. I did my engine rebuild 20,000 kilometers ago, so most of my parts are almost new. So I figured it must be the airflow.

Last weekend, I gathered some parts and got busy with upgrades. I flushed the system (three times) until clean water came out and added new coolant fluids with Motul MoCOOL, which is supposed to cool better. I changed the radiator cap to a 1.1 bar cap. I did a cold air intake inspired by GSX-dude: I added a hole to the right opening of the bumper and connected a flexible tube that directs air directly to the air filter through the OEM IC piping opening. I also considered ways to get more air to the radiator. I found a 1-2 cm opening under the FMIC that I could use, so I made a scoop, fitted it underneath the IC that directs air behind the IC and up to the radiators. It turned out pretty nice.

20250705_103654[1].jpg
20250705_103659[1].jpg 20250705_110724[1].jpg

20250705_154538[1].jpg


Yesterday, I tested the car on the same 2-hour trip in the same hot weather to see if the engine would overheat or if I could use the AC comfortably on a hot day. The upgrades proved useful! The intake temps are matching the outside temperatures consistently on the highway, and the coolant temps are lower. Now, they hover around 102-106°C with the AC on! Still a bit high, as I’ve read, but considering how hot it was yesterday, I see it as a win. Next time, I plan to repeat the same trip with lower outside temps to see if the car can keep the cooltemp under 100°C.

I still have some ideas for better airflow, like vertical walls directing air from the IC directly to the radiator, and maybe opening up the bumper more in the middle part — but that’s more work, so I’ll probably do it off-season. I also want to add a turbo blanket to the hot side of my turbo; I believe that will help too.

Oh, and I have a very daring friend who invited me to go to Nürburgring this August, and I thought, why not take the DSM too! So I’ll be heading there soon to see the Green Hell myself and see how the DSM handles the track. I still have some concerns about overheating, but the climate over there is much colder, and I don’t plan to push the car too hard on the lap — just going for the experience. Next time I do an update, I’ll share my experiences and post some nice pictures! :D
 
As promised, I’m back with the Nürburgring trip done!

Before the trip, I made a simple yet effective modification to the AC fan wiring to further improve cooling. I wanted the AC fan to turn on with the Radiator fan, so I wired the relays together. The guides suggested connecting the Rad.Fan (HI) to the Cond.Fan (HI), but that kept the AC fan from activating. So, I connected it to the Rad.Fan (LO) relay, and now it runs whenever the radiator fan is on—much better!

Once that was sorted, I packed my tools, brought a small fire extinguisher (just to be safe), and my trusty jack. Fortunately, the 2G has a surprisingly spacious boot, which allowed me to bring along some personal stuff too :D

The drive to Nürburg took about 14 hours primarily on the highway—pretty dull, but constantly monitoring gauges kept me occupied. Thankfully, the DSM handled the entire trip smoothly, and we arrived safely at the apartment.

20250822_200510.jpg


Next day we headed to the track to explore. We checked out the museum, the shop, all the amenities and the track. And WOW—nothing can prepare you for how intense the Nürburgring really is. Standing next to it, you notice the surface's bumps and crazy elevation changes. People taking high-end cars through those turns at extreme speeds? Madness.

For my first lap, I booked a Ringtaxi ride in a Hyundai i30N with 280 hp and front-wheel drive. I thought it might compare to my DSM. But with semi-slicks and a professional driver, it was a whole different world. The Nordschleife’s unpredictable, bumpy, and curvy nature made me feel like I was praying for my life in those first few minutes! :D Once I got used to it, I started to enjoy it—though I wouldn’t do it again at that speed. The G-forces from the passenger seat were intimidating.

I was honestly scared to take my own car on the track. But I gathered myself, bought a lap ticket (€30/lap or €35 on weekends), and took it slow for a warm-up lap. With control in my hands, it became more manageable. Still, I took it easy that day and then we headed to Cologne the following day.

545394057_10161743604731524_9041578518275286056_n.jpg


Cologne is a charming European town with beautiful architecture, a stunning cathedral, cozy beer gardens, and plenty of people. Nice to visit, but I was eager to get back on the track—just one lap wasn’t enough!

During the weekend on the Nordschleife I finally started really enjoying it. The DSM handled nicely (though I didn’t push it to the limit), and the chilly, clear weather was perfect—no overheating fears. I managed several laps, but the traffic and occasional accidents made it tough to keep a clean racing line. Always watching rearview mirrors for Porsches, BMWs, or other fast cars, plus yellow flag sectors for incidents—sometimes the whole track would shut down temporarily. Some drivers are daring, pushing confident but reckless, and it shows.

racetracker_39870179_623455.jpg
racetracker_39874771_623453.jpg


Overally it was a fantastic experience. I didn’t focus on lap times—I was more cautious, worried about pushing too hard and risking something going wrong. Many cars returned with mechanical issues, but the DSM held up like a champ. The only thing that gave out was the lower engine mount—original and completely torn after all the years —but I’ll replace it, no problem.

The way home was a long and quiet drive—bored but happy! I’m proud that my car was able to handle six laps around the Nordschleife without mechanical issues, and I even achieved decent fuel efficiency on the highway—29 MPG!

If you ever get the chance to visit the Nürburgring, I highly recommend it. It’s a petrolhead paradise—crazy cars, an epic track, and accessible to anyone with any vehicle. They even offer car rentals for the Ring, so if you can't bring your own, you can choose from a variety of track-ready machines. Truly an unforgettable experience!

Next, I'll be driving for another week or two before starting winter upgrades: insulating the O2 housing and IC piping, my lifters started to tick, so I'll be replacing those too, and doing basic maintenance like oil and timing belt changes. Plus, I have my EVO 8 Recaros ready to install, and I plan to refresh the interior with leather for the rear seats and door inserts.

Overall, I believe I've achieved my goal: the DSM is strong, reliable, and capable of handling everything I throw at it. This winter, I’ll focus on maintenance and interior upgrades, and I think the project is finally wrapping up (?) :D
 
Last edited:
2026 march update:

So, my maintanence and the the fight against the overheating continues!

Engine & Turbo Work

I installed new GSC zero‑tick lifters, and since I was already in there, I swapped the belts as well. They only had about 10,000 miles on them, but I’d rather reset the clock now. No pictures this time, but at this point taking the engine apart feels almost routine. I’ve done it a few times already 😄

When I removed the turbo, I found MAJOR cracks in the turbine housing and even some cracks in the exhaust manifold too.
20251022_094452.jpg
20251022_094434.jpg


For the exhaust manifold, I got a used one in better condition. I also learned that the OEM 2G manifold has a smaller outlet because of the fire ring, while the 16G turbine housing is larger and doesn’t use one. I had the fire‑ring seat machined out and the outlet diameter matched so the exhaust flow is smooth and even.

For the turbine housing, I bought a brand‑new one from Mamba Turbo. Surprisingly good quality — basically ready to bolt on.
20251230_142733.jpg
20251230_142501.jpg


Heat Management Upgrades

I had the exhaust manifold and turbine housing ceramic‑coated, and added a turbo blanket. I couldn’t find one specifically for the 16G, so I bought a smaller one and fitted it to the O2 housing. Not ideal, but it works — and honestly, the whole setup looks great assembled.
20260214_163013.jpg
20260214_163018.jpg
45ccd5ca-c30c-48cb-9767-80496b78de0f.jpeg


- A friend designed and 3D‑printed a custom airbox for me. It uses the OEM inlet and also has an opening for my custom ducting. The EUDM GS models have a larger fuse box, so space was tight. I had to persuade it a bit, but it finally fit. I added heat shielding on the engine side to reduce radiant heat.
20260314_171951.jpg
20260315_153527.jpg


I also wrapped the J‑pipe and the pre‑intercooler piping. So now the exhaust is ceramic‑coated, the hot side is heavily shielded, and the intercooler piping and air filter is protected as well.

With all the previous upgrades combined, I’m hoping for a much cooler, more stable setup — even on track days. I’m not planning to give up on track days this year 😄

Here’s how the engine bay looks now:
20260315_153524.jpg


Interior Upgrades

I installed Evo 8 Recaros, and they look fantastic. I’m planning to upgrade the rear seats and door trims to leather so everything matches. I also ordered the FIBA short‑shifter kit, which will be going in as soon as I get it. The garage is packed right now, so this is the best picture I could make:
20251019_153827.jpg


What’s Next

I have a few things I want to check in the suspension, and do the interior. Then the car will finally be ready. I can’t wait 🙂

20260314_171951.jpg
 
2026 march update:

So, my maintanence and the the fight against the overheating continues!

Engine & Turbo Work

I installed new GSC zero‑tick lifters, and since I was already in there, I swapped the belts as well. They only had about 10,000 miles on them, but I’d rather reset the clock now. No pictures this time, but at this point taking the engine apart feels almost routine. I’ve done it a few times already 😄

When I removed the turbo, I found MAJOR cracks in the turbine housing and even some cracks in the exhaust manifold too.
View attachment 787020View attachment 787021

For the exhaust manifold, I got a used one in better condition. I also learned that the OEM 2G manifold has a smaller outlet because of the fire ring, while the 16G turbine housing is larger and doesn’t use one. I had the fire‑ring seat machined out and the outlet diameter matched so the exhaust flow is smooth and even.

For the turbine housing, I bought a brand‑new one from Mamba Turbo. Surprisingly good quality — basically ready to bolt on.
View attachment 787023View attachment 787022

Heat Management Upgrades

I had the exhaust manifold and turbine housing ceramic‑coated, and added a turbo blanket. I couldn’t find one specifically for the 16G, so I bought a smaller one and fitted it to the O2 housing. Not ideal, but it works — and honestly, the whole setup looks great assembled.
View attachment 787024View attachment 787025View attachment 787037

- A friend designed and 3D‑printed a custom airbox for me. It uses the OEM inlet and also has an opening for my custom ducting. The EUDM GS models have a larger fuse box, so space was tight. I had to persuade it a bit, but it finally fit. I added heat shielding on the engine side to reduce radiant heat.
View attachment 787027View attachment 787029

I also wrapped the J‑pipe and the pre‑intercooler piping. So now the exhaust is ceramic‑coated, the hot side is heavily shielded, and the intercooler piping and air filter is protected as well.

With all the previous upgrades combined, I’m hoping for a much cooler, more stable setup — even on track days. I’m not planning to give up on track days this year 😄

Here’s how the engine bay looks now:
View attachment 787028

Interior Upgrades

I installed Evo 8 Recaros, and they look fantastic. I’m planning to upgrade the rear seats and door trims to leather so everything matches. I also ordered the FIBA short‑shifter kit, which will be going in as soon as I get it. The garage is packed right now, so this is the best picture I could make:
View attachment 787019

What’s Next

I have a few things I want to check in the suspension, and do the interior. Then the car will finally be ready. I can’t wait 🙂

View attachment 787026
I'd pay good money for one of those air boxes 👀
 
One of my theories about dual core aluminum radiators is that they are thermally inefficient because they have double the capacity of the original radiator and offer half the air flow through them compared to the thin factory radiator. When you put a thick intercooler infront of a double thickness radiator it cuts the airflow through the both of them way down. The radiator now has twice the amount of hot coolant in it and half of the air flow through it to cool it down

In Texas I have to run a stock radiator if I have a front mount intercooler and I want to use air conditioning in 100 degree traffic. Pulling air flow through an intercooler, ac condenser and radiator on stock fans isn’t easy
 
Add Value - Be Respectful - No Trolling - No Misinformation - Participate Often!
Support Vendors who Support the DSM Community

Build Thread Updates

Latest Classifieds

Back
Top