The Central Hub for DSM Community and Information

For 1990-1999 Mitsubishi Eclipse, Eagle Talon, Plymouth Laser, and Galant VR-4 Owners. This is where the DSM platform history is documented and archived. Log in to help us in our mission, and to remove most ads from the browsing experience.

IMG_9010.jpeg

1998 Mitsubishi Eclipse GSX

My dream car, white 1998 Mitsubishi Eclipse GSX 5 speed

This site may earn a commission from merchant affiliate links, including eBay, Amazon, and others.

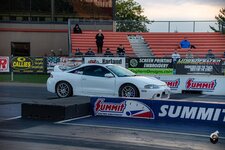
Quick SHOOTOUT recap

Registered and ran the 11.5 index

First and only qualifying pass I did was 11.513@131 which put me as the #1 qualifier for the whole weekend

Managed to get through almost all the elimination rounds. Until the semi finals where I bogged the launch and ran it hard out the back to a 11.49…. UGH

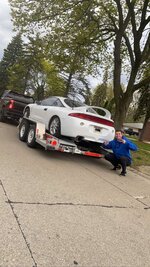
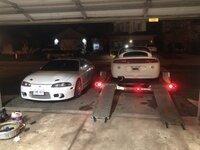
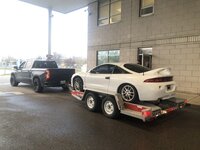
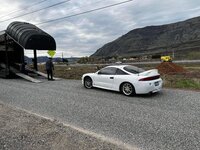
all in all was a great weekend spent with friends and cars. Was definitely nerve racking driving the car 4.5 hours down to race all weekend and drive it back home


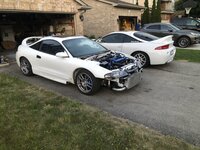
Didn’t take many pics of the weekend but here are some:

pic 1.jpg


pic 2.jpg


pic 3.jpg


pic 4.jpg


pic 5.jpeg


pic 6.jpg


pic 7.jpg


pic 8.jpeg
 
September 12th

after hanging out with @jdxnc at the shootout this past year, he noticed i had some voltage drop when in boost

so after i got back home i had grabbed some wiring and ran a new solid wire from the alternator to the fuse box ( i already upgraded the line from the fuse box to the battery )

it most definitely helped out with all my little electrical gremlins i was running in to

e1.jpg


e2.jpg


e3.jpg


e4.jpg


e5.jpg
 
Yeah wait until its done next year its in 2 hours from home getting ready for a dyno session, shell look great next year.
 
Been a while since my last update, it’s been way to cold and snowy up here in the north to do anything. But I couldn’t wait any longer so I started to fab up my new 3” IC piping on the cold side thanks to my new RMR 75mm throttle body. Was fun measuring cutting and running back and fourth to get it tacked up and then fully welded. Now I wait until my Tial BOV flange comes in so we can throw that on there too

IMG_4986.jpeg


IMG_4985.jpeg


IMG_4990.jpeg
 
Last edited:
What’s up guys,

Been a busy few weeks and was able to get a fair amount done on the car.

Was able to finish up getting my intercooler piping all installed, the evo 8 iac remote ISC installed ( found a pigtail and ISC in the local junkyard from a 2006 Lancer es ), picked up a Fluiddampr crank pulley, catch can relocated to firewall , the new Kiggly high pressure valve springs installed, had a keeper fall down one of the oil drains so I had to pull the pan. new GSC no tick lifters installed, and the GSC s2 cams too

IMG_5063.jpeg


IMG_5287.jpeg


IMG_5293.jpeg


IMG_5308.jpeg


IMG_5357.jpeg


IMG_5526.jpeg


IMG_5563.jpeg


IMG_5565.jpeg


IMG_5568.jpeg


IMG_5572.jpeg


IMG_5570.jpeg
 
A few updates for the car, sorry for the delay just been super busy.

Relocated my catchcan from the front of the trans to accommodate the new bigger IC piping and put it up on the firewall.

Also picked up some new tires! Michelin pilot sport 5 245/45R17. Needed to raise the car up like 2”-3” to fit them without hitting the arches. Got 2 alignments, the factory rear tow arms couldn’t adjust enough to zero the rear out. So you know I had to hit up @99gst_racer at Volk metal craft to get some of his new adjustable rear toe arms. Made the alignment 10x easier. Perks of working at a dealership I can throw it on the rack or a hoist at any time

IMG_5824.jpeg


IMG_5877.jpeg


IMG_5917.jpeg


IMG_5918.jpeg


IMG_5982.jpeg


IMG_6048.jpeg


IMG_6124.jpeg


IMG_6125.jpeg
 
Last edited:
A few updates for the car, sorry for the delay just been super busy.

Relocated my catchcan from the front of the trans to accommodate the new bigger IC piping and put it up on the firewall.

Also picked up some new tires! Michelin pilot sport 5 245/45R17. Needed to raise the car up like 2”-3” to fit them without hitting the arches. Got 2 alignments, the factory rear tow arms couldn’t adjust enough to zero the rear out. So you know I had to hit up Paul at Volk metal craft to get some of his new adjustable rear toe arms. Made the alignment 10x easier. Perks of working at a dealership I can throw it on the rack or a hoist at any time

View attachment 767698

View attachment 767699

View attachment 767700

View attachment 767701

View attachment 767702

View attachment 767703

View attachment 767704

View attachment 767705
Lookin' good!
 
Canada Day update:

I’ve been fighting with the car forever to try and get proper clutch engagement, I can’t get the car go into first smoothly at a dead stop and can’t get it to go into reverse but every other gear is butter. I’ve replaced:
- Clutch master cylinder
- clutch slave cylinder
- clutch pedal assembly
- shifter is all rebuilt
- shift linkage thanks to @Dusty Landrum
- re surfaced flywheel and gave them the specs needed
- pivot ball is shimmed
- CMC is adjusted correctly

It’s a brand new clutch and fresh rebuilt trans from TRE. I have all solid bushings for the linkage too. I’m lost here. But today July 1st I swapped the CMC and man being over 6’ crawling under the dash in the heat is not fun.

IMG_6335.jpeg


IMG_6338.jpeg


IMG_6216.jpeg
 
Hello everyone,
I figured I’d post some pics of the engine when I built it for the old shell just so everything is here.I remember finding the stock bottom end in Buffalo New York. left my hometown with my friend at like 7pm ( 2.5 hours away from me ) and got there at like 10 including the border. loaded it up in my old 06 lancer wagon ( the one that looks like an evo wagon ) and had the coolant and everything spill all over the hatch area on the way home. when i got to the border i told the guy what car it was for and he made a joke asking if i blew the welds on the intake LOL 
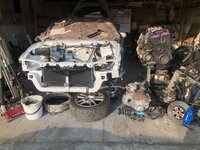
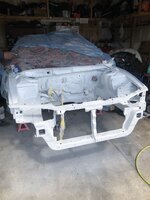
and let me through, got home around like 2am. Was fun machining it all when I was working in an engine machine shop and building the engine in my garage over 5 years ago!

IMG_8675.png


IMG_8709.png


IMG_8711.jpeg


IMG_8758.jpeg


IMG_8760.jpeg


IMG_8847.jpeg


IMG_8846.jpeg


IMG_8914.jpeg


IMG_8916.jpeg


IMG_8930.jpeg


IMG_8931.jpeg


IMG_8946.jpeg


IMG_8957.jpeg


IMG_9006.jpeg


IMG_9008.jpeg


IMG_9011.jpeg


IMG_9013.jpeg


IMG_9014.jpeg
 
Last edited:
Last was able to get the subframe installed with the rear diff. Barely have had time to work on the car sadly. Just need to button the rest up with some fresh fluids and then we’ll be ready to go again

View attachment 733117

View attachment 733118
How do you like the drivetrain whining sounds? I have solid diff bushings too and its tough to daily drive it LOL
 
Shootout 2025 prep #1

Install A1cvtech axles with matching hubs and frontline fab rear differential cover

For starters, what a massive difference in size! The A1cvtech axles are much beefier and such a smart upgrade with oem axles getting harder and harder to find. Had to modify the hub bolts to have them clear the outer CVs ( found out I obtained a first batch set before they fixed that issue ). Overall was easy to swap especially since the bearings werent seized in the knuckles. Didn’t even have to take apart the e brake! The new hubs have ARP extended studs so I had to find a new lug nut with an open end to be used. I did the front wheel bearings with the studs too while I was in there. Shoutout to @AndrewG for giving me the specs

IMG_6478.jpeg


IMG_6481.jpeg


IMG_6482.jpeg


IMG_6484.jpeg


IMG_6485.jpeg


IMG_6483.jpeg


IMG_6486.jpeg


IMG_6508.jpeg


IMG_6510.jpeg


IMG_6592.jpeg
 
Last edited:
Shootout prep #2

Since the 11.5 index had a new rule where you have to have a belly pan I had a friend of mine make one for me got it all fitted up. It was meant for one with a stock crossmember but since I had the boosted fab one I had to make some small cuts to make it fit. I also got the side cover on the interior from putting the staging brake in. Had to cut off more than I liked to get it to fit but I already had it all plumbed and wasn’t interested in doing it all again.

I also had the interior out and when I did I wanted to fix the relay location for the fuel pump and make it look more oem. I rushed through putting it together when I first got the shell because I was so excited to drive it. But now it looks all proper

Lastly, the shootout rules said I needed a kill switch on the exterior of the vehicle if I want to run a battery in the rear. So I decided to relocate it and put a small one in behind the wheel well. Thanks to @jdxnc for the battery box, with some modifying to get it all to work it’s all ready to go. one thing you will notice is i never drill any holes that werent there from the factory, just a weird thing im doing.

IMG_6711.jpeg


IMG_6714.jpeg


IMG_6713.jpeg


IMG_6715.jpeg


IMG_6712.jpeg


IMG_6698.jpeg


IMG_6664.jpeg


IMG_6663.jpeg


IMG_6723.jpeg
 
Hey guys,

Just got back from the shootout, always great seeing all my DSM friends I only get to see once a year and able to buy parts on the cheap LOL. Always great to hang out with @Dusty Landrum and @AndrewG

I ran the 11.5 index again this year but thinking of going to the 10.5 for next, I got eliminated I believe it was third round by 0.027 seconds… ugh

But good news was I got some great parts for the build which I will be slowly posting pics of as I install them. First one will be the DSS aluminum driveshaft I got thanks to RSB RACING.

Here is a bit of a photo dump

IMG_7014.jpeg


IMG_7013.jpeg


IMG_7023.jpeg


IMG_7024.jpeg


IMG_7029.jpeg


IMG_7038.jpeg


IMG_7042.jpeg


IMG_7057.jpeg


IMG_7058.jpeg


IMG_7067.jpeg


IMG_7071.jpeg


IMG_7104.jpeg


IMG_7131.png


att.ABpo7gQVpi3i6dXLP8vb2yMwwCdmw8P5imX9Wj1iF3s.jpeg


IMG_7136.png
 
DSS 3.5” Aluminum driveshaft install

I picked up this nice aluminum DS from RSB racing at the shootout, he brought it up for me all the way from Florida. It came with a tail stock made for a 3000GT rear end a 300M yolk. Shoutout to @FstDsm1994 for having a stock yolk for it sitting in his trailer at the shootout and I was able to pick it up.

The day I got back I dropped my driveshaft, grabbed my tailstock off and installed that stock yolk. Didn’t have time for the test drive yet but it’s all installed:

IMG_7105.jpeg


IMG_7106.jpeg


IMG_7107.jpeg


IMG_7109.jpeg


IMG_7110.jpeg
 
Well Fellas,

The season has come to an abrupt end for me this year, I done did broke it. Went out to the local track Friday night to see if we can hit a new PB, once I got there first pass was an 11.1@135 which I thought okay great super great base line. But we were fighting fog and dew up here in Canadaland so the track prep got worse. I had to almost hot lap it so the tires were still warm. I ran an 11.2@135 against my old neighbour in his foxbody then came back around with a little more boost with high hopes. I hit a PB 60ft in the new shell of a 1.6 60ft, the whole pass was feeling great until I put it in third then nope no third just noise and pulled over. Couldn’t go into any gear but was able to roll and nothing on the trans case broke. Will post carnage once I pull it out of the car. My guess was going to be a 10.5/10.6 ET which would have been GREAT to hit. Oh well there is always next year. Thanks to a few friends who were there and helped me out getting it home safe

IMG_7499.jpeg


IMG_7501.jpeg


IMG_7504.jpeg
 
Add Value - Be Respectful - No Trolling - No Misinformation - Participate Often!
Support Vendors who Support the DSM Community

Build Thread Updates

Latest Classifieds

Back
Top