The Top DSM Community on the Web

For 1990-1999 Mitsubishi Eclipse, Eagle Talon, Plymouth Laser, and Galant VR-4 Owners. Log in to remove most ads.

Please Support STM Tuned
Please Support Morrison Fabrication

1996 Eclipse RS rebuild & Cleanup

This site may earn a commission from merchant
affiliate links, including eBay, Amazon, and others.

This site may earn a commission from merchant affiliate links, including eBay, Amazon, and others.

Aproductions

10+ Year Contributor
2,124
50
Aug 11, 2009
Allentown, Pennsylvania
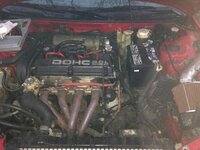
I am just making this journal to see my cars progress and to share it with the rest of you. A little bit of background on the car first.

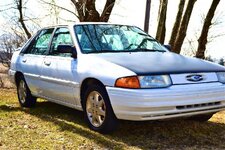
I sold a 1995 ford escort and picked this up for the same price.

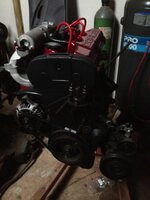
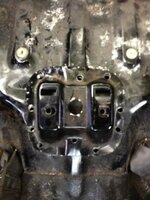
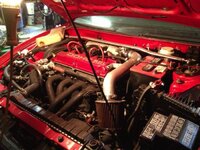
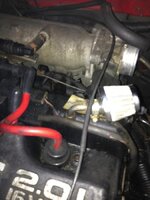
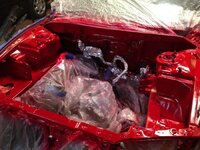
The car needed a lot of attention all around and eventually developed rod knock. That is where this build starts.

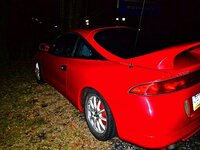
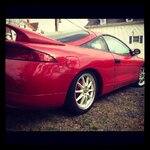
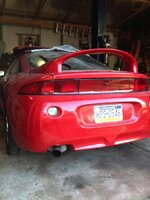
Here is a picture of the escort I sold and the eclipse I bought.

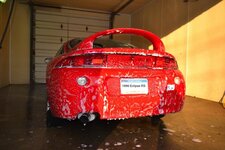
My plans for the car are to just clean it up and develop a nice daily driver.
 

Attachments

  • escort.jpg
    escort.jpg
    79.7 KB · Views: 97
  • 2.jpg
    2.jpg
    45.3 KB · Views: 533
Last edited:
The wheels were in horrible shape so I used some elbow grease and cleaned them up pretty good. Also the previous owner wired in, actually 1/2 wired in an alarm system so I will be cleaning that up also.
 

Attachments

  • better.jpg
    better.jpg
    45.8 KB · Views: 496
  • wheel.jpg
    wheel.jpg
    49.5 KB · Views: 94
  • wires.jpg
    wires.jpg
    47 KB · Views: 94
  • clean.jpg
    clean.jpg
    49.6 KB · Views: 100
Well I started the tear down on the motor because of the rod knock I heard. Also I am going to repaint the engine bay while the motor is out.

The only aftermarket parts are:
BBP header & down pipe plus some no name muffler
AEM intake and filter
red spark plug wires
17" ADR sudoku wheels

There were fuel and oil leaks all over the place, I am surprised the car even ran. If you look on the last picture, the fuel rail has a return line that the previous owner blocked off. Must be a different year fuel rail because there is no line for the return to connect to.
 

Attachments

  • engine 5.jpg
    engine 5.jpg
    43 KB · Views: 88
  • engine 3.jpg
    engine 3.jpg
    57.4 KB · Views: 93
  • engine 2.jpg
    engine 2.jpg
    57.9 KB · Views: 84
  • engine 1.jpg
    engine 1.jpg
    55.7 KB · Views: 87
  • engine.jpg
    engine.jpg
    39.6 KB · Views: 104
I got the motor pulled out of the car. As I thought the number 4 bearing did spin and get chewed up. Also the number 2 bearing was scorn in the middle. I did start to get the engine bay ready for paint. However, I will just be spray bombing this with the factory color in spray cans. That is it for now, more updates after the engine bay is painted.
 

Attachments

  • spun .jpg
    spun .jpg
    44.2 KB · Views: 91
  • spun1.jpg
    spun1.jpg
    47.4 KB · Views: 91
  • bay.jpg
    bay.jpg
    49.1 KB · Views: 92
  • bay1.jpg
    bay1.jpg
    48.2 KB · Views: 87
  • motor out.jpg
    motor out.jpg
    50.9 KB · Views: 86
Last edited:
Well I got the engine bay painted. I am pretty satisfied with it considering it only costed around $50. I also started to bolt some of the things back up. I have to start working on the wiring as it is currently a mess.

Also put on the rear bumper, 2GB SWAP!
 

Attachments

  • paint1.jpg
    paint1.jpg
    46.7 KB · Views: 89
  • paint.jpg
    paint.jpg
    49.3 KB · Views: 82
  • 2gb.jpg
    2gb.jpg
    47.3 KB · Views: 99
  • paint2.jpg
    paint2.jpg
    63.8 KB · Views: 77
I got the motor back from the machine shop.

valve job with supertech valve seals
head/block decked for MLS
head/block hot tanked
crank polished (got a different one, not the one that spun a bearing)
block honed


So I am starting to assemble it now. I picked up the mopar bedplate sealant and the lucas assembly lube (love that stuff).

I also got some pt cruiser lifters/rockers!
What is the deal with using 4g63 parts? what all is an "upgrade"? just the springs?
Pictures of how things are going. (coming soon)
 

Attachments

  • crank.jpg
    crank.jpg
    59.4 KB · Views: 84
  • block.jpg
    block.jpg
    56.8 KB · Views: 76
  • head.jpg
    head.jpg
    54.2 KB · Views: 88
Last edited:
Some more progress of the motor coming together. Things are going well for the most part. (about damn time) I pretty much just have a few bolt ons to do and then drop it in the car.:rocks: 
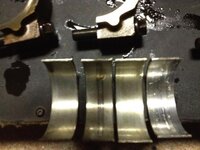
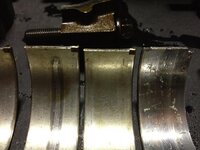
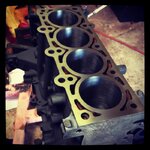
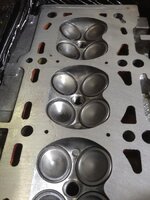
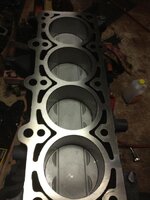
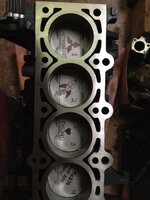
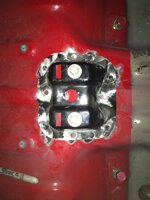
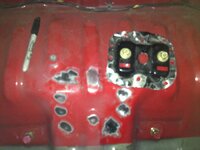
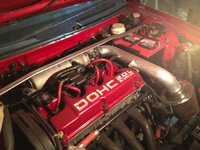
Oh and check out the art work on the pistons.
 

Attachments

  • pistons.jpg
    pistons.jpg
    40.7 KB · Views: 95
  • piston 1.jpg
    piston 1.jpg
    43.3 KB · Views: 94
  • motor.jpg
    motor.jpg
    55 KB · Views: 80
  • valve .jpg
    valve .jpg
    56.1 KB · Views: 80
  • longblock.jpg
    longblock.jpg
    64.5 KB · Views: 90
Lookin good! Lose the rear drums, dont wanna smash into anybody after all that hard work.
 
Lookin good! Lose the rear drums, dont wanna smash into anybody after all that hard work.

I plan to lose the drums during spring break. I have everything I need finally.

I have a lot to update now. I redid the interior which involved a leather upgrade and cleaning the carpet (was filthy) now looks factory new.

More about the interior:
For a leather upgrade in the RS model you need to convert the rear 1 piece bench into a 2 piece. I had to drill out a turbo model rear bench bracket and weld it in mine. (See pics). For the carpet, I just put it in a big garbage can (clean) and filled it with water and laundry detergent. I let it sit for a day and then pressure washed it. If only I had a before picture.

Also I got the motor and transmission bolted into the car. I upgraded to the poly bushings.

Oh and please excuse my method of motor installation, the hoist I had blew a seal.
 

Attachments

  • done.jpg
    done.jpg
    59.1 KB · Views: 86
  • motor no trans.jpg
    motor no trans.jpg
    44 KB · Views: 80
  • motor drop.jpg
    motor drop.jpg
    59 KB · Views: 82
  • assembly.jpg
    assembly.jpg
    40 KB · Views: 73
  • bracket 1.jpg
    bracket 1.jpg
    42.3 KB · Views: 87
  • bracket2.jpg
    bracket2.jpg
    33 KB · Views: 69
  • bracket0.jpg
    bracket0.jpg
    48.4 KB · Views: 83
  • leather.jpg
    leather.jpg
    40.1 KB · Views: 76
Last edited:
The girlfriend got me some HID's so I installed them and wired them up. I used the factory harness from the stock headlights so it was plug and play.

I have some minor odds and ends to tie up until the first start up.
 

Attachments

  • on.jpg
    on.jpg
    39.1 KB · Views: 68
  • parking.jpg
    parking.jpg
    37.1 KB · Views: 76
  • light2.jpg
    light2.jpg
    52.2 KB · Views: 85
  • lights.jpg
    lights.jpg
    44.6 KB · Views: 73
I am finished with this project for now, I have done a few oil changes already and have about 500 miles on the car. I really like it for a daily driver, so far it has not given me any problems. I will rip apart the filter from the first oil change soon and see what is in there.
 

Attachments

  • 1.jpg
    1.jpg
    67.4 KB · Views: 86
  • 3.jpg
    3.jpg
    57.8 KB · Views: 84
  • eclipse.jpg
    eclipse.jpg
    49.7 KB · Views: 81
Why is it always #4 that spins on these dam engines I've lost 2 that way and know a few others that have too. Hahaha nice build by the way.


Low on oil and turning right I believe. Since there is no baffle in the oil pan, the farthest bearing (#4) is oil starved and spins.
 
nice man i just bought a 1997 rs from a dude with a hard knock but its a smokey gray and i bought the same stock motor and a 420A but i am currently out of money but ill tend to the build soon but it looks reall good mate!
 
Support Vendors who Support the DSM Community
Boosted Fabrication ECM Tuning ExtremePSI Fuel Injector Clinic Innovation Products Jacks Transmissions JNZ Tuning Kiggly Racing Morrison Fabrications MyMitsubishiStore.com RixRacing RockAuto RTM Racing STM Tuned

Latest posts

Build Thread Updates

Vendor Updates

Latest Classifieds

Back
Top