The Central Hub for DSM Community and Information

For 1990-1999 Mitsubishi Eclipse, Eagle Talon, Plymouth Laser, and Galant VR-4 Owners. This is where the DSM platform history is documented and archived. Log in to help us in our mission, and to remove most ads from the browsing experience.

IMG_3567.JPG

Sun-Burned ’99 Spyder GS: Revived

2.4L DD

This site may earn a commission from merchant affiliate links, including eBay, Amazon, and others.

Just got caught up on the build from the beginning. It’s a great build, I appreciate all the photos to go along with the write ups. I wanted to get caught up ‘cuz I’m headed over to the 2,000 mile thread next. Looking forward to the next update.

Thanks. We all spend so much time screwing around with our DSMs, we forget how fun they are to drive since we tend to be on edge about the last repair, or listening for new noises.

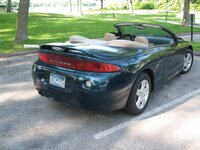
It was very fun to drive for several days, many hours each day and still smile when getting in the car, looking forward to the roads ahead.

We’re not trying to be different just to be different, but rather to customize the car for our uses, and reliability. A lot of the build was fun, but having to do something a second or third time takes the smile off your face quickly.
 
22. Rotor Warp

Took the brake calipers to a local shop that turned them and removed the warping. So nice to not have steering wheel drama when using the brakes again!

The constant use of the brakes in the cold and hot temps proved too much for the front caliper paint. It is no match for the expansion and contraction cycles that brakes go through.

One "problem" was that the calipers were new when we painted them, so when the paint came off, the calipers were shiny silver, and that meant that no paint stood a chance to grip onto the surface. So we let the calipers 'age' during the drive north and get a weathered surface to hold the paint.

When taking the brakes apart, there were hints of rust on areas of the backing plate, so that got wire brushed, coated with POR-15, and then sprayed with black gloss.

Front Disc Back Plate.jpeg


Then the calipers were cleaned and painted with 2-part epoxy caliper paint

Caliper Paint.jpeg


Caliper Paint Finish.jpeg


We let them harden for 48 hours and then reassembled

Brake Assm Complete.jpeg


The non-contact areas of the discs were painted to avoid them rusting when driven in the rain. Yes, that's high temp anti-seize on the disc face and studs. Okay, it might have been a little excessive as we found out during the test drive that redistributed it around the inside of the rim. LOL

Anyway, just feels good to have the brake project wrapped up.
 
Last edited:
The lower lip of the front bumper takes a beating, even when trying to be careful. A while back, we sprayed the bottom edge with undercoating to take the hit, instead of grinding off more of the actual bumper material.

You can see in this first photo, it was sacrificed as intended:

Lip Scuff.jpeg


Without sanding it all down and smoothing it all out, we applied a new layer of undercoat after degreasing the old layer

Lip Spray.jpeg


Not perfect, but it will work as intended and no one will see it unless they're working underneath it.
 
23. Custom Header

As you've seen in the earlier pictures, the eBay 4-2-1 header was chromed and connected together using two-bolt gasket unions, which repeatedly loosened and leaked after many miles, Both embarrassing to hear and frustrating to have to keep repairing.

The final straw was our cross country trip. Apparently, parts of the tubing walls had corroded from the inside out, most likely because of not being properly neutralized after chroming. The extended hours of heat while on the road ultimately blew out the sidewall (shown in previous post), and the too-stiff flex pipe forced a seam to crack.

Spyder Header Crack.jpeg


The header could be replaced with another online model, but the same problems would return, so it was time to ask a friend to fab up a header that was both stronger and used v-bands for connection points.

Here is his design using a spare head for mock up:
Spyder Header 1.jpeg

Spyder Header 2.jpeg


Checking for key clearances:
Spyder Header 3.jpeg

Spyder Header 4.jpeg


Incorporating a merge collector and spike:
Spyder Header Diverter.JPG


And final product! Beautiful welds and very clean design:
Spyder Header Finish.JPG


Here's how it looks installed:
Spyder Header 5R.jpeg

Spyder Header 6.jpeg

Spyder Header 7.jpeg


The combination of the flow design, heavier gauge tubing and the scavenging efficiency give the car a rumble of an exhaust note, both idling and accelerating, and we've already noticed how much less throttle input is needed for acceleration or cruising.

This is an exciting addition! We're very thrilled it added a deeper dimension to the car and we get to enjoy it, both for its impressive looks, and also while we're driving.
 
Last edited:
You're an inspiration. The breadth of knowledge and modifications you've done to your car is impressive. Your write ups are extremely helpful, too. Know that you're helping other DSM junkies in their garages, late at night, with your amazing knowledge.
 
You're an inspiration. The breadth of knowledge and modifications you've done to your car is impressive. Your write ups are extremely helpful, too. Know that you're helping other DSM junkies in their garages, late at night, with your amazing knowledge.

Thank you for your kind words. Why not customize the car the way it works best for each owner?

I never thought the mods would get this far, but the more we use the car as a summer daily, the ideas just keep coming.

There are several more custom mods planned for this winter and spring. We’ll document those as well to help blaze a trail for other owners that might want to do similar upgrades.
 
24. Fuel Pump Rewire

It has long been on the To-Do List to rewire the fuel pump. Finally got that done. Replaced the fuel pump, pickup filter, fuel filter and hose sections at the same time.

What made this happen now is, in another thread we had discussed battling strangely dropping fuel pressure after a few minutes of running. It was not obvious, but the flex line on the return side of the tank end had a small leak that was sucking air and "carbonating" the fuel in the tank, so eventually the pickup was drawing a mixture of fuel and bubbles. So happy that's over with.

New Fused Battery Power to new Secondary Fuel Relay mounted behind rear seat:
IMG_1191.jpeg
 
Last edited:
25. New Ignition Coils

Most DSMs have the factory ignition coils because they seldom seem to go bad. Initially chasing a small misfire, we noticed that the coils were one item that had never been replaced and given their age, it was unknown if one or both were healthy or weak.

For those that have replaced their coils, you already know what we found out: The wire harness connection to the coils uses threaded terminals instead of a plug. Fortunately, these terminals are different diameters to prevent someone from reversing the polarity, but we modified our "Y" harness, keeping the large harness plug in place and converting the individual coil connections to ring terminals.

Note: RA shows the terminal coils for every application except the set it sells for the 4G63 GSX model, with two coils already mounted on a bracket, with "Y" harness for $100. Since these were no listings for the 4G64 that included this option, we ordered the Delphi coils.

IMG_1114.jpeg


Challenge #2 happened when we discovered that the design of these is "flipped" from the original Diamond coils, so we had to slightly enlarge the square holes in the mounting bracket to fit the new coils.

And then came Challenge #3: The spark plug wire connection uses the larger size terminal on the spark plug wire. We didn't have any of the larger ends on hand to crimp on at the moment, so we spread the smaller terminals to produce a snug fit into the coil.

IMG_1120.jpeg


Overall it is a nice fit and the spark is plenty healthy, producing a smooth idle and plenty of punch under load. We're happy with the coils but will definitely be making a custom bracket at some point that compensates for the slightly larger coils and allows the 3 points of bolts onto the engine.

IMG_1122.jpeg
 
Add Value - Be Respectful - No Trolling - No Misinformation - Participate Often!
Support Vendors who Support the DSM Community

Latest Classifieds

  • For sale 2g 2G Mishimoto Radiator & Fan Shroud
    2G Mishimoto Radiator & Fan Shroud $200 + shipping and paypal feesYou must be registered to...
    • jersygsx
    • Updated:
    • Expires
  • For sale 2g 2G Power Window Switches ( tested and hardware included )
    2G Power Window Switches $55 + shipping and paypal fees* Tested 6/2/26 * Hardware included *...
    • jersygsx
    • Updated:
    • Expires
  • For sale VIRGIN 4G63 6-BOLT TURBO HEAD
    Came off a virgin stock AWD Auto 1G DMS (91), also have matching block and crank which are also...
    • The_Partout_Spot
    • Updated:
    • Expires
  • For sale 1G DSM 4G63 6-BOLT TIMING COVER
    Used, see condition in photos. Buyer covers shipping / fees.
    • The_Partout_Spot
    • Updated:
    • Expires
  • For sale Garage clean out
    Changing setups on the car and getting rid of some stuff as well that's been laying around. Will...
    • 92GSXtacy
    • Updated:
    • Expires
Back
Top