The Central Hub for DSM Community and Information

For 1990-1999 Mitsubishi Eclipse, Eagle Talon, Plymouth Laser, and Galant VR-4 Owners. This is where the DSM platform history is documented and archived. Log in to help us in our mission, and to remove most ads from the browsing experience.

IMG_9070.jpg

Prubingst's 1995 Eclipse GS-T

1995 Eclipse GS-T

This site may earn a commission from merchant affiliate links, including eBay, Amazon, and others.

what's the code on the check engine light?
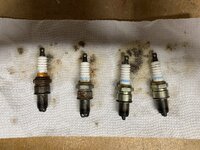
Hey - got it to throw again and it's P0302 - Cylinder 2 misfire. Since I've got a new set of NGK spark plugs and wires, I'm going to see if replacing them on cylinder sorts out the issue. I was away on work travel last week so had some time to research and @chrisman287 gave me some good guidance.

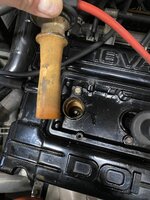
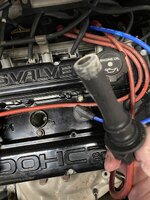
Got an hour yesterday to get started. Gapped the new plug according to spec, took off the old wire, went to remove the old plug and it wouldn't budge. Sprayed some WD-40 on it last night and going to see if I can get it free. If that doesn't do it, then I'll need to apply some heat and see if i can get her loose. I'm being really careful not to apply too much pressure. Last thing i want is a snapped spark plug.

My thinking is if it's not an ignition type issue, then it's most likely fuel system related. Probably cleaning/replacing injectors is next up. Open to any and all suggestions as this is new for me.
 
Stuck plug is no fun. How hard did you lean on it? I had one somewhat recently in a 4runner and I had to lean on it all the way out. As expected the threads were damaged in the head. I used one of these to repair the thread and thankfully didn't have to put an insert in. You won't know how bad it is until it breaks free. Once you're there you're committed. Hopefully just stuck on the seat and not the threads.
Screenshot_20250113_203626_Amazon Shopping.jpg
 
Stuck plug is no fun. How hard did you lean on it? I had one somewhat recently in a 4runner and I had to lean on it all the way out. As expected the threads were damaged in the head. I used one of these to repair the thread and thankfully didn't have to put an insert in. You won't know how bad it is until it breaks free. Once you're there you're committed. Hopefully just stuck on the seat and not the threads.
View attachment 753774

I haven't leaned on it too hard using a 3/8" drive ratchet. Didn't go for a breaker bar yet. A few things I tried last night, but unsuccessful. Used a Wagner heat gun on it for a few minutes to try and warm it up, but no movement. Then I tired getting the plug out of cylinder 1 to see if 2 was just problematic, but 1 didn't budge either. It's been sub 30 degrees here and the car has sat unstarted for about 9 days. My suspicion is the heat gun just ain't gonna get it hot enough. I checked this afternoon and the WD-40 seems to be sitting in there vs. penetrating. So I think next I will start it up for a few minutes to better warm the engine, let it cool for a bit, then try to crack it loose.
 
Hmm....not sure I'd consider that stuck if all you had was a 3/8 ratchet. Unless it was a long ratchet. Regular length 1/2 for me. If I can't crack it with that it's "stuck". The 4 runner I mentioned took a 2ft breaker bar. I didn't have to lean on it but it required force all the way out.
 
All it took was warming the car up and the spark plugs came loose no problem. Though, when I removed the wire boot from 4-3, 4 looked like it had gotten covered in rust and 3 had some corrosion. All 4 have now been thoroughly cleaned and looking better. Theres a pic below with what each plug looked like after removal in order of 4-3-2-1 With new plugs and wires it’s idling smoothly like normal. Too bad we just got snow. Once the roads aren’t too salty I’ll do a driving test
 

Attachments

All it took was warming the car up and the spark plugs came loose no problem. Though, when I removed the wire boot from 4-3, 4 looked like it had gotten covered in rust and 3 had some corrosion. All 4 have now been thoroughly cleaned and looking better. Theres a pic below with what each plug looked like after removal in order of 4-3-2-1 With new plugs and wires it’s idling smoothly like normal. Too bad we just got snow. Once the roads aren’t too salty I’ll do a driving test
Something obviously got into the hole on 4. I assume it's getting new wires and plugs? I don't care what ngk says i use a little antiseize.
 
Parts! 8 months searching for the flywheel inspection cover. Oily AF. Cleaned up just fine. The mirrors are going to be my test batch for reprainting with a gun this time around before I do it on the originals. The paint color in the mirrors I haven’t seen before as an oem 2g color. I might polish these to bring the color up for kicks before I prep them.

IMG_9952.jpeg


IMG_9954.jpeg


IMG_9955.jpeg


IMG_9956.jpeg


IMG_9957.jpeg


IMG_9958.jpeg


IMG_9953.jpeg
 
Getting started on the mirrors repaint. I’ve got a week off from work with my kids spring break so hoping to make progress on this and other things. Most pics are of disassembly to document the process. I discovered inside both mirrors some critters made a few honeycomb looking homes for themselves. Last pic is the first pass at sanding with 100 grit.
 

Attachments

took most of this past year to enjoy driving the car. Now with the holidays done and my workshop freed up I’m picking back up on the mirrors. Good progress on sanding they are basically ready for a filler coat. Also got the flywheel cover stripped to the metal and fresh coat of por-15 high temp aluminum paint. Happy with how it’s come out. Will do one more coat before heat curing.

IMG_0547.jpeg


IMG_0546.jpeg
 
Assembling mirrors can be very tricky, especially if you are installing new mirror glass becasue they come with a new padding in the back that needed to be compressed to secure the snap ring. Good luck!
 
Assembling mirrors can be very tricky, especially if you are installing new mirror glass becasue they come with a new padding in the back that needed to be compressed to secure the snap ring. Good luck!
Thanks for the tip! I have the mirror glass and full assembly for the originals currently on the car, and the ones from these replacement mirrors. I'm expecting to swap the glass and assembly from the originals bc they're in perfect working order, but as always 🤞🤞
 
coat #2 on the flywheel cover is done. Spoke to a few people yesterday and coming to conclusion from their advice; it’s not necessary to heat cure it for several hours and the finish will hold up just fine. So my next steps are to get the car back up and install this thing when I get a chance. Will be nice to have the peace of mind this part is done.

Mirror sanding continues before filler but it’s almost there.
 
Sometimes you go to the garage to do and sometimes you go to learn…I planned on the former this morning and ended up with the latter.

I finished repainting and curing my flywheel cover this this week. Woke up early, got the front end up on stands, all my parts ready to go, get under the car, and learned there is no way the flywheel cover is going on without removing several things including the oil pan. That wasn’t happening before my kids wake up, but now I know more. The flywheel is rusty. Another decision to be made there.

And so I took the opportuntiy while underneath to look around and see what else I can learn which includes:

The exhaust is in fact a turbo back. Appears to be 3” but next time I’m under will measure properly. The wastegate is an HKS unit. Could not find any other markings about that. FMIC is a Spearco unit. IC piping appears to be 2.25”, but again will measure. Struts are Tokickos. And the front bumper cover had a fiberglass repair on the back side. The turbo is a mitsu unit and looks to be a T25. Inlet is 2.25”.

Regarding the turbo it’s running 1.0 bar. But the pull doesn’t feel as strong as I remember in my previous GST and GSX from around 2002-2006. Those both were running at about 12 psi on the stock T25 with MBC, SMIC and hard upper piping with 1G BOV recirculated. In the current state, I’m planning to boost leak test and resolve any issues. Tester is in hand. Would love that done before summer.

So. Flywheel cover job is on ice for a bit till I figure out what else I’ll need/want to do while other stuff is removed. If anyone has suggestions, on good maintenance tasks or things to watch out for, fire away. Goal still remains to get all general maintenance done before I move on, but I’m happy with the baseline I have.

IMG_0566.jpeg


IMG_0564.jpeg


IMG_0561.jpeg


IMG_0560.jpeg


IMG_0559.jpeg


IMG_0558.jpeg


IMG_0557.jpeg


IMG_0554.jpeg
 
Sanding, filler, sanding, spot putty, more sanding. Rigged a wire hanger inside each to suspend for priming. I want to get color on the inside of these too and this setup worked well. Still have some high/low spots before I prime again with gray, guide coat them, then move on to red primer. The weather and wind cooperated well so far but now the pollen is out in here so I’ll be waiting some more till that’s gone and temps rise a bit before more spraying. Overall happy with the progress so far. Doing this stuff outside to save my garage from overspray has its own challenges to work around. On the plus side I’ve been driving the GST a fair amount early spring. Need to burn that winter gas out. Not too excited for paying $5.12 per gallon at the pump for 94 😳

IMG_0671.jpeg


IMG_0670.jpeg


IMG_0669.jpeg


IMG_0668.jpeg


IMG_0666.jpeg


IMG_0665.jpeg


IMG_0667.jpeg


IMG_0664.jpeg


IMG_0663.jpeg


IMG_0662.jpeg


IMG_0661.jpeg


IMG_0660.jpeg


IMG_0659.jpeg
 
Add Value - Be Respectful - No Trolling - No Misinformation - Participate Often!
Support Vendors who Support the DSM Community

Build Thread Updates

Latest Classifieds

Back
Top