The Central Hub for DSM Community and Information

For 1990-1999 Mitsubishi Eclipse, Eagle Talon, Plymouth Laser, and Galant VR-4 Owners. This is where the DSM platform history is documented and archived. Log in to help us in our mission, and to remove most ads from the browsing experience.

20250117_164758.jpg

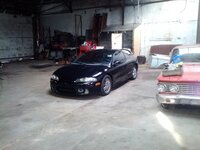
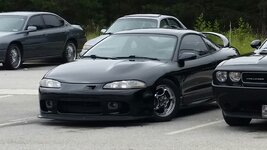
OZ Edition - Black on black

'99 OZ Edition to have fun on back roads and cruise around.

This site may earn a commission from merchant affiliate links, including eBay, Amazon, and others.

Finally got my car back on the road.

I did get a bit demotivated seeing it sit in my garage, but pushed through and got my manual conversion done. So glad I did. I also installed a new to me Fluidyne radiator that was actually made for the non-turbos back in the day and installed Morimoto fans and shroud (the stock ones wouldn't clear the header). Taking it easy and just getting some miles on it before continuing tinkering in her.

I bought some cheap Vors TR4 wheels and they do have a nice OEM+ feel to them and fill the wheel wells a bit better.

I just need to keep driving to let the suspension settle back down, since it's been off the ground for a long time. Man, I forgot how loud the Iceman intake/custom AMMFAB intake manifold make my car. 😄

image000000(1).jpg
 
Well, I took the car to get aligned. My caster is off 2° on one side relative to the other. The mechanic went over everything, and the only thing he found is the bushings on the lower s-bend arms have some sag. That's on me. I had the car supported at those spots with jackstands for close to two years. I drove the car and I still have a pull to the left during acceleration and it pulls to the right under braking. With everything being apart during my manual swap, and the bushing issue, I figured it would be smart to go ahead and replace all front control arms. Hopefully, Rock Auto will have my parts to me by Tuesday.
 
Been driving my car and noticed that after swapping over to manual, my front end sits a little higher. Shaving 126 lbs. will do that. So, I ordered Tein S-Tech springs so I can bring the front back down, only to get an email from Vivid Racing that there were no more in the States and they put an order in to Tein. Kinda cool, but damn it makes me realize how old these cars are and how parts are now becoming special order items. I did get them 3 weeks ahead of schedule, so I'm planning on installing them when I get a chance. After driving around enjoying my car, I started getting the battery light on my dash to occasionally turn on. (Looking back, even when I had my automatic trans in, I would have my car try to die occasionally coming to a stop. I just thought it was because of my cams and my car not being a manual.) It started getting more persistent and last night I was almost unable to start my car when I went to get some coffee with my wife. And before the drive, my dash lights and headlights started flickering when I tried turning my fogs on. When I got home and put my meter to the battery, I got 12.4 vdc. Not good. I had my wife turn the car off and back on and it jumped back up to 13.6 vdc and it started creeping back down. Needless to say, getting used to long lead times for parts and being as proactive as I can, I bought a new Denso alternator to install when this sort of thing happens. Since this is the original alternator and the car has 170k on the clock, I got my money's worth. I will try getting an alternator shop to rebuild it because I have little faith in parts store alternators.
 
So, I decided to make a pipe to better hook up to my Iceman intake to my AMMFAB intake manifold. Since it does sit lower and further back, and the original Iceman piping literally fit inside my 60mm TB, I wanted to make it clean looking while maximizing airflow. I was previously running a 45° union linking the two sections of piping and a 90° turn up to keep my intake from sitting too low. This, in my opinion, cleans up the look of the engine bay, returns the filter directly behind the opening, and minimizes bends. VHT wrinkle for the win. Lol. Almost perfectly matches the Iceman's texture. I also went ahead and put new weatherstripping on my sunroof. The rattling finally got to me. Lol.
1000236434.jpg
 
I've been having an intermittent short since doing the manual conversion. At first, I thought it had something to do with my headlights or foglights, since I'd see my dash flicker once I turn the headlights or fogs on, but I finally caught it messing up during the day. My head unit shut off for a second and my car hesitated, which I previously only saw at night. On top of that, I randomly get the battery light on the dash to light up, which turning the car off and on makes it go away. A different alternator did not help.

So, as I started digging into the wiring I spliced to get the conversion done, I figured I'd just bite the bullet and buy a harness out of a manual car. There are too many unused plugs near the transmission, and if I'm going to start going through the harness, ripping out the wires I no longer need, it would make sense to just swap out the auto harness for a manual one.

The one major benefit to the manual harness (and what I used to "justify" going on Ebay and buying one) is that the grommet where the wires go through the firewall will give me more room to run wiring for my gauges, since I will no longer have wires going to the TCU and the overly complex transmission control modules.

I'm going to unplug the ETAX relay to see if that does anything in the short term, since Import Alliance is right around the corner and I really want to take my car. Priorities.😆
 
I went ahead and replaced my Atoto touchscreen head unit for an Alpine single din. As much as I liked having the modern convenience of a touchscreen, I couldn't get the screen dim enough for night driving and the sound was way too bass heavy. Plus, the Alpine just has a more period correct look (and the ability to perfectly match the buttons to the rest of the car).

While I had the center console apart, I did address the issue with my shifter feel. The OBX shifter had a stiff feel, basically making me offset the resistance with a weighted knob. I went ahead and got a nylock nut and replaced the nut/lock washer combo the shifter came with. I finally was able to tighten it down to where there was no side to side slop, but still moved freely. It's all about the little wins.
 
It's been a while since updating my progress. I did finally install the harness and got everything good. Surprisingly, the harness under the dash actually had the plug for the clutch safety switch taped and ready to go. Gotta love it!

While working on the harness, I decided to get and install an oem intake manifold for the time being. I did dremel the flange to smooth out the transition for the 60mm TB. I do need to modify the AMMFAB intake manifold to make it fit better, but in due time.

I also found an Ebay header that was a weird 'kinda Greddy' style. Basically, longer runners than what's out there nowadays. I like the longer design because the bends are smoother. I did have to do some 'mechanical persuasion' on the back two runners to improve the clearance at the water pump piping. Having less than 1/16" of an inch was just too much of a risk. As much as I hated clearancing the header, at keast it was just a cheapy part.When I get some time, I'll refinish my OG Greddy header, cleaning it up to get some shine back.

I also reinstalled my washer reservoir, but since I have a Neuspeed bar, I did add some spacers (metal for the brake reservoir, plastic to match the washer reservoir) and bent the relay bracket to help clear the bar. All of the little details. Nothing anyone will really notice, but I will.😁 Also changed out the heater pipe with a refurbished piece I found online.

20250720_161121.jpg


20250720_171533.jpg


20250720_172822.jpg
 
After having the lower section installed on the header, I noticed the alignment was a bit off and a little too close to the oil pan ( about 1/16"), and seeing how the header would flex due to very thin walled runners, I decided to try my hand at cleaning up my old Greddy header. Not necessary, but after all of the work under the hood, having a 20 something old stained header right up front is something that wouldn't sit right with me.

So, I started my hand at giving new life to the runner section that would be visible when the hood was up. So far, I'd say I have easily 6 hours of scotchbrite and sandpaper, I think I'm a solid 70% there. You can see how stained the merger still is for comparison.

I was going to go for a polished look, but the brushed look is starting to grow on me, so I might just go for that look. I'm not aiming for perfection, just breathing some new life into some old stainless steel, leaving a touch of patina. I just have to figure out how to get to the runner #2 section right behind #s 3 and 4 with the scotchbrite.

Funny how a simple "I just want the car back up and running" turns into "Well, while I'm there..."🫤

20250810_192744.jpg
 
Finally got my car up and running. Felt good to hear it run. Talk about an old-school setup. Something about a slight lope at idle that brings a smile to my face. I remember when I bought the BC stage 2 NA cams, they were being discontinued, so I guess I can add that to the list of obsolete parts I have accumulated over the years.
20250817_183900.jpg


I think the header came out ok. Looking at the firewall, I need to get the DCP aluminum clutch reservoir bracket and radiator brackets to complete the look. The old, rusty bracket is definitely not doing it for me.

Now, on to the back. I need to fix the upper connection to the rear defrosted (the metal tab for the connector broke off). No idea what the best solution for that is, so any suggestions will be greatly appreciated. And I need to make a plywood replacement for the spare tire cover, since years of having a sub have made the flimsy factory cover cave in a bit.

I'm hoping that all of the work replacing the engine harness has fixed my intermittent electrical issue, but if it didn't, at least the other harnesses won't be as bad as what I already did. I know, I know... famous last words...🤣
 
I need to fix the upper connection to the rear defrosted (the metal tab for the connector broke off). No idea what the best solution for that is, so any suggestions will be greatly appreciated
Same here eventually. Curious as well. I was thinking just re-solder it but I may be incorrect.
 
I had a bit of work done on my car. Did the timing belt and water pump, backflushed my heater core (actually in pretty good shape), thermostat, and temporarily installed an oem radiator. I was chasing an issue where my heater core was blowing lukewarm air when it was cold and the temp gauge was fluctuating a bit. It never overheated, but seeing the needle move like it did made me too nervous. Everything is fixed now, so when I find a good shop, I'll have my aluminum radiator pressure tested and cleaned before re-installing it.

After driving it around bit after doing all of the above work, my car started stalling out, which ended up being the crank sensor starting to go out. But, to get it home, I had to use the e-brake to slow down while I kept the revs from dropping too low and stalling. That started another adventure in maintenance.

I developed a clunk that ended up leading me to the parking brake, which I am embarrassed to say I never serviced since owning the car. While working on that, I noticed my rear pads were wearing unevenly. Found the slides starting to stick, so cleaned everything up, regreased the slides, and threw new pads on. And, while I was working on all of that, I decided to spin the rear hubs to check their condition, and of course, one of the wheel bearings was going bad. Only way I could describe the sound was rain on a metal roof. So, I did both rear hubs. Another old car rabbit hole of repairs.🤷

After all of the work on my car, I decided to gift myself a small present. As much as I love my Grip Royal steering wheel, the plastic button took away from the overall feel inside the car. I found an aluminum horn button (not just a surround) from Forever Sharp Steering Wheels. I just got black bolts to make it more subtle.

20260209_165751.jpg

I think it gives it a bit more old-school, mature feel. Now I just have to finish up my glovebox-mounted gauge setup (I'm bringing the 90s back.🤣 ...but with a little bit of old man restraint.
 
I did a compression test with a better tester, since the one I originally had was giving me low readings (130psi across all cylinders), possibly due to the fact that it didn't have a Schrader valve. So, with BC stage 2 cams (slight lope) and 176k miles on the bottom end, my results were pretty healthy: 180, 180, 179, 182. Not bad at all for a high mileage engine.👍
 
So, in typical "I drive an old car" fashion, I noticed a ticking sound when I pulled the car in the garage. I told my wife to turn the car on, run it for a little, then shut it off, rinse and repeat. I thought something was going on inside my engine, so I grabbed my trusty stethoscope and starting probing around. Turns out, the sound is coming from the timing belt area. My timing belt's tracking is also a little wobbly, which is probably means something the belt rides on is either loose or about to fail.

I got a whole 3 weeks of enjoyment from my car (well, more like a week and a half of good weather driving) and now I get to redo what I just did. Since I have barely any time on my Gates blue belt, I'm reusing it, but replacing every other component.

And now I'm going to channel my old guy energy, look at the parts I installed, and say how they don't make them like they used to.🤣 I'm just glad I caught it before something failed.
 
Add Value - Be Respectful - No Trolling - No Misinformation - Participate Often!
Support Vendors who Support the DSM Community

Build Thread Updates

Latest Classifieds

Back
Top