The Top DSM Community on the Web

For 1990-1999 Mitsubishi Eclipse, Eagle Talon, Plymouth Laser, and Galant VR-4 Owners. Log in to remove most ads.

Please Support Fuel Injector Clinic
Please Support STM Tuned

Any 1G Clutch Pedal Pic Requests?

This site may earn a commission from merchant
affiliate links, including eBay, Amazon, and others.

This site may earn a commission from merchant affiliate links, including eBay, Amazon, and others.

<TABLE>
<TR>
<TD><B>Step 6</B></TD>
</TR>
<TR>
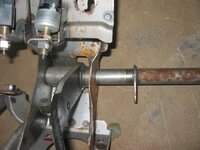
<TD>After you remove the bolt in Step 5, you can pull the brake pedal carrier frame off its hollow axle as shown in the following picture. Note the plastic bushing at each end of the brake pedal pivot point. You will be replacing each of these with the new ones that you bought from Mitsubishi.
</TD>
</TR>
</TABLE>

<IMG SRC=http://www.dsmtuners.com/forums/attachment.php?attachmentid=58101&stc=1>
</IMG>
 

Attachments

  • Step 6 Brake Pedal Carrier Removal.JPG
    Step 6 Brake Pedal Carrier Removal.JPG
    69.9 KB · Views: 2,834
<TABLE>
<TR>
<TD><B>Step 7<B></TD>
</TR>
<TR>
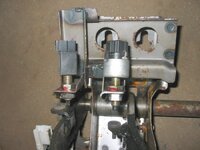
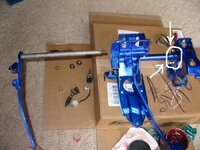
<TD>OK, this step is optional. You might have noticed how my pedal assembly has various patches of nasty rust on it. Apparently, it is made of plain carbon steel with NO rust prevention coating on it. No paint, no coating of any kind. Any drop of water on it will cause rust to form. Well, I just can't put something that looks like a piece of crap back into my car, after all that work taking it out and disassembling it. So, I decided to COMPLETELY disassemble this thing, then sandblast and powder coat it before reassembling it. You don't HAVE to do this step, so if you don't care how your pedal assembly looks, just skip ahead to the next step. What I did was take all the rubber stops out of the pedal assembly, and remove the rest of the brake and clutch electrical switches by removing their lock nuts and then unscrewing them. You can see these two switches in the following picture. The switch on the left is only on cruise control equipped cars. If you don't have cruise control, you probably just have a bolt in there. The switch on the right is the brake light switch. The last piece to disassemble is to pull the central axle off the master cylinder attachment frame, by removing the bolts shown in the last picture. For some reason mine only had 2 bolts in it, but I think you are supposed to have 4 in there. There are two more empty threaded bolt holes on mine. I used them all. Oh, and notice how I didn't powder coat the part of the clutch pedal axle that goes inside the hollow axle on the carrier. If you painted or coated that, it probably won't fit in there anymore. So be sure to mask off the areas that you don't want painted or coated!
</TD>
</TR>
</TABLE>

<IMG SRC=http://www.dsmtuners.com/forums/attachment.php?attachmentid=58102&stc=1>
</IMG>

<IMG SRC=http://www.dsmtuners.com/forums/attachment.php?attachmentid=58103&stc=1>
</IMG>
 

Attachments

  • Step 7 Electrical Switches.JPG
    Step 7 Electrical Switches.JPG
    60.4 KB · Views: 2,981
  • Step 7 Master Cylinder Carrier Bolts.JPG
    Step 7 Master Cylinder Carrier Bolts.JPG
    82.1 KB · Views: 2,832
<TABLE>
<TR>
<TD><B>Step 8</B></TD>
</TR>
<TR>
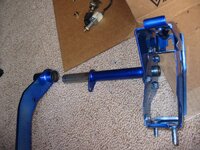
<TD>OK, now we can get on with putting everything back together with the new parts! This is the fun part. The first thing I did was to bolt the master cylinder carrier back onto the central hollow axle, as shown in the following picture. I still don't know why mine only had two bolts in it. Oh well, that has been rectified :)
</TD>
</TR>
</TABLE>

<IMG SRC=http://www.dsmtuners.com/forums/attachment.php?attachmentid=58104&stc=1>
</IMG>
 

Attachments

  • Step 8 Central Axle Installation.JPG
    Step 8 Central Axle Installation.JPG
    104.5 KB · Views: 2,717
<TABLE>
<TR>
<TD><B>Step 9</B></TD>
</TR>
<TR>
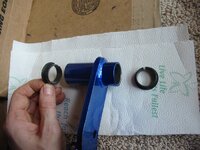
<TD>Now you can re-install the brake pedal into the pedal assembly. To do this, first put a light coating of grease on the two new plastic bushings that you bought for it. Then, press them into the hollow ends of the brake pedal pivot point as shown in the following picture. When you have the bushings installed, you must hold the brake pedal in position in its carrier, and then push the hollow axle (that you assembled in the previous step) through the brake pedal. You should put a light coating of grease on the inside of the bushings before doing this. When you have the axle pushed all the way through the brake pedal, install and tighten the single bolt that holds the central axle to the brake pedal carrier frame (see the picture in Step 5 for this bolt). Now your brake pedal should swing quite crisply :)
</TD>
</TR>
</TABLE>

<IMG SRC=http://www.dsmtuners.com/forums/attachment.php?attachmentid=58106&stc=1>
</IMG>
 

Attachments

  • Step 9 Brake Pedal Bushings.JPG
    Step 9 Brake Pedal Bushings.JPG
    70.7 KB · Views: 2,374
Awesome work so far. Ill be needing to do that this winter. Keep up all the pics! :thumb:
 
I actually replaced the plastic bushings in my assembly with brass ones that i machined. I haven't posted anything on it because i didn't know how the longevity would be but so far so good. Its been in the car for about 4 months and still going strong. I will try to find the pics i took and post them on here tomorrow.
 
Well, I had a bit of a computer failure since then and lost the writeup. I will see if I still have the pictures, maybe I can put it together again :)
 
SO I ordered all new parts from the dealer, got them installed and the first time i pushed my clutch in, it rounded out the keyway enough that i now have slack in it. just repulled it and had it welded. FML:ohdamn:
 
Last edited:
Just wanted to pop in and thank you for the great writeup, though I only used the removal section, and had Shep give it the brass bushing/weld treatment. May have opted for a black powder coating as well if I'd thought about it, but as-is, it matches the rest of the stuff with surface rust under there. Maybe one day. Thanks again!
 
Support Vendors who Support the DSM Community
Boosted Fabrication ECM Tuning ExtremePSI Fuel Injector Clinic Innovation Products Jacks Transmissions JNZ Tuning Kiggly Racing Morrison Fabrications MyMitsubishiStore.com RixRacing RockAuto RTM Racing STM Tuned

Latest posts

Build Thread Updates

Vendor Updates

Latest Classifieds

Back
Top