The Central Hub for DSM Community and Information

For 1990-1999 Mitsubishi Eclipse, Eagle Talon, Plymouth Laser, and Galant VR-4 Owners. This is where the DSM platform history is documented and archived. Log in to help us in our mission, and to remove most ads from the browsing experience.

20200906_150206.jpg

99GSX

This site may earn a commission from merchant affiliate links, including eBay, Amazon, and others.

r3dmak

15+ Year Contributor
82
134
Nov 4, 2007
orlando, Florida
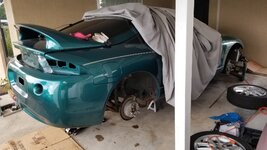
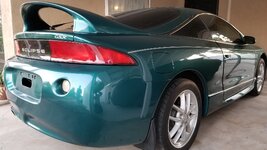
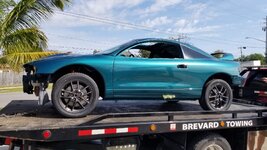
I've always been a fan of 2g eclipses! I was looking to get one but everytime life was getting in the way. Time kept ticking and cars were getting old so, eventually I pulled the triger on what I thought was a good example. The car was good in mechanical order, no peeling or fading on exterior paint and clear coat, even rubber seals were good. Unfortunately it was neglected underneath to the point that almost every nut was seized. After debating on what to do, I eventually decided to restore it. Fast forward a couple of years, I finally mitigated body rust(not completely yet) and painted the engine bay.

20220228_162848.jpg


20220228_162856.jpg


20220301_122319.jpg


20220301_122323.jpg


20220301_154145.jpg


20220301_154158.jpg
 
Last edited:
Well now, got my laziness aside and finally finished up the underbody to my satisfaction. For the most part I used eastwood encapsulator and was suprised to find out that in some areas the rust went thru the encapsulator. After that i went with por15 and it did a great job mitigating rust, preparation was a little tedious and in some areas the finish ended up being dull as oppose to gloss as was described on the ad, not sure why. I did like por15 seam sealer, its flexible enough to fill in the voids and when it dries its rock hard. Next step is slowly assemble the car back.
 

Attachments

A little update, I dropped off some parts to be powder coated and in the meantime decided to work on some other odds and ends. First was the fuel tank, I cleaned it up with some soap and replaced the gas vent valve. First I thought about just painting the existing valve, because it was so rusted that the small studs were spining with the nuts every time i wanted to twist them off. But with some tools and patience I manage to get the nut spin off freely, for refference its a metric m5 w/ .8 thread pitch.

Next, I cleaned up both fuel pump assemblies and painted them with por15, which I thought suppose to be gloss black but mine turned dull black for some reason. I also replaced the old pump with new walbro 190 and put a new fuel supply hose.

The last thing, I went ahead and pulled out break booster out the box. In my search for a new parts I got a 3g booster with 17/16" master cylinder attached to it, but I decided to switch it back to OEM 1" to have stock appearance and utilize stock brake line fittings. My car originaly had an ABS system and I was thinking about keeping it that way, but during the remove I had to cut most of the abs lines and was unable to find replacements. In the meantime I got lucky and found new non-abs lines so I ultimately switched to non-abs system. I will be running evo8 front and back brembos as-well, so we will see how it wil pan out.
 

Attachments

Time to update this thread. I'm finally started to put things back in the car a few weeks ago, with a hectic schedule I can barely find time to work on it. I got brake, clutch and fuel lines installed, then I had to maneuver them to line up with the clips as they go back in particular order. Mounted clutch and brake cylinders. Did some research on the injector resistor pack as mine was all rusted and I wanted to find one in decent shape. The original resistor is no longer available but evo3 resistor still does, so I was looking for their differences but with no luck, at the end I did score the original in good shape.
I prepared fuel tank for the install, upgraded the pump to walbro 190, got all new hoses and clamps for the fuel and vapor, cleaned and coated fuel neck with por15. The dull finish on the fuel neck is what por15 semi-gloss/ satin black look like, I thought it would have a little more shine to it, oh well, looks better then what it was.
Next on agenda is to rehab the rear diff and put together rear subrame so that rear end would be semi done.
20220704_182046.jpg
20220704_182109.jpg
20220704_182123.jpg
20220730_121334.jpg
20220730_134407.jpg
20220730_151451.jpg
20220730_151535.jpg
 
Last edited:
Ok, a little update on the project. I was ready to assembly both front and rear suspensions when I discovered that parts I bought long time ago were complete junk. Mainly the subframes, I didn't pay attention when i got them just threw them in the storage until recently. Front subframe was in better shape with only one bolt thread being repaired. The rear one however, was complete trash, rusted thru and painted over with bolt threads destroyed beyond repair. Luckily I found a good rear donor to start cleaning it up. Unfortunately with all other comitments i barely have time to work on the project except just stock piling the parts and assemblying odds and ends. So got my koni shocks with GC sleeves and eibach springs ready to go with. Refurbished fog lights, aparently 03 base lancer uses same fog lights as 2gb eclipses. I sourced chinese copy as I was only after yellow glass which looked great. I plan on keeping the ac in the car, so I got oem filter and now looking for the new oem condenser, if anyone have one, please let me know, if not then I would probably go with china one.
20220917_150337.jpg 20230209_215725.jpg20230209_215646.jpg
20220918_164318.jpg20220918_170939.jpg
20220903_100252.jpg20220903_095400.jpg
 
Last edited:
I have to add a follow up note on Ground Control coil sleeves and springs for 2g eclipse. When you buy a kit from their web site there is an option to add a helper spring, i didn't pay much attetion to it until I stated building up a shock and discovered that supplied main springs are TOO SHORT. They are short to allow room for a helper spring and with out them the main spring just bouncing up and down on the shock. The suplied springs are 7 in tall and the front ones are barely making it ok, but the rear ones i had to replace with 8 in tall springs. Anyway, hope this helps somebody and they wont need to jump thru hoops.

20230219_205706.jpg
 
Last edited:
Had one day off to do work on the house but it was raining so instead I messed with rear diff and subframe. With a help of a fellow DSMer, I was able to find a rear subframe in decent shape, so went and pick that up. Cleaned it and coated it with gloss por-15 along with the rear diff. The only thing missing was a subframe bottom spacers that I found in poland. The company makes poly bushes for galants vr4's and its rear subframe same as in eclipse so big win here. I mounted subframe first and then realized that there are not enough space to bolt the rear diff, so I had to go back to square one. Now I'm trying to get BFH sticker for the rear cover to finish the look.

20230417_094642.jpg


20230417_113025.jpg


20230417_113238.jpg
 
Last edited:
Time for an update, went ahead and started on the brakes. When i first got evo 8 calipers they were in terrible condition, tubes were bent, nipples were seized and pistons were painted over. So I got them cleaned up and powder coated, I was not sure what color to pick but then decided to make them stand out and look similar to new STI calipers. Next I could not find the evo8 cross tubes so I got evoX ones and they fitted just fine, also ordered black titanium nipples and brembo caps. I'm pretty satisfied how they turn out at the end.

After that I unpacked my parking brake parts and discovered i was missing a few bits so packed everything back in the box.

received_379154426453751.jpeg


20230512_110727.jpg


20230512_110734.jpg


20230512_111344.jpg


20230512_164551.jpg


20230506_105004.jpg
 
Last edited:
Enjoying updates on your build. Thanks for including pictures. Nice choice on the caliper color.
 
Refurbished fog lights, aparently 03 base lancer uses same fog lights as 2gb eclipses. I sourced chinese copy as I was only after yellow glass which looked great.

View attachment 686782View attachment 686783

Nice detail.

Too bad Mitsubishi called the white lens lights “fog” lights. Only the yellow lens lights will actually see through fog and snow, whereas the white light will reflect back at the driver.

White lens lights should be called *driving* lights. Spent plenty of years driving through mountain fog and snow. Many times it was easier to see better and further by turning off the headlights and just using the fog (yellow) lights.

Although you don’t see them often, there are some aftermarket lights that have the yellow and white lenses so a driver could select the best for the weather condition.

If we drove ours in in-climate weather, we would convert our driving lenses to fog lenses.
 
Thanks everybody, doing the best i can. I had a day off and was able to unpack and bolt the steering rack I scored from ebay years ago. While inspecting the rack I could not figure out, is it oem part or aftermarket, the only difference from my original rack is the sticker on the metal housing.

20230506_125737.jpg
the brand new rack

20230520_102525.jpg
red sticker not the same

20230520_102544.jpg


20230520_105002.jpg
rubber boot over steering joint, wondering why it was not there initialy even tho the manual shows it there.
 
Last edited:
Of all the DSMs we’ve owned, we’ve never seen one with a boot on the column u-joints. It would be a great thing to have to both prolong the life of the u-joints and clean up the bay a little.

However, on our recent work of changing out the ac compressor, I was glad we didn’t have one in the way.
 
A quick update on the resto mode. In a little time i had i was able to assemble the throttle body. It was months before I had everything together to fininsh the job. The coolant flow piece I discovered was the same as in 3000gt turbo cars. The FIAV and TPS i had to order from japan in hopes its not a chineese copy. The only thing missing is the throttle stop screw, which uses very fine thread and I may just re-thread it to most common one.

20230412_213542.jpg


20230531_213446.jpg


20230531_213658.jpg


However, on our recent work of changing out the ac compressor, I was glad we didn’t have one in the way.

Two sides of the coin i suppose, at least its not 3000gt.
 
Last edited:
The project is still moving but at the turtle pace. Over the summer I was able to finish up with the drive shaft project. It was taken apart, sand blasted and powder coated, then I assembled it with all new bearings, joints and grease.
A few things I wanted to pount out: first, the lobro joint kit MB837300, DOES NOT COME WITH METAL BRACKET MB505112, I realized it too late and had to refurbish and reuse the existing one.

Second, I was following Jafros driveshaft video and there at the lobro joint assembly he states to clamp metal clip LAST --> THIS IS NOT THE CASE FOR 2G, YOU HAVE TO CLAMP IT FIRST BEFORE BOLTING THE LOBRO JOINT TOGETHER. It was a nightmare to clamp it after lobro joint was assembled.

Third, if you decide to balance the shaft afterward, take it to the place that deals with commercial trucks, mom and pop shop wont be able to do it because of 3-piece shaft design.

20230617_104402.jpg


20230617_104413.jpg

SHOULD HAVE CLAMPED IT NOW
20230617_132108.jpg


20230617_132115.jpg

THIS IS THE DARN CLIP
20230617_132122.jpg


20230617_135511.jpg
 
Last edited:
Update on what was done in past few month. I have poked around and found a body shop that would take care of the shell for me. The plan is to remove all the dings and scratches, refresh the paint, fill cavities with antirust and fix dreaded rust spot by the rear wheel well. I was assigned a spot in january so in the meantime I have to put a shell on the wheels and finish disassembling doors and the hatch.

So, I started with front suspension
20240524_111149.jpg

Replaced tie rod ends with bump steer kit
20240622_132053.jpg

One issue i had was that right tie rod was longer than the left one, so I had to shorten it a little. Hopefully my alignment is not too far off.
20240525_112235.jpg

Assembled the parking brake, that had an issues with horseshoe clip
20240406_122511.jpg

20240712_101026.jpg

Moved on to a rear suspension, I was debating on using volk parts to keep restoration original, but then said fk it, plus built in sway bar links is a huge plus.
20240711_151126.jpg

Final look, I did not want to cut my new dust shields, so stock 2g rotors
20240711_192810.jpg
 
Soo, we are officially at the half way point! After two month in body shop, the car shell is finally at its top shape. The dreaded rocker panel rot was remediated, doors and hatch were cleaned from rust and cavities were filled with antirust solution, body was sanded and painted in factory monarch green color. Pictures of course doesnt do the justice how good it looks. Now its time to start putting this lego puzzle together.

image000000001.jpg

Getting ready

image000007.jpg

The usuall 2G

image000005.jpg

Cutting

image000004.jpg

Thanks to a fellow, I was able to get a rocker cut out and use it to repair rotted area

image000003.jpg

Final results

image000000002.jpg

And done!

BODY 3.jpg

20250222_110250.jpg

20250222_110127.jpg


BODY 4.jpg
 
So I gave a car some time to cure the paint and now I’m starting slowly put things back. To satisfy my itch I began with door handles and locks. Upon close inspection the driver’s door handle was replaced before with china counterpart which had following deficiencies: metal hardware were of low quality and were rusted more than OEM pass side, black gasket around the handle were hard plastic vs OE soft rubber, the spacer for the key cylinder was not sitting snug resulting a wobble of the key cylinder inside the door handle. I was also lucky enough to find a pair of billet door handles that were painted to match the car and complemented the final assembly.

20250329_101907.jpg


Next were the locks, both were filthy dirty from years of use and due to design could not be disassembled, so I have sent them to get ice blasted and it did the trick, both came back super clean apart from the corrosion on the metal parts. Since there are not much you can do about it, I lubed entire mechanism with hinge oil HHK-S, which initially starts as penetrating oil and then converts into a more viscous form.

20240720_154627.jpg


20240914_094020.jpg


20250128_104640.jpg


I did get several lube options for the sake of comparison, mostly to grease sunroof tracks, but ended up using hinge oil there too.

20250126_223329.jpg


My sunroof tracks have had both guides/stoppers broken off, so I hunted down the last two new pieces.

20250222_145943.jpg
20250222_165548.jpg


Moving to the hatch, so I found this replacement rubber grommet mb598395 for the rear wiper, but because of its concave shape I decided to stick with original piece covered in thick film of honda shin-itsu grease to prolong its life

20250228_173646.jpg
 
Last edited:
Making a quick recap of what has been done on the vehicle. After the paint has cured I started slowly put parts back: first went in was the sunroof, I wanted to see how it was operating so I removed the old motor, lubed the cables and replaced motor with the new one I had in spare. Fun fact: sunroof motor is a product of germany.

20250412_152842.jpg


Second, I moved to the doors, picked up new window lifts, left side is a complete kit with the motor by AISIN and the right side is my combination of AISIN lift and NOS mopar motor. Lets see which one will perform better.

20250329_172123.jpg


Third was a window installation, dug up a stash of new parts and replaced all of the window's hardware.

20250329_155610.jpg


I was able to find new window rear tracks. I also found new chrysler sebring front tracks but despite similarities the mounting bracket was different, no luck here.

20250418_153741.jpg


Found some new felt stabilizers, was very suprised. Sebring and 3g eclipse uses same part for reference.

20250418_122108.jpg


Fourth, installed body trim pieces, could not find anything new, so I replaced old rubber seal with epdm strips off an ebay and bolted them in. Next was a tidious job of adjusting the window to sit properly. Took a few tries but i got it dialed in perfectly. For reference, in my case the track has to sit as close as possible toward the inside and the felt hooks at the top have to be pushed out to the max.

20250503_003916.jpg
20250503_133814.jpg


Finally, received spoiler gaskets and secured it permanently to the hatch.

20250412_114344.jpg

20250222_141255.jpg
 
Part 2 of what has been done so far: Mirrors, I sourced new mopar reflective lenses and what a pain it was to fit them inside the housing, absolute nightmare

20250517_152742.jpg
20250517_165312.jpg


Rear wiper, the original 2g wiper is discontinued so I bought 3g wiper to try. It fits perfectly but a little longer than 2g one.

20250418_161609.jpg


Decided to have locking fuel/trunk levers from the spyder, but got a little dissapointed because only trunk lever can be locked, gas lid can still be opened. Spyder lock cylinder is obsolete so I had to modify 3g cylinder to work. If anyone got a mint spyder lock trim cover in tan LET ME KNOW!

20250517_145208.jpg


Also had a batch of parts vapor cleaned and clear coated

20250502_182610.jpg
 
Add Value - Be Respectful - No Trolling - No Misinformation - Participate Often!
Support Vendors who Support the DSM Community

Latest posts

Build Thread Updates

Latest Classifieds

  • Wanted 2g ISO Rear Pass EDM Tail light
    Looking for only a passenger rear EDM tail light for my 2g. Please lmk if you have one lying...
    • Gabriel Pena
    • Updated:
    • Expires
  • Wanted 4G63 ISO built short block
    Looking for either a 7 bolt split thrust or 6 bolt
    • Gabriel Pena
    • Updated:
    • Expires
  • For sale 2g 95-98 Talon air bag.
    2g Talon airbag. Really good condition. Can ship ups ground. Message 702-741-6987
    • Galant665
    • Updated:
    • Expires
  • For sale 2g 1996 Eagle Talon TSI AWD
    I have a 96 Eagle Talon AWD standard tranny for sale. The car still ran when I parked it. I had...
    • eli1977
    • Updated:
    • Expires
  • For sale 2g 2g front strut shock cup. MR103156. New.
    Mitsubishi Oem # MR103156 front suspension strut cup. New. Message 702-741-6987.
    • Galant665
    • Updated:
Back
Top