The Top DSM Community on the Web

For 1990-1999 Mitsubishi Eclipse, Eagle Talon, Plymouth Laser, and Galant VR-4 Owners. Log in to remove most ads.

Please Support JNZ Tuning
Please Support Fuel Injector Clinic

Street Build '97 Eclipse AWD GS-T (2006 to Present)

This site may earn a commission from merchant
affiliate links, including eBay, Amazon, and others.

This site may earn a commission from merchant affiliate links, including eBay, Amazon, and others.

Thanks Robert. I'm one update ahead of schedule! LOL

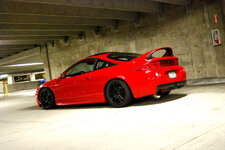
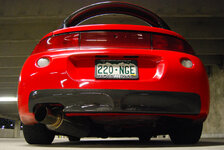
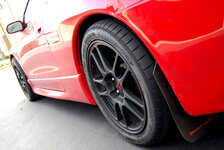
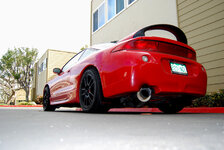
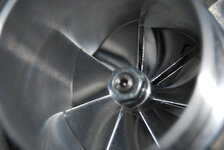
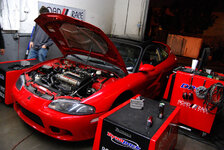
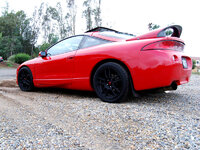
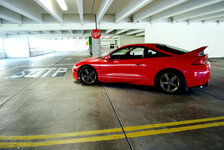
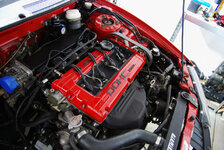
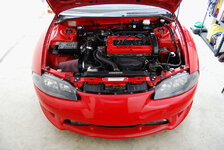
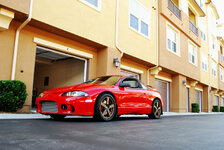
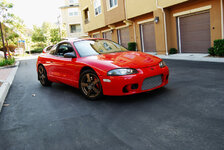
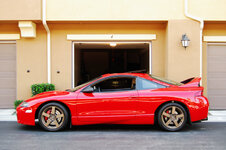
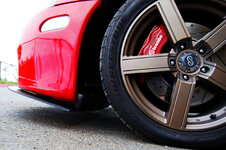
26JUN2013 - Chromoly Tubular Rear Subframe Install : Part II
It doesn't seem like much got done but progress is progress. I spent most of my time pulling the suspension and I was happy to see that the CV axles weren't seized in the hub, something that seems fairly common with older AWD's.

dsc_0122-jpg.jpg
 
30JUN2013 - Chromoly Tubular Rear Subframe Install : Part III

I got busy since it's the weekend and it was a nice cool 113* garage - got the toe arms loose, drained the diff, removed the rear knuckles, then lowered the subframe with the diff installed. I might be able to bench 225lbs but I wasn't OK with laying underneath this thing, while I loosened the bolts up, and try to press it down. I used my jack and some circus balancing skills and lowered it, it was pretty damn easy to be honest. On to the pictures...


Lowering the subframe with the diff/axles installed balancing it on the jack.

dsc_0125-jpg.jpg


The rear end is out of the car!

dsc_0126-jpg.jpg


Shot of the diff with the axles installed.

dsc_0127-jpg.jpg
 
01JULY2013 - Chromoly Tubular Rear Subframe Install : Part IV

Before I started bolting the diff up into the subframe, making it heavy, I wanted to test fit it to the chassis and make sure everything cleared. The fuel filler neck needs slightly modified, my plan is to cut it back 3-4", add a longer rubber hose to go over the subframe, then weld the filler neck check-valve inlet back on but I'll cross that bridge when I get there. I'm no welder so if I can get creative and not have to get something fabricated I'm all for it, hopefully I can figure something else out.

The gas tank straps needed some convincing but other than that, things fell right into place after I removed that gas tank filler neck.

You can clearly see where the clearance
issue is with the metal filler neck, leading to the gas tank.

photo_zps7643e775.jpg


Gas tank straps needed "massaged" into place to clear the front of the subframe, no biggie.

photo_zps2ccf3e4c.jpg


After dropping the filler neck and clearancing the gas tank straps I installed the tubular subframe. I also mocked up the F*F diff cover (no diff), the tubular LCA/toe arms, and sway bar brackets to see if I was going to have any issues going forward. Everything looked good!

dsc_0131-jpg.158116.jpg
 
02JULY2013 - Chromoly Tubular Rear Subframe Install : Part V

Back out to the garage this morning and started test fitting the rear diff in the subframe. Paul said the tolerances were tight as it was, that extra powdercoat on there didn't help matters so the fitment it TIGHT now. The car will rotate around the diff before it comes out of the subframe... LOL

I removed my stock rear diff cover to install the F*F cover, I've never seen the guts of one of these so I was "oo'ing and aw'ing" for a few minutes checking everything out. In my unprofessional opinion everything looked good for a car with 112,000 miles on the clock and running crappy Royal Purple gear oil.


dsc_0144-jpg.158139.jpg


dsc_0146-jpg.158140.jpg


dsc_0147-jpg.158141.jpg


Since I was the only one doing this I used my creeper a lot to help hold stuff. In this case, I placed the diff (no cover) centered on the creeper and sat the subframe over it carefully. It needed some convincing with a soft rubber mallet because of the tight tolerances around the diff but it fit, eventually.

dsc_0156-jpg.158142.jpg


Once I was confident that the diff fit into the subframe I installed the F*F cover next, bolting it into place in the subframe so I could slide the differential back into it.

dsc_0157-jpg.158143.jpg


I applied a thin coat of RTV to the inside sealing surface of the diff cover and after wrestling with the damn thing for awhile and wailing on it with a rubber mallet everything finally decided to line up. I bolted it down with the bolts that Paul supplied and torqued everything to spec after applying some Loctite to the threads. It was a lot of work in the heat but things were falling into place, not too much longer and the car will be drivable.

dsc_0158-jpg.158144.jpg


dsc_0161-jpg.158145.jpg
 
04JULY2013 - Chromoly Tubular Rear Subframe Install : Part VI

Ran into a few kinks that set me back a few days, I was hoping to get the subframe bolted under the car and torqued by Friday but it doesn't look like I'm going to meet that.

After applying some RTV to the diff cover and sliding the diff back onto it, then buttoning everything up, I noticed that I couldn't freely rotate the diff by hand. Questioning whether this was typical or not I took a step back to investigate and get some opinions of some DSM buddies. Turns out it was simple enough, still a pain in the ass to fix though. The ring gear protrudes into the diff cover and, for whatever reason, was contacting the Frontline Fab cover just enough to bind. I contacted Andrew, the owner of Frontline Fab, and he said he was aware... :rolleyes:

"I normally test fit every cover that went out because I was aware of the clearance issue.
The girdled covers never usually had a problem, so I stopped testing them all the time.
Probably 5 out of a 150+ had that clearance issue."

Sweet!


After pulling it all apart and lightly forcing it down as a friend helped rotate the diff we "marked" the case so I knew where to take some metal off with a grinder. Below is the before and after, that's all it took and now the cover is bolted back up and torqued to OE spec with Loctite 232 on the threads. Again.

Sorry the pictures are blurry, I was on beer 3 with low lighting and no tripod. You can tell by my clearancing job that I was all over the place. LOL

dsc_0163-jpg.jpg


dsc_0164-jpg.jpg
 
07JULY2013 - Chromoly Tubular Rear Subframe Install : Part VII

I was able to get the subframe lifted up under the car and bolted down tight, everything lined up great with the rear end installed. Man, it looks great under there! (Minus the jagged edge of the sheet metal, those Sawz-all's don't make a very clean cut) I'll clean that up later, though.

I still have to fill the diff up with Redline Heavy Weight Shockproof, connect the driveshaft and suspension parts, and then finish routing the gas tank filler neck over to the existing piece. If you notice, there's a coupler in the rubber gas filler hose coming off the tank. I ordered it from Fuel Filler Necks & Gas Tank Pipes | Filler Neck Supply Co., it was the 1.5" fuel filler coupler joint, adding this I can extend the rubber portion of the filler neck over the subframe to connect to the hard metal pipe going to the body of the car.

dsc_0181-jpg.jpg
 
08JULY2013 - Chromoly Tubular Rear Subframe Install : Part VIII

Today I installed the CV axles into the rear diff and then got to work making the final modifications to the filler neck to work with the subframe.

Axles installed!

dsc_0183-small-jpg.jpg


Cut the filler neck and mocked it up, it looks like all I need now is to find a 1.5" I.D. rubber gas tank hose to connect the coupler to the filler neck and I'll be in business. Off to the auto parts store and see what they've got in stock that might work...

dsc_0194-jpg.jpg
 
08JULY2013 - Chromoly Tubular Rear Subframe Install : Part VIII... (continued)

I returned from the auto parts store with the rubber hose I needed to finish the install, for once they had something I needed!

I made a trip to the local car parts store and snagged a 1.5" I.D. hose with a 30* turn for the fuel filler and a 5/8" and 1/4" hoses for the vents going from the tank to the filler neck. Everything fit up exactly how I'd hoped, I'll just have to see if it works when I try to fill the tank after I get a bunch of worm gear clamps around the hoses. I also bolted up the passengerside suspension (LC/toe/tension arms), next will be torquing everything down and trying to fit the exhaust before I drop it on it's wheels and fill the diff with Redline.

If anyone noticed I cleaned up that edge so it doesn't look I cut the spare tire well out with a butter knife, I'm going to put some foam hose around it too which should clean it up even more.

On to the pictures...

dsc_0198-jpg.jpg


dsc_0200-jpg.jpg


09JULY2013 - Chromoly Tubular Rear Subframe Install : Part IX

DONE SON!

Toe adjustment looks good, I definitely need to adjust for negative camber from what I can tell. I'll be tackling that chore in a few days as I need to take a day off, too much wrenching...

As I suspected though the exhaust doesn't clear the bottom of the subframe either so I'll have to take it into the fabricator's shop, hopefully soon, and get an exhaust welded up. For now though, it's
drivable and I can deal with a few exhaust fumes in the cab so I can enjoy the new handling improvements of this subframe.

dsc_0205-jpg.jpg


dsc_0215-jpg.jpg


...and this was a shot of the car AFTER I took the subframe out for a spin.

9312495970_b5fd67050d_z.jpg
 
23JULY2013 - Chromoly Tubular Rear Subframe Install : Part X

I have to admit, I definitely drug my feet on getting my exhaust fabricated to fit under the subframe. I was just having too much fun enjoying the new "feel" of the car and the corners, I didn't want to drop my car off at a shop just yet. After getting tired of the loud exhaust and the smell of fumes at stop lights I got it fabricated by a local who typically does cage work, so doing exhaust was nothing for him. He did a great job, too! I had him push it to the driverside as soon as possible since it's so low, I don't want any high centering problems if I can help it.


subframe-and-exhaust-jpg.jpg


dsc_0287-jpg.jpg
 
Any update from Summit about the leaky AN fitting? Debating chopping up my current rad and swapping to this.
 
Summit offered to give me a fairly generous discount on the 45* fittings, purchasing them as replacements for ~$50.00/ea if I remember correctly. Currently I'm dealing with Earl's to get a warranty and free replacements, still not done with it though.
 
That's it, it was the Earl update I was looking for. Also saw your note to go with 16AN to cut the cost down on the AN materials.
 
24JULY2013 - Assembling DG Koni Coilovers
In the past, less fortunate DSMer's had to build and piece this suspension setup themselves, using Far North Racing's website's (Far North Racing Koni Shocks) article. Fortunately though, Brian (snowborder714) and JayRacing got together and decided to help the DSM community and put together a group buy for them. Seems like a nice thing to do but if you read the fine print at the bottom of FN Racing's page, no vendor but Magnus is allowed to sell these unless they're sold at cost. Brian and JayRacing did this for the community, not making a dollar after all of their hard work piecing everything together, doing the machine work, and putting the shocks on the dyno.

The entire suspension includes...
- Custom upper mount plates with Aurora bearings
- Custom upper and lower standoffs
- Koni yellow shocks (front/rear)
- Hypercoil springs (750lb fronts / 350lb rears)
- Hypercoil helper springs
- Torrington bearings
- Koni coil over sleeves
Good things come to those who wait though, not knocking what Brian and Jay were did for us but I almost forgot I had purchased these as long as they took to make. We got them within 8-9 mos. from the start of the GB though so, not too bad. :D

These things came dis-assembled and Brian shipped them to me without providing instructions so after multiple failed attempts at assembly I put them back in the box. After bugging him enough though, a week later he created a step by step picture book for me. Thanks B! :D

This suspension looked serious and it was every bit worth the wait, now it's just getting it on the car and seeing how it paired with the chromoly tubular subframe!

DSC_0263-1.jpg


DSC_0264.jpg


DSC_0269-1.jpg
 
28JULY2013 - Properly Mounting Front Diffuser
I bought a ABS front diffuser back in March 2012 and it never did sit properly under the car. It wasn't just a lip for the bumper so all of the weight of it sitting under the car caused it to sag pushing the leading edge of it up. I liked the idea but it needed more work so, unfortunately it wasn't as easy as bolting it right up so I put it on the back burner until I could figure out how to support it.

Here's a photo of it installed back in 2012..

aero sag.jpg


Fast forward a year and a few months and I decided I was tired of looking at it leaning up against the wall in my garage so it was time to fix the sagging problem I had. It was a simple fix, I just had the welder that fabricated my exhaust for the tubular subframe weld a tab to the cross member that runs under the engine. Then he riveted a piece of aluminum to the back edge of it to make it more rigid and give me something to mount it to.

DSC_0291.jpg
 
30JULY2013 - Installing DG Koni Coilover Suspension
The new suspension setup looked great sitting on the floor in my office but it was time to get them under the car and put to use. I had been riding on the same Tokico shocks and only switching between the Eibach Sportline and Prokit springs, I was excited to get a halfway decent suspension on my DSM and maybe consider doing more than just straight line racing.

Here's a side profile of the car with my old Tokico 5 way adj. shocks / Eibach Prokit springs under it, the car appeared like it was flying away but my Hoosier slicks fit under it so it functioned like I needed it to.

DSC_0295.jpg


I started with the fronts since they were they're the hardest, then the rears were a breeze. I included a few shots comparing my old to the new...

DSC_0297.jpg


DSC_0299.jpg


DSC_0300.jpg


Here's the shot after, you can tell the car's a LOT lower but I wasn't going to drive it like that. I just adjusted all shocks to the same height not knowing how high/low it would actually be. I do like the way it looks dropped a bit more than it was but after going through CV boots, power steering racks, and hitting every speed bump/driveway I encountered having a low car wasn't worth it.

Time to raise it so I can still tuck those Hoosier DR's under it when I'm at the track then give it a proper alignment.

DSC_0301.jpg
 
Looks like Jay and Brian put together a solid product. I am really enjoying the updates.

P.S. probably going to use your intercooler article to tuck away a dual pass this winter :)
 
Any more info in the front diffuser/lip? Been trying to find/build something like that for a while now. I can't find anything that big that is more than 1/16th" thick. Looks great.
 
Looks like Jay and Brian put together a solid product. I am really enjoying the updates.

P.S. probably going to use your intercooler article to tuck away a dual pass this winter :)
Glad to hear it, Robert. That's half the reason why I try to keep pressing forward with this build thread, trying to make it one big "tech article" of how I built my car to help others. The other is so I can remember all the crap I've done to my car the last 9yrs.
Any more info in the front diffuser/lip? Been trying to find/build something like that for a while now. I can't find anything that big that is more than 1/16th" thick. Looks great.
Sure! It was actually a freelancer over on the ECMLink forums selling them, pretty damn cheap too! Here's the thread he started ---> 2G Front Diffuser...Any Interest? I'm not sure if he's selling them anymore as its been a few years and that thread hasn't been updated for a few.

The diffuser completely seals up the front end of the car and extends 2.5" around the leading edge of the bumper, then tapers back flush to the outside edges which is nice. It came pre-drilled with over sized holes, using the exact same bolt locations on the stock bumper that holds down the flimsy metal bracket. It's made of 1/4" ABS and weighs ~ 12lbs with all the hardware used to mount it and the diffuser itself, I just took out my stereo/speakers to offset the weight difference. LOL
 
Thanks for all the info Corey! Surprised I missed that on the Link forums.

My car seems to mimic your car's progression over the years. You really need to stop updating your build thread, you cost me money every time I see an idea I like!! Haha.
 
DEAL! LOL

Once 2014 hit my build progression slowed down a lot, I was too busy trying to plan/finance a wedding that the car took a back seat last year. Hopefully 2015 means more time for me to start catching up and finishing things I would have liked to have completed last year...

I'll have to swing over and check out your build thread, I can't say I've looked through it. Maybe I'll see a few things with your build I want to do myself...
 
I have read your entire build thread. It is such a wonderful story. Its like I lived with you and that car for a while. Great job buddy. Now that I am at the end of my build I am getting very antsy.
 
Thanks man, I appreciate it. It's a story with no ending it seems, hopefully in 20yrs I'll be turning 50 and I'll still be writing this book and hopefully I've figured out how to launch it by then too. LOL
 
15AUGUST2013 - 21st Annual DSM/EVO/GTR Shootout : Road Trip
It was my turn to finally go to a Shootout in Ohio, I had never been because of my schedule being in the military made it tough but I had no excuses now that I was separated. I made arrangements with Brian (snowborder714) and his brother Eric (turbosax2) to fly into Pennsylvania and road trip to Ohio with them. Couldn't ask for better DSM friends, their family treated me like one of their own feeding me and letting me crash at his parents house before we made our way West. I couldn't be more grateful for the experience, I had never met Brian or Eric and because them I was able to go to the S.O.

Brian picked me up at the airport Wednesday and we were go-go-go Thursday, we left for Pittsburgh to go get Eric that morning and started loading up his 2g on the trailer... then we were off! Of course the camera came out and never left my hands until Monday morning when I flew out. If you thought there were a lot of pictures in this thread, hold on because there's a TON from the Shootout. If you see any of your car and you want a full res. version PM me and I can email it to you, just ask!

DSC_0002.jpg


DSC_0006.jpg
 
Support Vendors who Support the DSM Community
Boosted Fabrication ECM Tuning ExtremePSI Fuel Injector Clinic Innovation Products Jacks Transmissions JNZ Tuning Kiggly Racing Morrison Fabrications MyMitsubishiStore.com RixRacing RockAuto RTM Racing STM Tuned

Latest posts

Build Thread Updates

Vendor Updates

Latest Classifieds

Back
Top