The Central Hub for DSM Community and Information

For 1990-1999 Mitsubishi Eclipse, Eagle Talon, Plymouth Laser, and Galant VR-4 Owners. This is where the DSM platform history is documented and archived. Log in to help us in our mission, and to remove most ads from the browsing experience.

94 Eclipse

This site may earn a commission from merchant affiliate links, including eBay, Amazon, and others.

codym

10+ Year Contributor
636
8
Dec 28, 2011
Amarillo, Texas

-Introduction-
1.Where it Started
7.The Road to Rebuild
8. Initial Inspection and Teardown
10.Rebuild Goals

Stage: -1

11. Engine Bay - A/C & P/S Delete
17. Parts and 6bolt arrive, engine installed, & a crazy sledding story.
18. Taking pics at Whataburger
19. 2013 Mod list
20. Transmission Issues; Wideband; Shifter bushings; Cable bearings.
23. GM MAF & MAF-T install
26. Photos; IM Gasket Replacement
28. Intake Stealthification
29. Engine Bay Detail
31. 450cc Injector install, First Logs w/TunerPro


Intro

First I would like to start this build journal by stating, yes, my goal IS to go turbo!
I'm the kind of guy who likes to things to be perfect, and this journal will document my journey from when I bought my 1g DSM in October of 2012 for 3k to me taking the steps to build a fun, reliable car.. for now. Since it is a 1g, and is FWD, in the end I'll be running a setup leaning more with top speed in mind rather than launching, but with a quick acceleration to match.

Where it Started
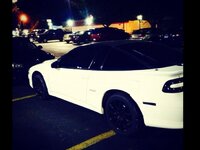
Here is my baby, my first night of ownership and after an intense cleaning session.
Jeep 100.JPG


After only a short month of owning my first, 1st Gen DSM - I was rolling merrily on my way to work, when suddenly the car began to decrease in speed and it felt like the power was being sucked out of it.

From 65mph, the car slowly decelerated and then suddenly.. BOOM, Clackackackackack! The car stalled on it's face and there I was, stuck in the center lane of the freeway, not having a single idea what was going on.
I hopped out of the car as soon as I was certain I wouldn't get creamed, and attempted to start pushing it.
I saw fire coming from below the car, and had no option but to get to the side of the roadway ,call 911 and pray no one took my car out while I waited for the local FD.

We got the car to the safe zone , and thankfully nobody was hurt.
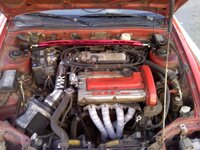
After I got to look around, there was no oil cap, but no oil on the inside of the hood... :hmm:
Either I have a super absorbant hood panel or it was bone dry from the start.
I called my buddy , who was kind enough to use one of his free AAA tows for me!
 
Last edited by a moderator:
I had a 94 gs that went mid 14's full weight with a slipping clutch and no traction. I revved it till I hit fuel cut at 7800 rpms.And I dailied it for 2 years and a little over 60k miles. One thing this motor does really well with is breathing improvements. Intake and exhaust. and IMO the Weapon-R intake is by far the best one for it. I still have mine sitting around if you'd be interested. It helps cleanup the bay too! :thumb: In this pic it was super dirty but it was taken in the winter and only decent bay pic I had.
 

Attachments

I do have that strut bar still but it is not for sale. It's now on my car that is my profile pic. ;) But as for the header wrap I got mine from summit racing. It's DEI and painted with their coating. It looked really good and Held up great for the 40k miles I had it on there. The key to wrapping headers is to soak the wrap, then WEAR GLOVES and take your time pulling it as tight as possible and using steel zip ties to holdd it in place. You def want gloves because most wraps are fiberglass! It's time consuming but for the look and the heat resistance it's worth it IMO.
 
So, im a few hours away from gettin her on the trailer and on the way to the rebuild... I'll update later today with more pictures :hellyeah:


We are in town! Finally I am reunited with my beloved DSM!
Camera(13).jpg


Not of top quality, but you can clearly see the rod protruding from the block. No Bueno.
IMG_20130208_000013 (1).jpg


And so the road trip begins!

Stopping to eat, gas up, and make sure she doesn't try to slide off on me in the midst of the night ;)
Camera(22) (1).jpg

Camera(21) (1).jpg
 
Last edited by a moderator:
Back in town, got the car unloaded and in the garage. Began the teardown process, and got the motor pulled in about 3-4 hours. Not too bad for my first time.

Showing the rod through the block
0208131455.jpg


Engine on the hoist, boy was this thing a mess. I had a lot of clean up to do.
0209132119.jpg


Engine-less bay. So empty, but yet so cluttered. Something must be done of all this mess!
0209132041a.jpg


Showing the multitude of metal shavings, chunks, pieces, etc. in the oil pan.
0209132128.jpg


Just giving you guys an idea of the parts of the rod I was seeing.
0209132129.jpg


You can see here the connecting rods are crammed skillfully into the crank. This was such a pain to teardown with hand tools.
0210131611.jpg


Picture of the not one, but two rods that failed miserably. This is after we got the block completely tore down.
0210131638.jpg


Close up of the crankshaft, this was marked everywhere, and was completely toast.
0210131638a.jpg


Some of the carbon build up that was on the valves, with just under 180k, this engine was likely close to it's end anyways.
0210131638b.jpg
 
Last edited by a moderator:
Build Goals

So to keep everything organized, my method of building this car will be in multiple stages.

Stage "negative one"
This will cover the steps leading up to the turbo swap, what I plan to do is basically slowly convert over to turbo, part by part, until the last things I need will be turbo, intake, exhaust. I will essentially bolt these parts on, retune it, and I'll be set.


EngineThe first question might be how I plan on simply adding a turbo without thinking about the pistons, and their compression ratio. Well I do have a set of factory pistons, but that still wouldn't help me if I essentially bolt on a turbo over night, as certain things have to be checked that I quite honestly don't know about. So before any boost is introduced with this block, I will get a piston/rod combo with a 9:1 compression to support up to my Stage 2 goals, a mid 500hp reliable daily driver. This way I have to spend once, if I'm careful.

For an initial setup I will go with a mild street cam, still doing research on this subject, I'd like to find something streetable but something that will still give me power when I crank up the boost.


Transmission
Since I am FWD, eventually the transmission will be geared more towards top speed than quick acceleration. Before the car is introduced to boost, I will invest in a turbo transmission and be getting it rebuilt by a vendor here on tuners.

Tuning
I will start off with a GM MAF, and DSMlink will be done when I am closer to the swap, after stage2 limits are met I will use a SD setup.


Stage: 1


This will cover basically from the time I put the first turbo on until the time I'm ready to advance to either a larger turbo or more boost.
For an initial setup, I'll be running an evo3 16g on 10-12lbs. Fuel will be e85.
 
Last edited:
Stage: -1

Engine Bay - A/C & P/S Delete


Not much to do with no MOTA!? Wrong! I was getting irritated at all the clutter in my bay, so after doing some research about some things I could do, I decided a few things were in order...
downsized_021713143701.jpg


First step was removing the entire a/c system, I took the lines, condenser, and compressor out. Eventually the a/c harness will be removed, but that will be later on.
0217131320b.jpg


Second Step was to remove the P/S pump, mount, and loop the lines at the rack. Filled with Bobcat hydraulic grease
downsized_0217131320.jpg


Finally with some of the clutter removed, I'll be able to sleep tonight. :coy:
downsized_0217131320a.jpg
 
Last edited by a moderator:
Just look in the classifieds. Check the part out threads, I've seen them in supposed "running" condition for as little as $400. I sold my old 6bolt for $500. If I were spending $1800 I'd rather build it myself to make sure it's done right than buy it from someone I didn't know.

Also craigslist is a good source for people parting dsms.


I'm not personally buying it from someone, my dad can get a discount through his work for one, & it's from one of his vendors. It's a brand new, 0 miles on the whole motor. So if I get a used long block for a good price, but have to take the time and extra money to rebuild it, then I'll be out longer than I want to be.

My block and crank is obviously trashed, so none of the vendors here accepted it for a core charge. I'll look into it more, I just want to get back on the road soon , thanks for the input man!
 
Last edited:
Stage: -1

Parts and 6bolt arrive, engine installed.


:cool:

It's about that time...
allabouttime.jpg


Got all the compatible parts swapped such as valve cover, intake/exhaust mani, Gates timing belt, oil pan and pickup, etc.
Block.jpg


ITS THE FINAL COOUNTDOOOWWN!! Dannnaanaaanaaa, dana na na na naaaah :hellyeah:
fvshop.jpg


Off topic but insane story. Yes this is true, bear with me on the drawing.

Okay so... My Mom and I take my 8 year old sister sledding off the side of this rather large grassy overpass. First thing I noticed is at the bottom of where everyone else was sledding (7-8 others) there was a guardrail protecting about a 4ft open drain. ..

After making a few runs with little sister we were on our way back up to the top when we saw a girl maybe a few years older than my sister freakin' BOOKIN' it down that thing. The sled turned around backwards, she was still hauling ass....

luckygirl.jpg


She slammed back first right into the guardrail, I mean she friggin' smacked that thing hard. I thought she broke her neck or back caused she was folded in half like pretzel. The bottom of the guardrail was right into the back of her neck, screaming bloody murder . It was a miracle that didn't kill that girl.

Ambulance was called and needless to say, we didn't sled there after that.
 
Last edited by a moderator:
Stage: -1

Pictures at Whataburger


Got some new meat for the back... speaking of meat.. Double Whataburger anyone? image.jpg
 

Attachments

Last edited:
Well it has definently been a rough few months for myself, and I haven't quite had as much time as I would like to spend working on the car. Tax return granted me a little extra spending money, and some extra time as well.


Transmission problems
Here recently I have been going through a rediculous amount of clutches, some would last 2 months while others would last 2 weeks, I experimented with different clutches and different flywheels attempting to solve my issue. After the 3rd went out with a few weeks, even making sure to baby it, I knew something wasn't adding up.


After doing some research I came to the conclusion that I was indeed, missing the transmission dowel pins.

After getting those installed, I am now using an OEM Flywheel with a cheapo clutch, and I have no slipping or clutch failure. I have a fidanza fly, but the lack of dowel pins caused the starter to chew up the teeth, to the point of where it won't contact anymore. I'll have to find a new teeth ring and friction plate.


Tax Return Goodies! :hellyeah:

So with my tax return I ordered the following ---

LC-2 Wideband
MAFT
Shifter base bushing
STM Shifter cable bearing
OEM IM Gasket


I picked up a GM MAF from a 2003 Impala at a local salvage yard. Along with a few extra pairs of headlights, not bad for 50 bucks!

Wideband Install


I hooked up the LC-2 with my Dad last night, he's a a wiring guru - worked for Rockford back in the day and if anybody in the family needs a stereo, we all go to him :p

So after getting my wiring straight, we started ripping into the car.

Got the old o2 out which was a PITA! Even with an o2 socket it took me a hefty pull to get it broke loose. We ran the wire through the steering column boot, simply sliced the boot just enough to get the cable through.


Before we started cutting and soldering any wires, I wanted to get the gauge mounted.
I used one of the factory HVAC switches, the one on the far right that cycles in cab air or fresh air from outside( I think that's what those symbols mean :confused:

Removed the face, and using a dremel and step drill we cut enough room to get the gauge sitting flush with the face, and got it mounted.
gmount.jpg

Had to trim the little white piece of the hvac where the knob sticks into to get everything mounted good, ran the wire through a little gap.
egbush.jpg


Now it's time to do some soldering.


First we started with the ECU Pin 4, having not much soldering experience I let my dad tackle this one to show me the ropes, I didn't want to have a faulty connection my first soldering experience.


After taking some good tips from him, it was time for me to take a whack at it.

I wired the switched 12v source from the sensor and the gauge to the thicker solid blue wire of the Radio Harness. Wired both grounds to chassis. Wired illumination to green/white wire of radio harness. Last but not least, yellow sensor wire soldered to gauge's white wire.


And that's all she wrote! We got all the wires tucked away, and I calibrated everything, and got the sensor secured in the exhaust.
lcsens.jpg


Shifter Base Bushings

I ordered the STM Cable Bearings, along with the ES Base bushings.

Went to install the base bushings, and upon tightening I had one snap.. than the other.. It became obvious to me I needed some new high strength bolts.

After aquiring my 4-m8x1.25 bolts, I struggled to the broken bolts out with vice grips. It was a close call, but the bolts we just sticking out enough to get a good grip.

Got those bolts in, re adjusted the shifter linkage, and bada bing bada boom she's good to roll.


Cable Bearings
Taken directly from STM's website, their bearing need to be pressed or 'big ass C clamps will work'


I don't have a press, so big ass C clamp was the way to go.

I went for the first one and when I got it set the damn thing snapped in half! Than I looked at the other one that wasn't snapped, it had 4 small spot welds holding them together.

Had a pretty nasty dust storm, it's taking its toll on my bay.
cbear.jpg

After trying to see how it would work if both pieces were in there, I came to realize that these are breakaway bearings. Because the second one broke as well once it was set.
 
Last edited:
I'm confused, are you going turbo? The n/a pistons arn't good, the ring lands are too close to the top. And the n/a block would be missing oil squirters.

If you are staying n/a, a wideband and a MAFT seem like over kill?
 
Please read the last paragraph of my latest post..

I am aware the n/A pistons are closer to the top. They are also cast, and have a compression higher than that of the factory turbo pistons. I have a set of turbo pistons awaiting inspection.

I have done research on the oil squirters and it will be safe to run without them at my initial boost levels.

Not quite sure what the question was there, but there is nothing wrong with reading AFRs on a n/a vehicle.
I am using the MAFT because like I stated, I am having issues with my current MAF. Instead of buying another n/t MAF, than invest in a factory turbo MAF, and eventually have to invest in yet another MAF setup....
why can I not use a GM MAF and a Translator now, and when I feel I am at a level that it would be for the greater good.. I will invest in dsmlink and a Speed Density setup. 2 stages. Versus... 4?

The SAFC I got for an upper timing cover, so it's not like I invested a lot in things that won't be of use in the future.
 
Last edited:
MAFT Install

Got the translator and my extension harness in the mail today :hellyeah:
Went to plug it up and as I expected the plug is for a turbo MAF :p

Took down some quick notes for the wires, snipped the connectors off and soldered the needed wires together. The bundle I'm holding is the MAF wires after it's taped up.
lcconmafwire.jpg
I got the extension harnesses wired through to inside the cab.

After getting the initial settings good to go,set the idle and I took her out for a spin. Man was it WAY smoother. My old MAF was worn and beat up, and it would randomly just choke up.
 
Last edited:
We'll now that you edited it I see it's there. Just giving a heads up as far as a non turbo block goes. I had a piston explode on me and found out the place I paid to replace my motor put a non-turbo block into my car.

As far as the MAFT goes, I didn't see anywhere before WHY you ordered, but since you said your stock one was cutting out then I can understand why you were changing it. Keep up the good work!
 
I apologize, I went back through the entire thread and re-wrote it. You probably caught me when I was in the middle of editing that post ;)
 
Last edited:
Add Value - Be Respectful - No Trolling - No Misinformation - Participate Often!
Support Vendors who Support the DSM Community

Build Thread Updates

Latest Classifieds

Back
Top