

The Central Hub for DSM Community and Information

For 1990-1999 Mitsubishi Eclipse, Eagle Talon, Plymouth Laser, and Galant VR-4 Owners. This is where the DSM platform history is documented and archived. Log in to help us in our mission, and to remove most ads from the browsing experience.

Talon_cleaned.jpg

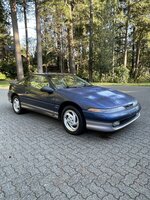
Street Build '91 TSI AWD 75k mile time capsule resto mod

'91 TSi AWD

This site may earn a commission from merchant affiliate links, including eBay, Amazon, and others.

My car does not have ABS, but the plug that should cover the hole for the ABS sensor is missing so it allowed a bunch of water to get in while I was doing all the cleaning and pressure washing I did a few weeks back.
Holy cats. I wonder if the 1990's with no ABS have a hole there that needs to be plugged?
 
Radwood was a lot of fun. Wet, but fun. August in the PNW is usually hot and dry but it's been cold and rainy for the last week (of course that changed starting Sunday once the show was over...).

My car was one of two 1G Talons there, and both were shockingly the same color combo! He's on here but I didn't get his user name, maybe he'll pop in and say hi.

53949654168_225ae12728_o.jpg


53949654193_86d5427944_o.jpg
 
One weird thing did pop up on the way home though: the clutch doesn't seem to be releasing all the way? I had to drive very carefully because as soon as the car went into the boost the clutch would slip as if it's not quite released fully. It's a brand new Southbend kevlar so I doubt there is anything wrong with the clutch itself. I'm guessing there might be something that came out of adjustment? I'll put the car back on the lift later this week so I can inspect everything.
 
Update on the clutch thing: based on some research I did it seems the kevlar clutches take forevvvvver to break in so I've just kept driving the car and it seems to be getting a little better over the last couple hundred miles. I was seeing on other forums that it was taking people like 1000 miles to get them broken in finally. Mine has like 500-600 miles on it at this point so I'll give it a little more time.
 
Now that winter has arrived, it's time to make this project car into a real project car. The Talon started the weekend as a running, driving car. Now, it is not.

First things first: remove the rear bumper. I'd noticed in looking at other build threads that the rear bumper support is always in awful condition on even the cleanest cars so I figured I should see how mine looks. It's got some rust from catching 30+ years worth of road gunk so I'll strip it down and clean it up or maybe fabricate a new lighter weight one. I was surprised how much effort is required to remove the rear bumper cover. DSM really wanted those to stay attached to the car!

The only rust on the car is just a little bit of surface rust in the hatch area from what I'm assuming is a leak from a tail light seal or the hatch seal. This should be pretty easy to clean up. There's only one spot I've found so far where the metal is thinned from any rust, and it was where one of the screws for something goes through the metal.

54206444006_c2ffa7457c_b.jpg
 
Next up: dropping the tank and rear subframe. I've only had my lift for like 9 months and WOW does this make life easier. I was surprised how quick everything dropped out of the car. I think it took maybe 3 hours, and that was taking my time and checking stuff out as I went along.

Yet again, I'm amazed at how clean this car is. This is partly due to all the detailing I did earlier in the summer, but none of the bolts were seized and nothing fought me on the car. I went around and loosened all the bolts I could easily reach before I dropped the subframe so taking it all apart will be easy.

54206858885_f2fe9c861e_b.jpg


54206685359_068b3870a5_b.jpg


54206684088_007daa9546_b.jpg


54208621298_382e8f733e_b.jpg


Next up, I'm going to disassemble everything and get it cleaned and ready for powder coat or epoxy coating. I'll do new polyurethane bushings everywhere and new ball joints while I'm at it too.

I'll be tackling the fuel system while I'm in there too and installing a Walbro 255 and -6 lines to the fuel rail along with an FPR in prep for the 16G I have.

I also have a 4-bolt rear I'm going to swap in and I'll be rebuilding the axles with fresh boots while I'm at it too.
 
Last edited:
Next up: dropping the tank and rear subframe. I've only had my lift for like 9 months and WOW does this make life easier. I was surprised how quick everything dropped out of the car. I think it took maybe 3 hours, and that was taking my time and checking stuff out as I went along.

Yet again, I'm amazed at how clean this car is. This is partly due to all the detailing I did earlier in the summer, but none of the bolts were seized and nothing fought me on the car. I went around and loosened all the bolts I could easily reach before I dropped the subframe so taking it all apart will be easy.

View attachment 751982

View attachment 751983

View attachment 751984

View attachment 751985

Next up, I'm going to disassemble everything and get it cleaned and ready for powder coat or epoxy coating. I'll do new polyurethane bushings everywhere and new ball joints while I'm at it too.

I'll be tackling the fuel system while I'm in there too and installing a Walbro 255 and -6 lines to the fuel rail along with an FPR in prep for the 16G I have.

I also have a 4-bolt rear I'm going to swap in and I'll be rebuilding the axles with fresh boots while I'm at it too.
What are you using to get it that clean?
 
Other places in the US that are close to salt water have car corrosion problems due to "salt air". Probably mostly where the salt water is warmer than here. I've lived near Puget Sound since 1984 and haven't noticed much problem from salt air. But I've never lived closer than about 1.5 miles from the shoreline here.
Anyway, I got curious about the salinity level of the water around Gig Harbor. I found one very specific result on seatemperatureinfo where it says: "The ocean salinity in Gig Harbor is 27.49% and the average salinity of the World Ocean is 35%."
Found a map of Puget Sound salinity on researchgate that just goes along a path past the general area and shows color codes in the 25% to 35% range going past the Gig Harbor area. So even the south part of Puget Sound is pretty salty, even with all the fresh water inflow from rivers.
Whatever, that's just some spaghetti thrown out there, but I've wondered about this for years.
 
Hey, the rust in the trunk could very well be from the rear hatch drain clogging and causing water into the trunk. This is Alex btw, it was definitely clogged when I had it and I cleared it out. Common issue when sitting in a field collecting pine needles. The clutch issue is confusing, it has a brand new act flywheel, clutch, oem throw out ext.. Hopefully it resolves itself with more miles I know I had less than 500 miles on it also. Are you sticking with the large side mount set up? Love seeing this get the love it deserves.
 
Last edited:
Hey Alex! Glad you found this thread. I'm not too worried about the clutch, I think it will resolve itself with some more driving. I'll use the car to commute for a few days this spring and the stop-and-go on the freeway should get it broken in quick enough.

I still have the Dejon sidemount you gave me with the car, the current plan is to stick with that. I might go with a front mount at some point, but we'll see.
 
The clutch issue is confusing, it has a brand new act flywheel, clutch, oem throw out ext..
The pressure plate and the kevlar disc and the ACT flywheel were all new at the same time?
If they were it should be good.
I emailed back and forth with Tim Zimmer a few years ago about a kevlar disc and he said only use one if you are putting in a brand new pressure plate at the same time. A new kevlar disc on a re-used pressure plate he said wouldn't work. So he wouldn't sell me one because I wanted to reuse an ACT pressure plate that had maybe 600 street miles on it.
For the flywheel, he said a new or properly resurfaced ACT would be fine. Or stock. Or Competition Clutch. But not a Fidanza.
Those are the only problems I know of.
 
Squeezed in a little more work on the car this weekend. I moved the rear subframe and fuel tank outside and pressure washed everything off that I couldn't get to when still in the car. Then I disassembled the subframe (except the lower arms because I need to go a buy pickle fork to get the damn ball joints out). Next step will be paint and powder coat.

54221772763_fed52cd511_b.jpg


54222949853_2423c8a7c4_b.jpg
 
This weekend's project was painting the bottom of the car. I used Raptor 2k in the fender wells and "high traffic" areas, and Krylon enamel in the areas that don't see a lot of abuse. The Raptor liner is pretty awesome stuff, I highly recommend it. It's a little pricey though (~$35/can) which is why I didn't do the entire underside of the car with it. I used one can for both rear fender wells and the fuel tank. The second can I'm saving for the front wheel wheels.

54234669413_67f9046031_b.jpg


54234439691_3db3b0c3d8_b.jpg


54234847465_66ae220d6f_b.jpg


54234439701_3917bddb2c_b.jpg
 
Got the fuel tank put back together and in the car again today. Of course, it got a fresh coat of paint and some Raptor liner while I was at it. The interior of the tank is absolutely pristine and looks pretty much brand new. I wiped a little bit of sediment out of it, but it was very minor.

I also put the Walbro 255 in while I was at it. I don't like the factory mounting method, it just seems like it's leak prone (which I know is kind of silly since plenty of people have theirs installed the standard way). Instead, I cut off the end of the pipe and gave it a little flare then used some submersible fuel hose with Oetiker clamps to secure it. It's not leaking or going anywhere now.

54249371859_31415fb782_b.jpg


I also removed the original power supply wire and pulled it out of the harness to use to trigger the relay when I wire that up. I then replaced it with a 12ga wire that got mechanically fastened and soldered to the original passthrough. Then I encased it in liquid electrical tape to make it look OEM-ish.

54249371854_51c0f0568b_b.jpg


Then I replaced all the hoses that come off the tank and mounted it back in the car. I also refurbed the fuel filler neck while I was at it and go that back in the car too.

54249361198_c93b60699b_b.jpg
 
I want to pull the tank off my car but bolts snap, and ugg, love the porshce two of my friends have a cayanne, and a mint 911 from i forgot what year , but its a concourse one from a long time ago, Love the build.
 
Add Value - Be Respectful - No Trolling - No Misinformation - Participate Often!
Support Vendors who Support the DSM Community

Build Thread Updates

Latest Classifieds

  • For sale Misc Left Over Parts
    Hello, I have a few left over parts for sale, these do not include shipping, please pm me for a...
    • r3dmak
    • Updated:
    • Expires
  • For sale Alpha Injection Clinic 2200cc for 4G63 DSM/EVO
    I have a set of Alpha Injection Clinic 2200cc high z injectors for DSM/EVO. I am stepping up to...
    • spoolinpos
    • Updated:
    • Expires
  • Wanted WTB 2g half rad
    ISO of a 2g koyo half rad or something equivalent.
    • Michael Wucher
    • Updated:
    • Expires
  • For sale Coilover Springs
    Used pair of Eibach coilover springs from an old set of Ground Control coilovers. 2.5" inner...
    • RamenPride
    • Updated:
    • Expires
  • For sale 4G63 Mitsubishi logo early valve cover
    Early Mitsubishi logo valvecover. “1990” All threaded holes are good. Has the 90 style vent...
    • Galant665
    • Updated:
Back
Top











