The Central Hub for DSM Community and Information

For 1990-1999 Mitsubishi Eclipse, Eagle Talon, Plymouth Laser, and Galant VR-4 Owners. This is where the DSM platform history is documented and archived. Log in to help us in our mission, and to remove most ads from the browsing experience.

image3.jpg

4g63t Swapped Mighty Max

This site may earn a commission from merchant affiliate links, including eBay, Amazon, and others.

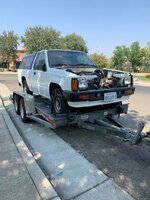
To start this build thread off, I bought the truck back in July of 2021 from a local dsm owner but found out about it back in September of 2020. He had a 95’ eagle talon that was tuned by tedspec but it was involved in a hit and run and the shell was toast. He decided he wanted to swap everything over to the mighty max since his brother in law had already completed a successful swap and made a drift truck out of his own mighty max. The previous owner (PO) posted both the talon and mighty max projects on offerup asking for a best offer for everything. I messaged him that I was interested but didn’t have enough to buy out both vehicles at the time. He sold me his evo 8 ssl seats with wedge brackets that he had in his talon after finding out I had a 2g which is how I met him and got to see the truck for the first time in person. At the time, he had just pulled the engine out of both the talon and mighty max, but gave me a rundown of his plans for the swap. I had just binged a youtube series from “TilltheWheelsFallOff” on his 4g63 mighty max swap and got the itch to get one or maybe an expo/colt vista for a swap. Fast forward a few months and PO had started to sell off parts from the talon that he wasn’t gonna use, some of which ended up on my car. Then in July of 2021, I saw a post on marketplace and immediately realized that the PO was parting out the truck. I messaged him asking how much he wanted for everything and he gave me, what I thought was, a reasonable price at the time. The engine from the talon was a 6 bolt block with a 2g head, which had hks 264/272 cams, bc valve springs and retainers. It had dsmlink v3 and came with a bunch of parts such as a 2g punishment racing intercooler, bastard 20g, and a xline mishimoto radiator. The long block was already mounted in the truck (moved forward from the stock location) but the project still needed a lot of work to be finished. I still had to do all the wiring, figure out the cooling system, redo the fuel system, and do a bunch of other things including the transmission mount. All that work and I couldn’t start working on it until I made room at my parent’s house which was about a month after I paid for the thing. By this time, I had my gsx, my brother’s gst and gsx shell, parent’s truck, accord and ae86 all at home. Here’s some pictures of when I brought it home and all the parts it came with.

image92.jpg


image6.jpg


image11.jpg


image13.jpg


image63.jpg


image65.jpg


image83.jpg


image56.jpg
 
PO had sold me the project because he didn’t have the time to work on it and I thought I could get it done by the end of 2021 LOL. I was going into my senior year of college at the time and I didn’t anticipate it eating up so much of my time. On top of that, the clutch on my gsx gave up so I needed to get parts to fix it. I did pick up a free black Mishimoto intercooler from my friend Chuchu (el_chu_dsm on instagram) within a few weeks of bringing the truck home but made slow progress as I didn’t have it prioritized. I lowkey neglected the truck but did my best to collect parts as the opportunities came up. I still regularly went to picknpull whenever dsms popped up and one day I stumbled on a 90 gsx. I ended up taking the transmission to use as a core for my gsx and took the seats and steering wheel for the mighty max. By the end of 2021 I found a gauge cluster with a tach in Illinois and had it shipped to me since most trucks lack this option. I also cut another radiator support since PO cut the original one to make removing the engine and transmission easier. I’ll probably keep the support removable for this reason but still need to paint it.

image84.jpg


image85.jpg
 
As time went on and summer hit, I started to want to get the mighty max going so I stepped it up a bit and ordered a h23 turbo manifold. The manifold was readily available for about $50 on ebay and others doing a rwd 4g63 have had success using it. The bolt pattern is similar enough and with some porting, grinding and redrilling, it fits pretty decently as a 4g63 t3 log manifold. I started looking for a hx35 or h1c but none local were in the budget so I took the ebay t3 20g that was on our gst (we weren’t gonna use it anyway) and mocked it up. I figured it would work in the meantime and was free so I stuck with it.

image2.jpg


image12.jpg


image15.jpg


image33.jpg


image71.jpg


image91.jpg
 
Around this time I also started trying to get the cooling system figured out. PO included a frontline fabrication thermostat housing delete that had female 16 orb threads. Also included was a 16 orb to 16an 90 degree fitting but I was still unsure of how it was going to work out so I ended up ordering a billet inline thermostat housing from modularmotorsportsracing on ebay. It had 16 orb female threads on the inside but also could adapt to 1.5” hose. I had also ordered a hose adapter from 1.25” to 1.5” with a 1/8 npt sensor port on it. The plan was to somehow go from 16an to 1.25” hose to then connect to the inline thermostat housing with 1.5” radiator hose and then maybe just use 16an from the housing to the radiator. I decided to buy a 1.25” barb to 16 orb with the hope of just running a 90 degree radiator hose to the hose adapter but there wasn’t enough firewall clearance. I then decided to braze the hose barb to the original 90 degree fitting in order to route the hose the way I wanted. The plan with the thermostat housing was to use a 1/2 npt tee fitting and run one port to the heater and use the other spot for the dsm coolant temp sensor for the ecu. Ultimately this changed but not until recently and will soon change again LOL

image40.jpg


image78.jpg


image87.jpg
 
Still the Summer of 2022 and I knew I wanted aftermarket gauges. The truck came with a AEM uego wideband, glowshift oil pressure, and autometer boost gauges but came with a 2g pillar pod. I wanted something more discrete and found a montero gauge pod one day at the junkyard. I got it with the intention of using it on the dash and displaying the 3 glowshift gauges (2 I later ordered). I wasn’t sure how I wanted to go about closing the gap on the sides and tried air drying modeling clay but it was too fragile. I ended up just using some abs sheet I had from another project and used some plastic jb weld to stick it. I plan on sanding it down and blending it better but it doesn’t look too bad considering the effort.

image20.jpg


image54.jpg


image72.jpg


image79.jpg
 
The fuel system was somewhat interesting. PO had the talon tuned on speed density and flex fuel so I figured I might as well make the truck the same as it came with all the parts like a flex fuel sensor and fuel pressure fuel lab pressure regulator. I ordered a 6an ptfe kit from evil energy on amazon along with a torque solutions 6an fuel rail adapter as the truck only came with one. I never worked with ptfe fittings or an fittings in general before this but I made the feed and began mocking up where I wanted to put the fpr in the engine bay. I decided to put it where the stock coolant overflow bottle went and relocated the bottle to where the wiper reservoir went. I ended up using the stock fuel filter location under the truck because I thought it was cleaner than moving it into the engine bay since space was limited.

image74.jpg
 
I found the right combination of couplers and pipe for the intercooler and rwd evo 3 intake manifold. It took some time as I needed to find an aluminum elbow and out of sheer luck, I happened to check Performancepartout and they had one listed at $15. I had a universal 2.5” kit but the 45 and 90 degree couplers would not work so I had to order a 60 degree coupler. The intercooler had a 3” inlet/outlet so I bought a 90 degree 2.5” to 3” for the turbo side and a straight 2.5” to 3” for the intake side. I used an old 2.5” pipe off the gst for the rest of the intake side and found a 2” to 2.5” straight coupler for the turbo. With the way I set it up, I just had to clock the turbo so that a 12” straight 2.5” pipe connected the turbo to the intercooler. I plan on welding a tial flange to the intake side later on when it’s driveable.

image29.jpg


image31.jpg


image80.jpg


image89.jpg
 
By the end of Summer 2022, I had started to unloom the engine wiring harness and organize any resources I had found towards the wiring side of it. I tried to put it off as much as I could since most of the information posted for rwd specific wiring is based on a 1g wiring harness. Being that I was using a 95 harness, I felt pretty intimidated by the whole thing. I started by unlooming the harness and labeling what I thought I needed/didn’t need and important ecu and mpi relay pins. I’ll go over specifics on what is needed on a 95 ecu and harness later in this thread. I initially planned to route the harness through the stock ac firewall plug to try and tuck it a bit but decided to move it to the driver’s side when I actually got it running. Honestly, running it through the driver’s side presented issues with trying to keep the harness away from the pedal assemblies and up high in the dash. I might switch back to the ac plug route like it was in these pictures but we’ll see.

image8.jpg


image9.jpg


image31.jpg
 
I didn’t really touch the truck for the rest of the year since I started my last semester in college. I majored in mechanical engineering and was required to build my senior project that I designed the semester prior which ate up most of my free time. Since graduating in December of 2022, I got motivated to get the truck going. I started by ordering some more 6an fittings and adapters to get the fuel system buttoned up. I installed a walbro 255 that I ordered from extreme psi during black friday and used a submersible fuel line: gates 27093 to connect it to the stock sender. I also bought a relay kit from amazon to help the pump stay consistent. I decided to keep the stock sender for simplicity and ordered an adapter to go from the stock flare (m14x1.5) to 6an male to connect to the feed line from summit racing: ear-at9894dbherl. I did pick up another sender from picknpull to use bulkhead fittings in the future but still haven’t gotten that done yet. I used the stock return from the tank to the fpr and bought a 6an to 5/16” adapter with a 3ft long fuel line for startup.

image30.jpg


image46.jpg
 
I ordered a bunch of other stuff at the beginning of this year. I got a glowshift boost gauge and water temp gauge to match the white face oil pressure gauge that came with the truck. I’ve had good luck with glowshift gauges in my gsx but used an aem x series for the wideband in that car vs the aem uego in the truck. I also ordered a gauge pod off amazon to go on the top steering column cover. For the wheel, I mocked up a low mile base 1g one rather than the 90 wheel that I picked up at picknpull.

image68.jpg
 
For exhaust, I decided to use the o2 housing that came off the gst that bolted to the turbo. I flipped it so that the flange faced upwards to allow me to make a ghetto hood exit for the first startup. Obviously not permanent, but I got a bung welded for an o2 sensor and cut it roughly where the hood would be

image8.jpg


image53.jpg


image54.jpg


image77.jpg
 
The truck still needed a few other used parts to get it running including a throttle cable. I tried using the stock cable from the mighty max since others have had success using it, but it didn’t work for me. I then tried using one of the 2g cruise control thing cables and it looked like it’d work perfectly but the cable was too short so I’d have to make my own. I then decided to check other mitsubishi cars at the junkyard for cables that looked like they’d work and got one from a 1999 montero sport. I grabbed the cable mount for it and it fit pretty decently on the truck after bending it slightly to make the cable shoot straight at the throttle body. The cable is a little long but is just looped on the side of the intake manifold which doesn’t bother me.

image27.jpg


image61.jpg
 
Originally I had just wanted to get the truck running but decided I wanted to make the engine bay decently clean. I ordered a billet coil pack mount from rtm in canada that sits on top of the evo 3 intake manifold, making room for the throttle cable to run on the inside of the manifold; I like how it kept the spark plug wires clean but also because of the ptu mount on the back on the rtm bracket. I could have probably made the mount but having lost access to the machine shop at school, I figured it’d be a lot less work/time to just order it. I don’t know if it was just because of my manifold but one of the mounting bolts towards the back of the manifold doesn’t fully thread into the hole and had trouble lining up with the bracket. I also drilled and tapped a few 1/8” npt ports on the manifold rather than run a vacuum block.

image5.jpg


image24.jpg


image75.jpg
 
For the cooling system, I kept the frontlinefab piece and fitting I brazed but opted to get a 90 degree 1.25” aluminum pipe from speedway motors to run under the intake manifold. I tried to braze a 5/8” barb bung to it, but it was really thin and I ended up blowing a hole through the pipe. Using some putty from autozone, I filled the small holes that I couldn’t fix and it sealed fine for startup. The thermostat housing I mentioned earlier was then connected to the pipe using a 1.25” to 16an orb fitting and a 1.25” silicone hose. I used a stock 2g upper radiator hose to connect the housing to the radiator after brazing a 35mm pipe an orb fitting. For the lower radiator hose used a flexible hose off rockauto: GATES 25255 (I think) for the lower hose which cleared the alternator and wastegate. I kept the modified mighty max water pump to make the radiator hose routing simple and also keep the stock heater hose.

image25.jpg


image83.jpg


image92.jpg
 
Nearing the end of things I needed to get the truck running, so I began looking for a water pump pulley that would work. Most people just use a press or vice to crush a stock dsm pulley to get it to line up with the mighty max water pump but I didn’t want to risk the wobble. I found that a late 90's/early 2000’s galant pulley might work but was smaller than the stock pulley so it’d spin faster than stock. I ended up using one from a 98 mirage with a dsm small water pump to power steering pump pulley as a spacer. While looking for a pulley at the junkyard, I found a 94 mitsubishi expo that I snagged the alternator off of. It uses the 1g style connector like the stock mighty max charge circuit and is 75 amps. I might look for a 90 amp or go with a saturn alternator later on but this one seems to work. For the tensioner, I used a 5-1/2” heim joint tensioner from amazon and used the stock 2g belt. Note: dsms use a 4 rib pulley/belt and the mirage water pump pulley has 5 (Idk if it’ll matter long term but I hope to find a better solution).

image7.jpg


image84.jpg
 
One of the last things I had to do before startup was to change the starter plate. PO had a cut of what I assume is the stock mighty max starter plate so I ordered a new fwd turbo plate from JNZtuning (MD008892). For the clutch setup, the combo is a fidanza 1g aluminum flywheel, custom clutches clutch (splined for mm trans: 1” 23 spline), and Exedy MBC567 pressure plate. The transmission itself also has a tuff pan which helps keep the km132 rigid and hopefully reduces the chance of the case cracking. I included recent pictures of the flywheel and clutch.

image45.jpg


image18.jpg


image23.jpg


image43.jpg


image60.jpg


image4.jpg


image44.jpg


image50.jpg


image40.jpg


image72.jpg


image43.jpg


image55.jpg
 
So the day came when I finally got the truck ready to start and failed. I checked timing and swapped out the idler pulley for a new one since the one on there got some surface rust from sitting. I added new fluids, installed a mechanical oil pressure gauge, and added some distilled water to the radiator and the thing was just cranking. The next day, I realized I mixed up the isc connector with the injector resistor pack one. I had completely forgot to even have a resistor pack until I found the labeled connector for the isc. I also realized I had the firing order for the plugs flipped. After fixing those two things, it fired right up.
 
Last edited:
After getting it running, I wanted to make it drivable. PO decided to move the engine forward a couple of inches to gain firewall space and used a mitsubishi starion tail shaft to keep the shifter in relatively the same place (still got the droveshaft extended slightly). The issue with that was that the transmission mount still needed to be cut and extended about 3” so I had my friend weld it for me. All that and it didn't go into gear when it was running. Most people extend the throw out bearing (what I ended up doing) but another possibility is that the clutch disk is too thick. I should mention that I always planned to get a more reliable transmission after this one blows since it doesn’t like much torque even with the tuff pan. I’d like to keep it manual but a powerglide would also be cool for drag racing. Options for manual include a t56, ar5/r154, or a cd009 from a 350z that is currently being developed. Either way, hopefully, I don’t need to swap from a km132 soon

image28.jpg


image26.jpg


image64.jpg


image15.jpg


image49.jpg
 
I hadn't pulled the transmission out yet but started addressing a couple of issues after startup. I had a leak on the turbo drain since I used 2 cut stock drain tubes for the turbo and oil pan connected with a ¾” hose which was fixed by repositioning and tightening the hose clamp. I fixed up a 6 bolt timing cover that had a piece missing from it to use since I would rather have one when it’s drivable. The stock radiator drain was leaking and ugly so I got an aluminum one from oreilly: murray 433700. It fit well after widening the mounting holes and required a new cap: murray 7013. For the fan, I chose a 14” spal fan since it was on sale for $138 and was rated for about 1800cfm. I probably could have gotten a 16” one but didn’t think the extra amp draw and money were worth it. After receiving it, I decided to make a fan shroud due to how much of the radiator wasn’t covered by the fan.

image33.jpg


image36.jpg


Screenshot 2023-05-16 081351.png
 
As far as other stuff I have planned, I ordered mostly cosmetic stuff. I got some new fidanza cam gears, a clear timing cover, a billet spark plug cover, and a jmf 2” bung/cap. I have a diamond logo mitsubishi valve cover that I picked up at junkyard that has a gouge mark on the sealing surface of the oil cap that I wanted to run on the mighty max so the jmf cap should fix that problem. I’ll probably also get two 8an fittings welded onto the cover and paint it blue to match the cam gears, future gates timing belt, and ngk wires. For the interior, I found a lancer center console (basically the same as an evo 8/9 center console) but I need a short shifter since it moves when going into different gears. I’m gonna be switching the oil filter housing to a 90 or forward facing once I get an oil pressure range since the one on the truck has a water-cooled 6 bolt housing that has been ported. I also plan on fabbing up a full exhaust to the back but adding a cutout side exit or something to keep it lowkey but also cool. I used the internal wastegate to start it up but I’ll be switching to an external one and may make a dump.

image1.jpg


Screenshot 2023-05-16 083729.png
 
Got the shroud installed and it fits pretty well. I used a 1/16” aluminum plate and made a frame using 1/16” aluminum C channel. I then riveted/jb welded a couple of tabs to the back and it fit pretty good. I might add rubber flaps so the air has the means to escape if I’m up to speed and the fan can’t keep up. I also mocked up a mishimoto coolant overflow tank next to the radiator. I drilled and tapped a cheapo tank cap for a 1/2” npt barb. Ideally, I’d like to tuck the hose in between the radiator and overflow tank but I’m not sure it’ll like the heat. The stock one would probably work well but I’m sure we can agree that the mishimoto one looks better.

image68.jpg


image79.jpg


image19.jpg


image39.jpg


image29.jpg


image42.jpg
 
Since I wasn’t able to shift into gear once the truck was on, I started looking into extending the throwout bearing. There’s a lot of conflicting info on how much to extend the tob so I decided to take a dsm tob and compare it to the mm tob and found about a 1/4” difference between the two. The most common way I’ve seen people extend the tob is to use a press to press the housing until it matches the distance you want to extend and weld/modify the housing so it is able to clip into the fork thing. I still didn’t have a press so I decided to take the mm tob apart to remove the bearing. I then took an act 2g dsm tob I had laying around, cut the legs off, and fit it up against the mm housing after trimming the housing a bit. My plan was to have my friend weld the dsm tob to the mm tob housing. I went to home depot and bought a 1.25” wood dowel that kept the two pieces concentric and my friend tack welded it together after trimming a bit of the housing face off and making a few holes. The rubber part of the dsm tob caught fire a few times while welding and a bit of the grease seemed to have melted as there was a thin layer lining the bearing race. This probably could have been avoided if we let it cool but I just wanted to try the act tob. I'll probably order an oem tob and keep the ears to just weld those to the mm tob housing. That or get get a press. I just didn't want to shell out the extra $40 +shipping without knowing if it'd work.

image69.jpg


image20.jpg


image63.jpg


image62.jpg


image78.jpg


image51.jpg


image38.jpg


image90.jpg


image17.jpg


image35.jpg


Screenshot 2023-05-16 114103.png


image22.jpg


image52.jpg


image59.jpg
 
To change out the bearing, I decided to pull the whole engine and transmission as one assembly since my radiator support is removable. After removing a few accessories I got the engine and transmission out. I got the tob swapped and put the assembly back into the truck. I struggled a lot with trying to get one of the driver side motor mount bolts installed so I resorted to going from the m10 bolt I had to a 3/8” grade 10 bolt from ace hardware. I had this issue the last time I pulled the engine for the starter plate and by switching the bolt, it made it bolting it in super easy. Once Installed, I connected the clutch cable and it felt like an actual clutch this time when pressing it in.https://www.youtube.com/watch?v=-eNV0oNtI7M
 
After getting the tob changed and reconnecting everything, I jacked up the rear end of the truck and went to fire it up. I messed up twice here. First I started it with no distilled water; only ran for a couple of seconds before I remembered. After firing it up again, I got out to the front of the truck and realized I left painter's tape on the turbo inlet. Probably one of the stupidest things I’ve done and I didn’t react correctly imo. My instinct was to pull the tape off instead of shutting the truck off. The tape was stacked on itself and a part of it had unstuck, leaving a place for the turbo to pull air from. I’m not 100% sure no tape got sucked up as I didn’t look at it much before pulling it off, but my memory says it wasn’t torn so hopefully not. I left the truck running for a couple of minutes and it seemed fine and then put it in reverse and 1st gear while jacked up. You can see how I had it taped here

image11.jpg
 
Add Value - Be Respectful - No Trolling - No Misinformation - Participate Often!
Support Vendors who Support the DSM Community

Build Thread Updates

Latest Classifieds

Back
Top












