The Central Hub for DSM Community and Information

For 1990-1999 Mitsubishi Eclipse, Eagle Talon, Plymouth Laser, and Galant VR-4 Owners. This is where the DSM platform history is documented and archived. Log in to help us in our mission, and to remove most ads from the browsing experience.

10307433_10203578053793147_7251949571235150993_n.jpg

1995 GSX Build - Journey to a 450awhp daily driver

This site may earn a commission from merchant affiliate links, including eBay, Amazon, and others.

I would wipe that hood down with acetone and let it set out in the sun or in the booth for a while before spraying it.. That stripper is bad news when being used on fiberglass or cf because its fairly porous and the stripper will soak into it.. Acetone is a very quick evaporating cleaner, esp good for prepping fiberglass and cf.

Looks good.. Is that metallic black a factory color? or from a different car? I am spraying mine Cosmos black from the BMW which has a very similar flop

It is fiberglass safe stripper so it should be ok but I do plan to clean it well before painting it. Thanks for the advice :thumb:

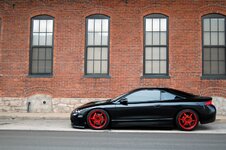
The color is pxr (Dodge/Chrysler color, brilliant black metallic) with a little bit of gold pearl mixed in. I love it :D


January 6, 2012 – Removed wheel spacers, solid carrier bushings, solid motor mount


I still need to fix the SRS light that came on after the dash swap but I did a few more things to the car.

First of all, I have a strange grinding/rattling sound from my drivetrain. I jacked the car up to see if the carrier bearings may be torn or sagging or anything and they looked fine. Decided to go ahead and install my solid carrier bearing bushings though.
826fed75.jpg


I am tired of my tires rubbing on the outer fender so I wanted to double check that the spacer was needed before I tried to roll the fenders some more. Seems that these tires are a little less wide than my other ones because I have plenty of clearance without the spacers! I should have less rubbing problems now :fyeah
5fdac0bd.jpg

50e6d7bb.jpg


Goodbye spacer
c1d2c1d4.jpg


Went around to take the other spacer off and noticed something odd with the caliper and rotor...the edge of the rotor was a little rusty (the other side is shiny). Can anyone see the problem with the caliper?
6a0a224e.jpg


What about now? This is after I fixed it
937d3a2c.jpg


If you guessed that the pins were out, you are correct! I don't know how they backed out but I am glad that I caught this now before something worse happened.
48d88873.jpg


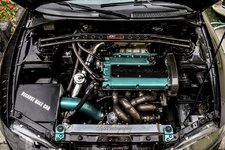
And last but definitely not least, I installed a solid front motor mount.
48744964.jpg


I wasn't really expecting it to make too much of a difference, but wow. Shifts feel sooo much better just driving to work and it doesn't seem like there is any slop. And this is only with the front one installed! I don't even know if I will proceed to install the rear one because it may not be needed. I can't even tell a difference in vibrations as I already had the front prothane insert in and prothane side mounts. This is a very good mod though
 
this car is definatly sick man. I cant wait to hopefully see this thing come may

I'm planning on making it to the meet if the weekend lines up for me so count on me being there :p


January 11, 2012 – More work on the hood


Got bored last night and decided to work on my hood again. Decided to bring a new weapon to attack the paint with...
cd995ec6.jpg


So yet again, put on the stripper and let it sit
da53dc91.jpg


Let it sit for a while and then scraped/wiped off the paint and primer. Did that 2 more times and still didn't get it all off
01492d4c.jpg


Started working on it this morning and decided to use the stripper again so I could just wipe off the primer
3c6b779f.jpg


Finally got it to this point after wet sanding and then taking it outside for some more regular sanding. The filler still needs to be sanded off and then inside of the side vents but it's almost there :)
f46d3ee8.jpg

03444d87.jpg

cc9937ed.jpg


I am probably just going to spray it with plasti dip until I save up money for paint. I would rather do something temporary than attempt to paint it myself and have to do this process all over again
 
I say keep the stock hood.

I would if I didn't overheat last summer WITHOUT a/c...I am putting the a/c back in for this summer so I have to have vents of some kind or else it will be a sure thing that I will overheat

Oh, and it isn't my most preferred hood of choice but it was free so why not. And I cut out that center divider, never liked it
 
^^Good to hear!


January 12, 2012 – Snow Pictures


SSNNNOOOOOWWWWWW!!!!!!!
Nothing too special, just took some pictures out in the snow before it disappeared.

Good thing it was tucked away all night :)
DSC_0575-1.jpg

DSC_0577-1.jpg

DSC_0585-1.jpg

DSC_0601-1.jpg

DSC_0602-1.jpg
 
Last edited by a moderator:
Holy smokes your car is low. If you drove it in the winter up here in Toronto, you'd be plowing the streets!

Fantastic ride man. So sleek. I am so damn jealous. Haha.

I'm just hoping to get my rust bucket up and running before spring.

Have someone working on it for me.
 
Haha this winter was very very mild around here so what you see there is the most snow that we got pretty much. It snowed last week but was gone the next day as well. Next winter it will be raised and have winter wheels on it but I just never bothered this winter since snow was never in the forecast haha.


January 20, 2012 – Turbonetics Housing Machined for Holset


Housing has been machined for the holset exhaust wheel

untitled1.jpg

untitled.jpg


Fits perfectly!
26f51d48.jpg

1fa42132.jpg
 
Last edited by a moderator:
January 23, 2012 – Little bit of hood work and fog light bezels in

Just a small update


Yet more sanding on the hood...and cutting! I hate that center divider in the vent so I took a grinder and got rid of it. I am going to have those side vents filled in most likely since they serve no purpose.
a686ebfd.jpg


And I plastidipped my fog light bezels and put them in. It looks sooo much better
1ffa4256.jpg
 
Last edited by a moderator:
What dash were you swapping out/in?

Chances are you just swapped out the dash harness and away you went. Just wondering because I'm going to be swapping a spyder dash into my GSX, and vice versa. Figured there would be an issue with the roof controls.
 
Swapped in the black dash from a spyder for my gray dash. I did just swap out the harnesses because they were different for some reason. I don't know if it was because of year or because one was a coupe and one a spyder but there were slight differences. It isn't too difficult, just a little time consuming. Good luck!


January 30, 2012 – Holset rebuilt, Downpipe wrapped, AC parts going in, and mud flaps acquired


Did some work this weekend...rebuilt the turbo, wrapped the downpipe, put in the ac condenser, and put in a pusher fan

Tools all set out
1cffcca8.jpg


What have I got myself into :derp
791d5ebc.jpg


Turbo rebuild went sort of smoothly...had some problems with the thrust collar being really tight on the shaft but talked to Justin on tuners and he said as long as it seated then it should be fine. So turbo rebuild is done! Ordered the rest of the parts to do the headgasket/timing/bsek so once I find some time I can have the car down for a couple days the holset will be on :)

Again tools set out for what I want to do...I didn't even end up using half of this stuff though. Lol. The tubing was too big to do what I wanted with it and the tape wasn't what I thought it was. Then I didn't have time to use the sheetmetal to do any ducting so that will come at a later time.
06f168cc.jpg


Started tearing it apart for a few changes
d01ccc29.jpg


As I have said I want ac back in the car for summer so I decided to give the ac condenser a bath before it went in
747a0606.jpg

Dirty
80a5f41d.jpg


Condenser in and foam around the edges to seal it to the radiator.
d95cc787.jpg


Fan in position and wired up
aa967c1d.jpg


Downpipe wrapped and being painted with the DEI coating.
aa6afdf0.jpg

Drying
078b9470.jpg


Read a few threads where people said it's a bad idea to wrap the flex section so I cut out that part
4a086472.jpg


On a sidenote...
I love coming home to packages :)
3c0dd64e.jpg


Mud flaps are in :D
91a7f731.jpg


One small problem though...I don't even know these will be functional since my wheels are so aggressive, they look puny compared to them LOL. I may sell them for a profit if they don't function for me
 
Last edited by a moderator:
February 3, 2012 – Made a fan shroud


Got bored last night and needed to figure out a new way to mount my main fan. The car ran just a little hot yesterday with the pusher fan being the only one going so the main puller needed to go back on.

I figured the easiest way to go about doing this would be to make a shroud. So I took some of the sheetmetal I bought for the radiator ducting and cut it in half. Then I measured out how big I needed it to be and marked it.
1063a795.jpg


Cut it out and bent over the edges to a 90* then put the fan on top to trace it out.
d690b2ac.jpg


Cutting out the middle
e91bf868.jpg


Almost done. Holes are drilled and middle is cut out, just need to mount the fan to it and put it on.

fe4004e6.jpg


Fan mounted to shroud and rubber vacuum line around the edges of the shroud to seal a little better.
f2cb679e.jpg


Installed
92bbfa9d.jpg

73ad10b7.jpg
 
Last edited by a moderator:
Damn. That was a good idea and turned out pretty good

Thanks :) I need to take it back off and fix a few things but it is working great so far :hellyeah: One of these days I may have it fabricated out of some thicker stuff so it looks a bit better as well


February 8, 2012-February 10, 2012 – Aerocatch hood latches in, oil pressure gauge installed, cigarette lighter relocated


Once again, posting these two updates separate didn’t really make for big updates so I am just joining them up.


Aerocatch hood latches in


Aerocatch latches and passwordjdm plates came in today :)
ecae7b4e.jpg


Also, thought this was kind of funny seeing as I drive over stuff like this all the time LOL
9f6b3251.jpg


Oil pressure gauge installed, cigarette lighter relocated


The Holset install is slowly getting closer so it was time to get ready for the oil pressure gauge install in the feed line. Went ahead and put the gauge in the car...not exactly where I planned though. I wanted it in the other hole in my gauge cluster 2 gauge pod but it is way too long. I got another black center console from a friend a bit ago that already had a gauge hole cut where the cigarette lighter was...so that got relocated and the gauge found a home

Passenger side, seems to be enough out of the way
af81150c.jpg

86f6f201.jpg


Oil pressure gauge ready to go, just need the sender hooked up
8cd06c0d.jpg

840fe733.jpg
 
i love mudflaps. on the right car they look like pure sex. love the build though, good work on it, cant wait to see the end result.
 
Me too! I just need to have my 2gb side skirts painted and I can put the mudflaps on and see if I like the look of them on my car...on a good note, this post will make this thread up to date!


February 20, 2012 – Holset is on


So here goes, last weekend I went forward with the h1c install. Got the manifold off and all without too much hassle.
3107e5bc.jpg


Then took off the worn out turbonetics 50 trim and bolted on the h1c with the new housing and heat shield
5a3a961e.jpg


Well after mocking it up on the car I realized I couldn't clock my turbo the way I need it to be clocked because of my oil feed...so out came the grinder.
ae968fe7.jpg

997ac0e4.jpg

Clearance made.

So next I needed to tap a hole for my boost source so I started working on that
9180be36.jpg


Got that finished up and all was good to go. Of course I ran into various problems along the way such as too small of couplers, too messed up of an oil drain hose etc etc but when you are frustrated pictures aren't the top priority LOL. Anyhow, here is the first holset on.
634a08da.jpg

756cead6.jpg

bf801fc6.jpg


Thought that was over huh? Wrong. Had the h1c on for one week exactly and it felt like it was developing some shaft play (I think I may have been overreacting though...). Either way, I bought a new turbo...a 7 blade hx35. And it was diiirrttttyyy.
DSC_0006.jpg


I cleaned it up and then just resprayed it silver until I decide what color to powdercoat it. You can see it in some of my pictures later on.

Car apart once again
DSC_0011.jpg


HX35
DSC_0009.jpg

H1C
DSC_0010.jpg


A mess
DSC_0008.jpg


Back together
DSC_0007.jpg


Experimenting with my new camera and exposure settings :)
DSC_0005.jpg

DSC_0003.jpg

DSC_0002.jpg
 
Last edited by a moderator:
Why would you want to look away from the road to view your oil pressure?

Because it only takes a split second and mostly gets looked at during idle to make sure it isn't low. The center console was just sitting in my attic with a hole cut in it for a gauge when I got it so I used it. The gauge itself was too long to fit in my gauge cluster pod so this was the only other option :thumb:
 
Thanks for the reply. And it would be different because of the roof open/close switch. (replaces the rear window wiper)
It's already out too. Got the dash, then decided to buy the whole car after they cut the harness out... :S Good fun...
On that note, did you have plans for that spyder harness? Shoot me a PM if you're looking to rid of it, I might be able to use it! :D

Side note, awesome with the mudflaps! Didn't even know these cars had them.
 
Also, how sweet did it feel to score a all black leather interior?!
It was a glorious day when I did that. Drove all the way to NYC to get mine and my oh my is it ever sweet!! Got lucky and found a couple doner cars to equip my spring project with the same ;)
 
Add Value - Be Respectful - No Trolling - No Misinformation - Participate Often!
Support Vendors who Support the DSM Community

Build Thread Updates

Latest Classifieds

  • For sale 2g 2G DSM Link V3
    2G DSM Link V3 $600 + shipping and paypal fees* no cable included * cables are 75 on the...
    • jersygsx
    • Updated:
    • Expires
  • Wanted 2g Shot in the dark (2g Pass strut cut out)
    Need 2g strut tower to save time.
    • frosh29
    • Updated:
    • Expires
  • For sale 2g 2G Mishimoto Radiator & Fan Shroud
    2G Mishimoto Radiator & Fan Shroud $200 + shipping and paypal feesYou must be registered to...
    • jersygsx
    • Updated:
    • Expires
  • For sale VIRGIN 4G63 6-BOLT TURBO HEAD
    Came off a virgin stock AWD Auto 1G DMS (91), also have matching block and crank which are also...
    • The_Partout_Spot
    • Updated:
    • Expires
  • For sale 1G DSM 4G63 6-BOLT TIMING COVER
    Used, see condition in photos. Buyer covers shipping / fees.
    • The_Partout_Spot
    • Updated:
    • Expires
Back
Top