The Central Hub for DSM Community and Information

For 1990-1999 Mitsubishi Eclipse, Eagle Talon, Plymouth Laser, and Galant VR-4 Owners. This is where the DSM platform history is documented and archived. Log in to help us in our mission, and to remove most ads from the browsing experience.

10307433_10203578053793147_7251949571235150993_n.jpg

1995 GSX Build - Journey to a 450awhp daily driver

This site may earn a commission from merchant affiliate links, including eBay, Amazon, and others.

Cant wait to see the finished car, And hopefully some high res pictures of your car with the red wheels.
 
^^ Getting there..keep in mind I am just now getting to July of last year ;)


July 6-22, 2011 – Saturn alternator swap, car troubles, and track passes


Ok so this update is spread out in a week or so but I have no documentation of when it was finished, so I am compounding it all into one large update.

Alternator was going bad so I decided I might as well do the Saturn alternator swap while I am replacing it anyways. Going from a 65amp alternator to a 105amp that keeps power during a wot pull should be helpful. Also picked up a spare intake from a friend and bored it out to match up with my 1g throttle body...going from 53mm to 60mm(?) there, so another big difference.

Made some progress tonight and will finish it up over the next few days.
Had to do some grinding on the alternator for it to fit right. I had to grind more than this but I forgot to take a picture of it when I was done.
IMG_0466.jpg

Here is how it looked when I started on the intake tonight
IMG_0469.jpg

And when I finished for the night
IMG_0470.jpg

Cleaned up and brought my injectors inside to soak in gasoline for the night to get rid of the black goo buildup
IMG_0471.jpg


I took out the ac compressor since the lines and condenser are long gone and had to figure out a way to recreate the spacer for my cv axle, so I came up with this
IMG_0474.jpg


But, I didn't like that, so I cut up the ac bracket instead. The piece on the bottom is what originally bolts up there, I just didn't need the top piece anymore.
IMG_0475.jpg


The alternator tension bolt was too short so I found that one of the bolts that held on the ac bracket was the same thread pitch
IMG_0467.jpg


It didn't fit into the tensioner so I got out the grinder and went to work again.
IMG_0477.jpg


All finished and tightened up
IMG_0478.jpg


Everything off and ready for the new throttle body and intake manifold
IMG_0473.jpg


I made a gasket that I figured would work for the thermostat housing...but I was stupid and didn't extend it out to the bolt holes...
IMG_0472.jpg


So therefore this happened when I went to do the last nudge to make sure all the bolts were tight..
IMG_0481.jpg

IMG_0483.jpg


Luckily a friend of mine had one so I went to ozark and got the replacement which had a rusted and broke water neck going to the heater core
IMG_0485.jpg


So, I hammered out the one from the housing that was on my car and then swapped everything over to the new housing
IMG_0486.jpg


Almost finished!
IMG_0480.jpg


Annnnnnddddd..Started it up when I was finished and it was running on 2 cylinders and the tach was fluctuating erratically. Bummer. Proceeded to test all of the electronics and make sure they were within specs. Everything checked out, got fuel, spark, everything. I took out the injectors and tested each one individually, put them back in, then took them back out again to switch them around. Swapped out the ptu, coil pack, checked all connections to make sure they were tight. Put the 2g throttle body back on and hooked the fiav back up with no change, then put the 1g throttle body back on. Checked all grounds to make sure they were good...it was a long process and made me angry that I couldn't figure it out. I somehow got it running on 3 cylinders but something still wasn't right. Bought a spare CAS from a local dsmer and put it on and still ran on 3 cylinders. Hooked my laptop back up to take a log and noticed an engine code that hadnt been there before. Downloaded firmware to eliminate it and car started up and ran fine.


I would like to note here that to this day I do not know what the problem was. The code that came up was a common one with the Saturn alternator swap so it shouldn't have caused the issues I had. The CAS I bought started leaking so I put the old one on and it is still good, so the CAS never was the issue like I suspected. I'm thinking the thing was possessed or something and magically came back to life. The car was down for a week while I tried figuring this out and it wasn't a pleasant time for me and my relationship with the car.

So got it back running and had it tuned again yesterday morning. Set the boost at 26psi and improved spool by 400rpm. Turbo is most likely bad though as it is a 50trim and hits full boost at 4300rpm, so something is wrong with it. (I was denying the inevitable; the major shaft play was likely the cause the whole time.)

Went to the track last night (I want to say this was July 22nd) and ran a new personal best of 12.61@112 with a 1.89 60'. Never got the launching technique down so it could be improved still but I am happy with that and will settle here for a while until I get a new turbo. I am going to focus on radiator/fmic ducting now. Plan is to buy a new front bumper as the one on it is cut for a greddy fmic and doesn't look too well. Then I will cut and modify the new bumper and use sheet metal to seal the fmic up to the bumper. Then I will use the fog light hole to duct air up to the air filter and seal it off from the engine. Going to install a pusher fan in front of the turbo manifold for a little extra air and then seal the radiator to the fmic. Last on the list will be a hood vent or buy a vented cf hood. All of this is to prevent such hot intake temps in the summer and to prevent overheating on the hot days. Plus it will help for my future goals of autocrossing it and road racing.
 
Last edited by a moderator:
July 24, 2011 – Cam gears, quick release bumper kit, video from track

Got a few goodies. One in the mail and one from autozone
Cam gears! :OMGohyea::
IMG_0491.jpg


Annnddd spark plug wires..ones on it were so bad that the metal electrode things inside the spark plug wires all stayed on the spark plugs when I pulled them out
IMG_0497.jpg


Also, I bought the quick release bumper kit earlier in the month.
2g Quick Release bumper kits - DSM Classifieds


Video of my car from the track a couple days ago...notice my loss of spool and slow shift to second. Trans issues and spool issues really slow ya down
<object width="640" height="360"><param name="movie" value="http://www.youtube.com/v/DAd1nR6ZmLM&hl=en_US&feature=player_embedded&version=3"></param><param name="allowFullScreen" value="true"></param><param name="allowScriptAccess" value="always"></param><embed src="http://www.youtube.com/v/DAd1nR6ZmLM&hl=en_US&feature=player_embedded&version=3" type="application/x-shockwave-flash" allowfullscreen="true" allowScriptAccess="always" width="640" height="360"></embed></object>
 
Last edited by a moderator:
^Could have been much better considering my mods LOL, thanks though


July 30, 2011-August 4, 2011 – Evo Brakes bought and in

Have another update!

I have been considering what I want to buy for my car this fall and have been back and forth on whether or not to buy motor parts or something else that I have been wanting done....these made up my mind. They were a decent price so I jumped on it.

Complete setup, front and rear:
DBA 4000 XS Rotors
Evo calipers with oem pads
Hawk pads

August 4, 2011

Got home today to see a couple of packages in my room...
I wonder what this could be?
IMG_0507.jpg


Speedbleeders! For all four calipers and my clutch slave cylinder..also a speed bleeder bag to prevent a mess
IMG_0503.jpg


Next package looked promising as well...
IMG_0508.jpg


This one contained most of the good stuff! What could possibly have been in there...
IMG_0509.jpg


Yup, four piston evo front calipers, 2 piston rear calipers, and Hawk pads all the way around. Those front calipers are freaking massive, much bigger than I thought they would be
IMG_0510.jpg


Rotors will probably be here tomorrow and hopefully my order from extremepsi comes in as well so I can get these babies on
 
Last edited by a moderator:
August 9, 2011 – Hit and Run


WARNING: What you see below may sadden you. If images of shredded metal and torn body parts concern you, please refrain from continuing further.


I woke up and started to leave my girlfriends house when I saw this. Notice the huge curb mark and that the tire is flat...you would think I would remember parking like that.
IMG_0517.jpg


Thought it was odd that I didn't notice jumping the curb when I parked here, but I was pissed either way cause my wheel was curbed...then I walked around the car.
IMG_0515.jpg


I can't even describe the fury and pain that overwhelmed me. I couldn't even speak. I just sat there thinking what piece of shit lowlife could hit my car this effing hard and not stop? I hope to this day that karma throws him under a bus.

I took the car by a body shop and got a quick estimate...$3700 in damages. Bumper got torn off on the way there because it was rubbing my tire.
IMG_0520.jpg

IMG_0521.jpg

IMG_0519.jpg


At this point I had a decision to make. Keep the car or take my insurance money and run. I loved the car but it had its problems cosmetically. It had an aftermarket sunroof with no headliner so it will be nearly impossible to replace. The paint is only in so-so condition in a few areas. The wiring is a mess in some areas. The A/C was torn out of it. Just some small things that are hard to replace. Plus the fact that it is pretty much totaled. I searched for days looking for another car to swap parts over to and I found a spyder that I almost bought. I was oh so close to buying it and swapping it to AWD, but I didn't.

Insurance gave me $3900 to fix the car after my deductible. I barely kept the car from being totaled though. First adjuster totaled it. I then sent them a list of all of the aftermarket parts and they decided to not total it. I had a quote to pull the panels out and repaint it for $2000 by a well-known shop. I kept the car. However, I didn't go to the shop to do the repairs like I should have. I had the panels pulled at one place and then painted at another, which possibly wasn't as good of a job. I will never know though.


Panels have been pulled.
IMG_0541.jpg

IMG_0546.jpg


Those of you that know my car, this is likely the stage of my build you have been waiting for as it leads to the newest look of my car most are familiar with.

I found an amazing deal on a set of red 18x9.5 +35 Advan RG1s.
IMG_0550.jpg

I figured it was going to be a massive headache getting these things to fit with 255 wide tires...but nope :)
IMG_0555.jpg

IMG_0554.jpg
 
Last edited by a moderator:
August 17, 2011 – Evo Brake Install

Since I decided to keep the car I figured I would go ahead and install the evo brakes finally.


I used brackets based off of kmv's design but made by Shane Steffens. Thought I had everything together but when I went to install the brackets I couldn't find the right size tap. So after driving around town for about 1-2 hours going to all of the parts stores, I randomly stopped by a shop right down the road from my house. I got lucky and they let me borrow the tap I needed! So the install proceeded as planned, but with a slight delay. I opted to grind more and clock them upwards because I think they look better like that and it was well worth it.

Caliper painted after being machined
IMG_0575.jpg


Some pictures of what has to be grinded to clock them upwards
IMG_0570.jpg

IMG_0571.jpg

IMG_0572.jpg


Old front rotors vs. New rear rotors
IMG_0574.jpg

Old front rotors vs. New front rotors
IMG_0573.jpg


Fronts installed
IMG_0579.jpg


Rears installed
IMG_0580.jpg


Also installed SS lines to give it a more firm pedal with the stock MC. Feels pretty good to me as is.
 
Last edited by a moderator:
September 2, 2011 – Photoshoot

Now is a good time to show how the car has looked over the months I have owned it.

Its first look
90c18b83.jpg

Then I made the HD lip and put my Drag DR-31s on
FirstShoot.jpg


Then the car was fixed after the hit and run and now had new wheels and brakes as well
Pic-4.jpg

Pic-2.jpg

Pic-3.jpg

Pic-5.jpg

Pic-1.jpg
 
Last edited by a moderator:
^^Thanks guys


Mid October, 2011 – Clutch install and track times


The last venture I had was a clutch install. I have had clutch problems for a while with dragging and a high engagment point so I figured the clutch was shot and the flywheel stepped improperly. I had bought a used southbend 6 puck and act 2600 pressure plate from a friend nearly a year ago for my old car and finally put it to use. Dropped the transmission and swapped the clutch, replaced the tob with oem, shimmed the pivot ball with another washer, had the flywheel stepped to .610 and put it all back together. I thought my issues were finally over when it didn't drag, but the engagement is still high after adjusting the pedal any such way...so I think my slave is shot again.

Went to the track after 100 miles of sort of break in (was told it didn't need a break-in period since it was a used disk and pressure plate) and first pass ran a new best of [email protected] with a 2.1 60'...blah. I either spun extremely badly or the clutch was slipping. The next pass the clutch slipped all through 1-2-3 and then I let off and coasted to the line. Let it sit for a bit then went for another run. It slipped again so I was done for the night and not happy to say the least.

I wanted to see if it would slip on the highway and nothing, except for the shower of sparks behind my car :( so it was slipping, just not enough to notice apparently. Since then I have just been taking it easy and staying out of WOT to give it a little break-in period at the advice of a vendor on tuners. Not sure went wrong with it but if it still won't hold the trans will be coming back out this winter.

Oh, almost forgot but I also replaced the rear main seal with a new oem one and replaced my oil pan so I could put my -16AN drain line on for when I finally get my holset on. That thing is massive haha. Also installed my new modified downpipe..i need to get a few pictures of these. And I replaced my passenger axle because the boot was torn. I was doing something with my car a couple days ago and now the driver side one is torn though, so looks like I will have to replace that one soon too.

Here's a picture of the clutch disk and pp
c6ea0803.jpg

And this one shows how much my car hates me..
acf81e30.jpg

Clutch fork position
ad8f5727.jpg
 
Last edited by a moderator:
Me too! But then this happened -_-


October 27, 2011 – Hit and run...again. Old wheel test fit with brembos

You have got to be kidding me...around 2-3 weeks after I get the car back from being painted one of my jackass hick neighbors hits it while pulling out of their parallel parking spot. I am pretty sure I know who it was but I have no proof so it will just be scraped up for a while. The best part? It was the last night the car would ever be parked outside overnight as the next day I moved into a new house with a garage.
9c15da47.jpg

3835d16c.jpg

227c944f.jpg


In other news, test fitted my other wheels.

Gram Lights aren't going to clear without a 17mm spacer...
4680e5d7.jpg


Drags fit fine though, my new winter wheels
52a4d478.jpg

bd50a4a7.jpg
 
Last edited by a moderator:
November 18, 2011 – Moved. Black interior, vented hood, misc acquired

Moved into a new house since the last update :D Car now has a new home and will be garaged every night :)

Meanwhile, I worked out some trades with a couple friends

I traded an aeromotive afpr I had lying around from my previous build for this
a56bc8bf.gif

I then traded the NOS parts to a friend that has a GTO and plans to spray it. It pays having good friends :)


Hey these are pretty nice
7e2bf4c4.jpg

Oh but what's this?
b3d0ae5f.jpg

Noo...could it be?
59772e55.jpg


Why yes, yes it could :D full black interior!!!! Well, almost...it's everything that will work in my car from a spyder. Also, a few more goodies...
9eff7b0b.jpg

Fog lights, covers, clear turn signals, reverse lights, other random crap


Also getting a pretty beat up evo style carbon fiber hood :) I'll be sanding it down back to the carbon fiber and see if I can work with the current hood pin locations (they are uneven, I'm hoping I can even it up with aerocatch latches)
IMG_0693.jpg


I have the dash too, just haven't picked it up yet. Literally everything black that was in his car I took. Plus the other random goodies.

Now for the best part...I paid $15....for all of it!!
 
Last edited by a moderator:
Sick build man i just read the whole thing LOL. I just posted my build thread on here also today, you should check it out. I live down here in columbia we should meet up sometime. Also you should check out our local missouri car website. Its midwestce.net
 
Sick build man i just read the whole thing LOL. I just posted my build thread on here also today, you should check it out. I live down here in columbia we should meet up sometime. Also you should check out our local missouri car website. Its midwestce.net

Cool cool, just created an account there. My sister goes to school at Mizzou so maybe I could use a meet up there as an excuse to visit her :hellyeah:


November 29, 2011 – Stripping the vented hood

As I mentioned and posted earlier, I got a vented hood in the trade so started stripping it down back to the carbon fiber. I started sanding at about 3:30 with a fine grit sponge (not sure what grit, I would guess 300 ish). Well that was taking forever so I switched to 150grit sand paper..that took forever too so I switched to 60grit. That worked a little better but at this rate it will still take me a good week to get this thing stripped down to the carbon fiber. And that isn't even including if its salvageable and I have to strip the gel off too.

Here is the hood :D
IMG_0693.jpg

After 1.5 hours of sanding...
IMG_0694.jpg


I will be cutting out the middle divider in the vent and seeing if an actual evo's mesh will fit in the hole with some trimming… (it doesn’t for those that are curious)

I scrapped the sanding idea and got some advice about using paint stripper...so I have half the hood stripped and no ill affects yet. I need to smooth out the part I began sanding on with the coarse sandpaper but that's not too involved either. I will finish up with 500 grit sandpaper to take out any deep scratches in the hood and then go from there.

Here is the progress so far!
Bought this
d237929b.jpg

Tested it on the piece I'll be cutting out
126842ea.jpg

Looks good to me! Except or the cracks and sanding marks from when it was painted..
342bf0b0.jpg

So I covered a big portion of the hood..after first coat
dadaa732.jpg

Second coat
423b430d.jpg


I had to leave for work so I wiped the stripper off and will continue tonight. It seems to eat the paint and make it bubble up, then the second coat makes the primer turn to liquid and easy to scrape off..it's messy though! I’ll be working on this at various times throughout the winter so updates will be sporadic :p
 
I love the DR31s. What's the size/offset and tire size?

Thanks :D 
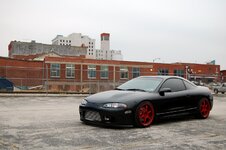
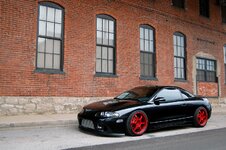
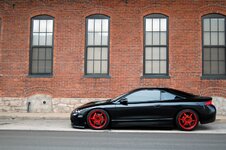
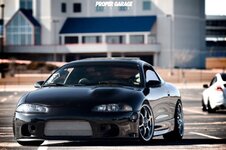
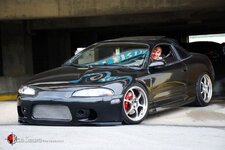
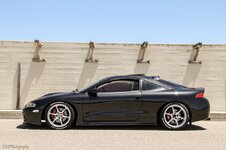
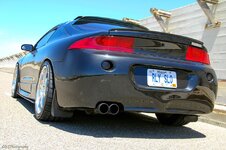
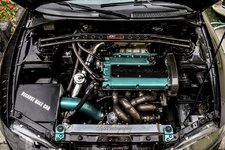
The DR31s were 18x8 +35 with a 235/40/18 tire


December 30, 2011 – Parts hoarding, master/slave cylinder replaced and no cutting required intake ducting


Well first off, I replaced the slave cylinder and master cylinder the 3rd of this month but it didn’t seem like it was a big enough update to put in a separate post since it is nothing special. I put in full SS line from master to slave and bled it using my speed bleeder. Put in an Autozone master at first then just went ahead and bought an OEM master to be safe so that is what is in it now. Clutch still engages at the top of the pedal and with the rod adjusted all the way out the clutch fork can still be pressed in…beats me what the heck is up with it.


I picked up a few more parts to go on the car over my winter break from class. I should be putting this on before summer sometime but no idea when.

Complete low-mile AC setup - $125 shipped
OEM composite headgasket - 30 shipped
Picked up the following for 120 shipped
-OEM water pump with 2k on it
-OEM timing tensioner with 8k on it
-OEM tensioner and idle pulley, new

Parts collection is building up (to be put on the car, you don’t even want to see what’s in the attic)
6528e193.jpg


Now onto the intake ducting…

Home Depot is at it again :rocks: My intake temps were extremely high during the summer so I fabbed up some intake ducting to help out for the upcoming summer. I have yet to seal off the filter to the ducting as I am trying to decide the cleanest way to do so, but this should help as is nonetheless.

First of all, I had to compare prices. Lowes and Home Depot were very close in pricing so I just went to the one that was most convenient at the time, in this case Lowes. The pictures are from Home Depot but they are the same parts.

I bought:
6" 90' Adjustable Ducting
7c442bc8.jpg

6" to 4" Reducer Ducting
c412465c.jpg

4" 90' Adjustable Ducting (I know it says 3" but it looks exactly like this)
97dad0bc.jpg

And the last piece I didn't get a picture of at the store because I found it last minute but it is just a 4" piece that has slots already cut in one end to folder over in a non-circular hole. I believe it said circle to square adapter or something like that. You will see what it is in the pictures later.

So began the fabbing up.
I attached the circle-square adapter piece to the factory smic piping hole. I had to kind of work with it to get the tabs up far enough but it will work with some force and coercing. Once you have it up far enough just grab some pliers or something and start bending the tabs over like such.
3e6a80d2.jpg

At this point you should have this
6efff3a6.jpg


So now you want to take off two of the slidable adjusting pieces on the 6" ducting. No pictures of this but you can just bend the piece in and it will pop out. The pieces aren't held in by anything. You want to take off the pieces on the opposite side of the reduced end so it can slide into your 6"-4" reducer...hard to explain but you will understand once you look at it. These pieces are taken off so the ducting will fit.

At this point I attached the 6" adjustable piece to the 6"-4" reducer, and the reducer to the 90' 4" adjustable piece like so.
e25a3d5e.jpg


The 6" piece slides over the side vent on the front bumper perfectly. I slid it over the vent (with everything together) then manuevered the ducting with the adjustable 4" piece to attach it to the circle-square adapter that was put on earlier. I pushed all of the attachments together as hard as I could so they didn't separate and sat back and enjoyed the easiness of the project. Total cost was $21 I believe. I coated it in some cheapo black paint for now so it isn't as obvious.
a6ecec45.jpg
 
Thanks for the fast reply! I like your duct it's simple, cheap, and most likely very effective.
 
January 3, 2012 - Road trip pictures over the holidays

And it isn't even that dirty! Most of my family lives in Arkansas so I traveled down there for Christmas. The roads were a little wet/dirty going down highway 7 but I figured I would stop and take a few pictures of the scenery anyhow. Enjoy :D
DSC_0559.jpg

DSC_0555.jpg

DSC_0564.jpg

DSC_0572.jpg

DSC_0565.jpg
 
Last edited by a moderator:
probably one of the most enjoying build threads ive followed, and ive read alot of 65+ page ones with lots of pics. very nice car, the red on black pops nice, and the fixing of the car impresses me and tells me: you, sir, are a true enthusiast and passionate about your car. long live your GSX, and remember, NVRLFT. :hellyeah:
 
Thanks man :)


January 4, 2012 – Black Interior Install

As I said earlier, I acquired most of the pieces for a black interior and I finally got around to swapping out the dash. Sorry for the crappy pictures, my iPhone seems to have crapped out that day LOL. New updates as of February 21, 2012 will contain nice pictures taken with a dslr :D

Center console removed, gray dash still in
5cdb7f5e.jpg

Airbag removed and other such things
a3859c27.jpg

Let's get this thing outta here!
bba39724.jpg

....This looks like crap...time for rewiring...
fbf6d4ec.jpg

So much wiring...
41fe29af.jpg

Dash out
e66570ed.jpg

Encountered a small problem...dash harnesses were different :/
dbc57be8.jpg

Time to swap them out
9e47d49a.jpg

Got the wiring swapped out and realized I didn't like how crappy the roof looked without headliner and the aftermarket sunroof wires running everywhere (NOT my doing)..didn't work anyways
9a958688.jpg

b35972b8.jpg

3672a273.jpg

Manual sunroof conversion done :D Much cleaner...for what it is anyways
19576446.jpg

1adf3cce.jpg

Ok, so in with the black dash. Had to swap out the VIN plates as well
3e1f24a5.jpg

Its in!
1ea9b20f.jpg
 
Last edited by a moderator:
I would wipe that hood down with acetone and let it set out in the sun or in the booth for a while before spraying it.. That stripper is bad news when being used on fiberglass or cf because its fairly porous and the stripper will soak into it.. Acetone is a very quick evaporating cleaner, esp good for prepping fiberglass and cf.

Looks good.. Is that metallic black a factory color? or from a different car? I am spraying mine Cosmos black from the BMW which has a very similar flop
 
Add Value - Be Respectful - No Trolling - No Misinformation - Participate Often!
Support Vendors who Support the DSM Community

Build Thread Updates

Latest Classifieds

  • For sale 2g 2G DSM Link V3
    2G DSM Link V3 $600 + shipping and paypal fees* no cable included * cables are 75 on the...
    • jersygsx
    • Updated:
    • Expires
  • Wanted 2g Shot in the dark (2g Pass strut cut out)
    Need 2g strut tower to save time.
    • frosh29
    • Updated:
    • Expires
  • For sale 2g 2G Mishimoto Radiator & Fan Shroud
    2G Mishimoto Radiator & Fan Shroud $200 + shipping and paypal feesYou must be registered to...
    • jersygsx
    • Updated:
    • Expires
  • For sale VIRGIN 4G63 6-BOLT TURBO HEAD
    Came off a virgin stock AWD Auto 1G DMS (91), also have matching block and crank which are also...
    • The_Partout_Spot
    • Updated:
    • Expires
  • For sale 1G DSM 4G63 6-BOLT TIMING COVER
    Used, see condition in photos. Buyer covers shipping / fees.
    • The_Partout_Spot
    • Updated:
    • Expires
Back
Top